Android Tricks 4 All: Apple Watch
News Update
Loading...
Showing posts with label Apple Watch. Show all posts

Monday, December 17, 2018

Download iOS 12.1.1 Update for iPhone & iPad [IPSW]

Download iOS 12.1.1 Update for iPhone & iPad [IPSW]

iOS 12.1.1 update available to download for iPhone and iPad


Apple has released iOS 12.1.1 for iPhone and iPad users. The freshly updated version of iOS includes a handful of small changes and improvements, along with the usual bug fixes.
Additionally, Apple also released MacOS Mojave 10.14.2 Update, Security Updates for macOS Sierra and High Sierra, updates to Safari, and an update for Apple TV as tvOS 12.1.1, along with watchOS 5.1.2 for Apple Watch with ECG and other new health features.
One of the more notable changes in iOS 12.1.1 is that it moves the FaceTime camera switching button back to a more obvious location during a FaceTime conversation, rather than staying hidden behind various other layers of interface abstraction, as was the case with FaceTiming in prior iOS 12 builds.

Other changes with iOS 12.1.1 include notification haptic feedback for iPhone XR, expanded eSIM support for iPhone XS, XS Max, and XR, and support for Live Photos in FaceTime. The full release notes for iOS 12.1.1 are available further below for those interested.

How to Update to iOS 12.1.1

The easiest way to install iOS 12.1.1 update on an iPhone or iPad is through the Software Update function in iOS Settings app. You will need sufficient storage available to install the software update.
Be sure to backup the iPhone or iPad to iCloud, iTunes, or both, before beginning any iOS system software update.
  1. Open the “Settings” app in iOS, then go to “General” and to “Software Update”
  2. When iOS 12.1.1 is available to download, tap on “Download & Install”
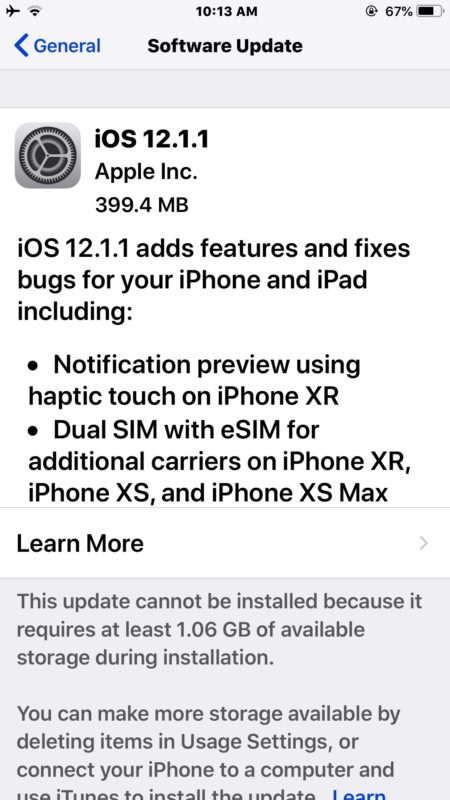
iOS 12.1.1 update download
The iPhone or iPad will reboot to complete the installation to iOS 12.1.1.


Users can also choose to download and install iOS 12.1.1 through iTunes on a computer if desired, this can be achieved by connecting an iPhone or iPad to a Mac or Windows PC running the latest version of iTunes and choosing the ‘Update’ option in iTunes.

iOS 12.1.1 IPSW Download Links

The following are links to IPSW firmware files hosted on Apple servers. For best results, right-click the link and choose ‘Save As’ and be sure the downloaded file has a .ipsw file extension so that iTunes can recognize it:
Advanced users can update iOS by using IPSW firmware files, though for most people it is impractical to do so, and is generally considered advanced.

iOS 12.1.1 Release Notes

Release notes accompanying iOS 12.1.1 are as follows:
iOS 12.1.1 adds features and fixes bugs for your iPhone and iPad. Features and improvements include: 
– Notification preview using haptic touch on iPhone XR 
– Dual SIM with eSIM for additional carriers on iPhone XR, iPhone XS, and iPhone XS Max 
– One tap to flip between the rear and front-facing camera during a FaceTime call 
– Live Photo capture during one-to-one FaceTime calls 
– The option to hide the sidebar in News on iPad in landscape orientation 
– Real-time text (RTT) when using Wi-Fi calling on iPad and iPod touch 
– Stability improvements for dictation along with VoiceOver 
Bug fixes include: 
– Fixes an issue where Face ID may temporarily become unavailable 
– Addresses an issue that prevented visual voicemail from downloading for some customers 
– Fixes an issue in Messages that could prevent predictive text suggestions when typing on the Chinese or Japanese keyboards 
– Addresses an issue that could prevent Voice Memos recordings from uploading to iCloud 
– Fixes an issue where time zones may not have updated automatically 
This release also adds features and fixes bugs for HomePod including: 
– Support in Mainland China and Hong Kong 
– HomePod LEDs illuminate during Group FaceTime calls 
For information on the security content of this update, please visit this website:
https://support.apple.com/kb/HT201222
Friday, July 14, 2017

How to use Apple Watch to unlock your Mac in macOS Sierra

  • HOW-TO
  • TOP STORIES
cult of mac
Hey, presto! No more typing in passwords. 
Photo: Ste Smith/Cult of Mac
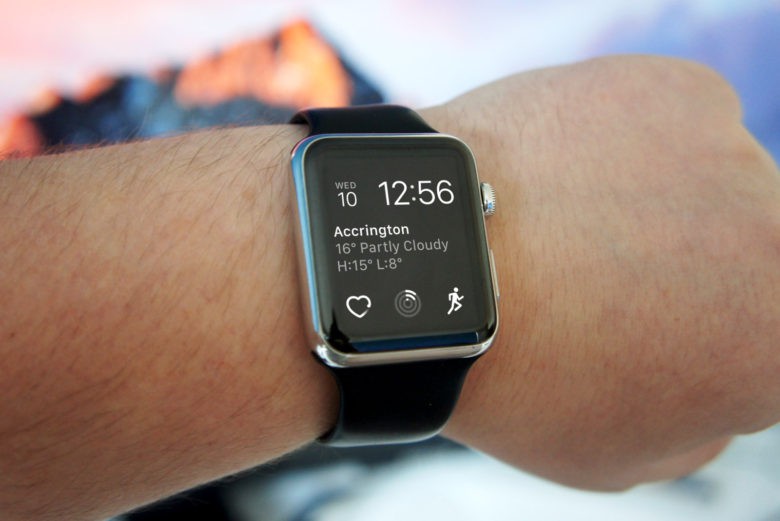
The devices in Apple’s ecosystem always work really well together, and macOS Sierra doesn’t buck that trend. In fact, the upcoming desktop operating system lets Apple Watch owners automatically unlock their Macs using the wearable device — no lengthy password needed.

It’s a small, but incredibly useful, new feature that rewards Mac owners who have taken the dive and invested in an Apple Watch. Here’s how to use it when running macOS Sierra, which is currently in public beta and will be released this fall.

Unlock Mac by Apple Watch

Set up two-factor authentication on your Mac

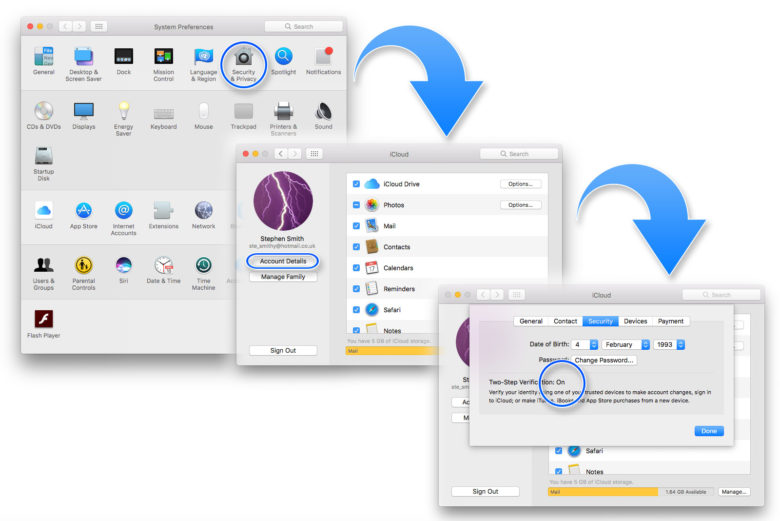
First off, ensure that Two-Factor Authentication is enabled. To do this, open up System Preferences on your Mac, then click on iCloud and go to Account Details. Next, select Security and Enable Two-Factor Authentication.

cult
Setting up Two-Factor Authentication is your first step.
Photo: Luke Dormehl/Cult of Mac

Set up passcode on Apple Watch

Next, you’ll need to ensure you have a passcode set up on your Apple Watch if you don’t already. To do this, tap the Watch icon on your iPhone’s home screen. Go to the My Watch tab, tap Passcode and then tap Turn Passcode On. You’ll then be asked to enter a four-digit passcode. (Make this different than the passcode you use with your iPhone, for security reasons!)
Cult of Mac
You’ll need to set up extra security on your Apple Watch.
Photo: Ste Smith/Cult of Mac

Disable automatic login on Mac

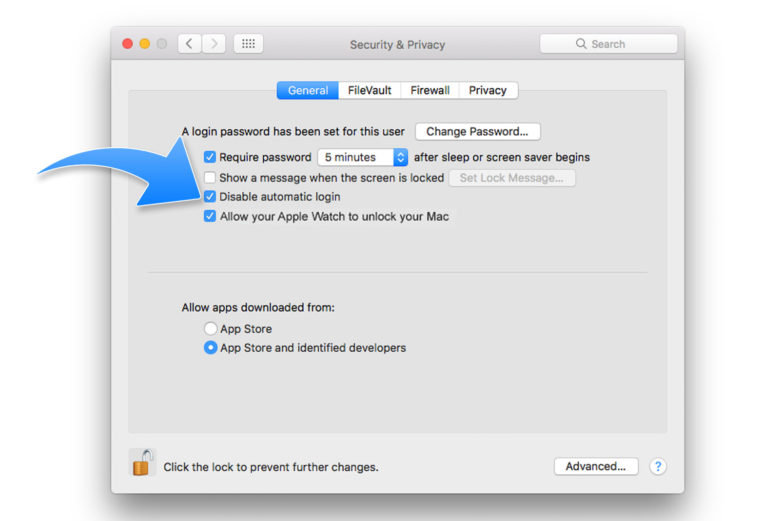
Now go back to System Preferences on your Mac and click Security & Privacy. Click the General tab. Once there, make sure that Disable Automatic Login is unchecked. You might have to enter the new password you created during two-factor authentication setup. If the option is grayed out, you might need to click the padlock icon at the bottom of the window to make the necessary changes.
apple watch
Almost there …
Photo: Luke Dormehl/Cult of Mac

Enable Apple Watch to unlock Mac

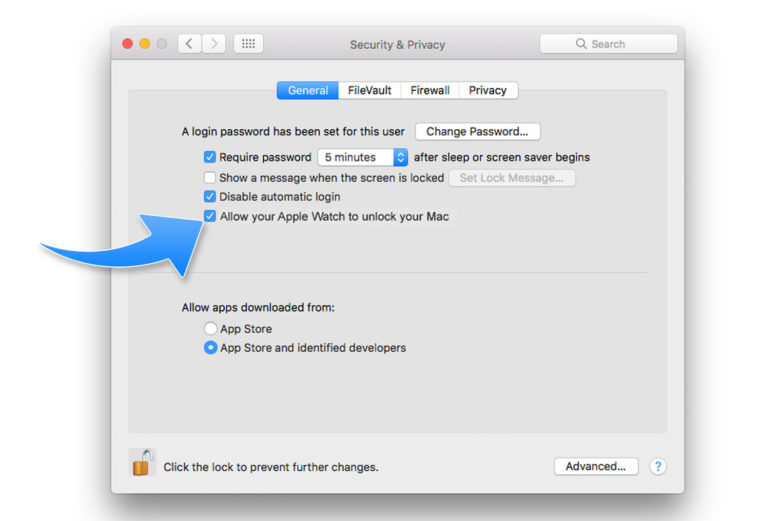
After that, make sure the 
Allow your Apple Watch to unlock your Mac box is checked. A Turning On message will then appear, and might ask you to enter your password.

Apple watch
One more step and you’re finished!
Photo: Luke Dormehl/Cult of Mac

Wednesday, July 12, 2017

How To Bring A New Look To Notification Banners And Today Widgets In iOS 10

How To Bring A New Look To Notification Banners And Today Widgets In iOS 10

If you want to bring a new look to notification banners and Today widgets on your iOS 10 device then you should definitely download a new jailbreak tweak known as Modern. This tweak change the banner notifications look throughout iOS 10, whether you’re in an app, on the Lock screen, or in Notification Center.


Look on the image example below you can see that the effects of Modern are noticeable and look quite nice. The tweak doesn't change the size of banners. It means that they still take up the same amount of space after installation as they did before. However, the sleeker UI now gives the optical illusion that banner notifications are smaller and it make the whole interface look better.


Modern also brings some changes to your Today widgets appearance on the Home screen’s left-most page, in Notification Center and on the Lock screen:

Modern tweak is available for download from Cydia for $1.00. The tweak works fine only with jailbroken iOS 10 devices. Modern comes with a preferences pane that allows you to customize banner notification look and behavior:


The tweak allows you to enable it for widgets and alert banners separately, change the app icon size on the banner, turn on/off shadows, replace the ‘No Notifications’ label with any text of your choice and change the color of notification header text to black or white.

Respring your device is necessary in order to apply and save your changes. So hit a respring button that is included inside of the preferences pane to bring a new look to notification banners and Today widgets on your iOS 10 device.

It should be mentioned that Modern is compatible with other notification UI-enhancing jailbreak tweaks such as ColorBanners and Noctis, so you are free to play with your notification aesthetics using all these tweaks.

Tuesday, June 14, 2016

How To Remove iCloud Lock via iCloud Remover Service

How To Remove iCloud Lock via iCloud Remover Service

Searching the net for iCloud Removal Tool and how to Remove iCloud Lock by official Remover solution is common trait for many people who are enduring the difficulties of the iCloud lock restriction. It is well documented fact that the number of locked to iCloud devices is really big and on top of that there is very little info on how to fix this. Still, the emergence of some new and revolutionary methods specialized in dealing with iCloud Removal problems have made things a bit easier at this moment.
Résultat de recherche d'images pour "icloud hack"
The main reason on why the iCloud lock happens is due to the inability of the iPhone owner to enter his iCloud ID or password. In some cases this is the case because the device is lost or stolen, but sometimes the reason can be simply because the owner has forgotten his login credentials. But let’s leave the reasons on why the iPhone is blocked for some other time. What is important at this point is to learn about the methods which can be used to remove the activation screen restriction on your handset.
As you may know, there are several fake services who are offering non-functional Removal solution services. It is important to make distinction between a perfectly functional methods and fake ones.
iCloud Remover

Remove iCloud Activation Lock by iCloud Remover

At this point there are two verified iPhone iCloud Removal Tool methods that actually work. The first method is what we call the default one. To qualify for this method you must meet certain criteria. You must have the original receipt from the Apple store from which you have bought your device or valid warranty. If you meet these criteria then all that you need to do is to go to the nearest Apple store and ask the technicians there to Remove the iCloud activation lock. Even though this method costs money, still it is 100% safe and efficient.

Alternative Method to Remove iCloud Activation Lock

However, even though it may be logical to use Apple’s services if something is wrong with our iPhone, for some users it is impossible to meet the criteria of providing ownership proof, simply because they have not bought their iPhone from official Apple store, but from the internet or different second hand seller.
If you belong in this category of users then you are well aware that it is very difficult to find alternative Remove iCloud Lock solution. Most of the online providers only charge large fees and do not actually remove the iCloud lock.
Remove iCloud Lock
But, in case you did not know there is one alternative solution that works. It requires that you use a iCloud Remover which was developed by Apple team of experts. This tool is very popular among the iOS society and is proven to fix the iCloud issue in only a few minutes.

How To Remove iCloud Lock by Removal Tool

  1. To get started, first use the iCloud Removal tool from the official website. Press this link here.
  2. Complete the online form. Complete the empty fields with the required data and press Confirm.
  3. Now wait several minutes while the iCloud removal process is conducted. A confirmation email will be sent once the old & locked iCloud account is removed.
  4. After the confirmation mail is sent, you will be able to create a new iCloud account which you will use on your device.
  5. Now all that you need to do is to login to your new iCloud account and the activation screen lock service will be permanently removed.
The iCloud Remover service works for all iPhone 6S, 6S Plus, 6, 6Plus, 5, 5S, 5C, 4S, 4C, 4, 3G, iPad 4, 3, 2, Air 2 and iPod touch. It is compatible with the new iOS version regardless of the broadband. The Bypass service tool has been put thru rigorous testings and trial periods and it is confirmed to be completely safe for use.
In case you own Apple handset which for some reason is iCloud locked then you can use this exclusive offer and Remove the iCloud activation lock screen immediately. You only need the correct IMEI code and a stable internet connection. There is no need to send your device anywhere and on top of that the service. Give it a try.

Monday, April 27, 2015

The Apple Watch Appears to be Good and Bad for the iPhone's Battery Life

The Apple Watch Appears to be Good and Bad for the iPhone's Battery Life

The Apple Watch Appears to be Good and Bad for the iPhone's Battery Life

People have been concerned about the Apple Watch's battery life ever since it was announced. The reports just couldn't decide how long it was going to last. But now it's in the hands of the consumer, people are actually more concerned the iPhone's battery life.
As many of you already know, the Apple Watch needs to be linked up to an iPhone to be able to access the overwhelming majority of its features. If it's not then it just becomes an expensive rectangular watch. But what impact does it have on the battery life of the phone?
On one hand connecting an Apple Watch means you don't have to keep interacting with your phone, meaning the display can't sap away at the battery throughout the day. The flipside is that you need to have Bluetooth (and possibly Wi-Fi) enabled to be able to send everything over to your watch during the day. Users have apparently experienced both.
Both Ryan Block, former editor of Engadget, and John Byrne both believe that the culprit is, in fact, the Apple Watch companion app, and that force quitting will save you power over the day.
Users in the MacRumours forums can't seem to come to a consensus though. Some users are blaming the problem on a software bug for the drain, while others claim that battery drain is due to particular usage patterns.
We're bound to find out more in the coming weeks as more people get their hands on Apple Watches of their own

Featured

[Featured][recentbylabel2]

Featured

[Featured][recentbylabel2]
Notification
This is just an example, you can fill it later with your own note.
Done