Android Tricks 4 All: Reset
News Update
Loading...
Showing posts with label Reset. Show all posts

Wednesday, July 15, 2020

Found a Lost or Stolen iPhone? Here’s What to Do with  few steps you can take to return a lost iPhone to its rightful owner

Found a Lost or Stolen iPhone? Here’s What to Do with few steps you can take to return a lost iPhone to its rightful owner


Even with the best of intentions, it’s often difficult to know how to proceed when you find a lost or stolen iPhone. Fortunately, there are a few steps you can take to help return the device to its rightful owner.
There’s no exception when it comes to other people’s property, so holding onto something that isn’t yours could be theft. Plus, all modern iPhone models are useless thanks to the Activation Lock feature.
So here’s what to do if you’ve found a lost iPhone.

1. Is the Lost iPhone Charged?

Action: Buy or borrow a charger and keep the device on and charging.
Modern smartphone batteries aren’t great, so most of the time a lost device has a day (at best) before it runs out of battery. If there’s no charge, try holding the power button (a single button on the right-hand side) to see what happens.
Provided the iPhone still works, you’ll first need to charge it. If you don’t own an iPhone yourself, you’ll either need to borrow or buy a Lightning cable. You can pick up an AmazonBasics Lightning cable for a few dollars.

2. Does It Have a Passcode Lock?

Action: Check for a passcode, but don’t try to brute-force it. Check the call log and registered Apple ID for contact details if you can access them.
Once the iPhone starts up, you’ll see a lock screen. Pressing the Home button or swiping up at the bottom of the screen—depending on which iPhone model you’ve found—will likely prompt you for a passcode, Touch ID, or Face ID.
But there’s a small chance the phone will unlock. This means the owner didn’t set a passcode, which is something all smartphone owners should do.
ios 10 passcode
If the phone does unlock, you have two options to get more information. The first is to head Settings > iTunes & App Store to see what the owner’s registered Apple ID email address is. You can then send an email to the owner, informing them that you have their device.
The second is to head to Phone > Recent and check the call log. You should be able to deduce a suitable contact to call so you can inform them that you’ve found this iPhone. You should also be able to find the owner’s name listed at the top of the Contacts list in the Phone app.

3. Look to Medical ID for More Information


Action: Access the Medical ID feature, even with a locked iPhone.
If you’re still looking for the owner of a lost iPhone, try the Medical ID feature. While its main purpose is to provide important medical information to first responders in case of an emergency, it can also give you more clues about the identity of the owner.
To access the Medical ID function, access the lock screen on any iPhone and then select Emergency on the bottom-left side of the screen. You’ll then see a number pad on the screen. On the bottom-left of that screen, select Medical ID.
If the owner has set up the feature, you’ll see their name and more information about them. Hopefully, that will help you track down the owner.

4. Is the Phone in Lost Mode?

Action: Look for a message and make contact using any details provided.
Someone else’s iPhone is useless to anyone other than the owner, provided Find My iPhone is enabled. A feature called Activation Lock prevents the iPhone from being used even after a software reset, and the same feature lets the rightful owner track down lost devices.
Find My
If the iPhone has been put into Lost Mode, the owner has logged in to iCloud.com and marked the device as lost. You should see a message informing you of this, along with a message left by the owner. This should include a contact number or email address you can use to track down the owner.
If the phone connects to the internet, its location will be sent to the owner via iCloud.
You should certainly have Find My iPhone enabled on your own device under Settings > [Name] > Find My. Make sure to take a closer look at our explanation of the Find My app and everything you need to know about it.

5. Try Asking Siri

Action: Grill Siri for information to locate the owner.
Provided the phone is online, Siri can do a lot even if the device is locked. This will only work if the phone was turned on when you found it, however.
After a restart, Siri is disabled until you first unlock it. Pressing and holding the home button will trigger Siri, which then gives you a chance to ask a question to help find the owner.
siri who owns this iPhone
A few ideas you could try:
  • “Call my wife”—Or husband, mom, dad, boss, etc.
  • “Read my call log”—This may show you a recent call, so you can then ask Siri to call the contact (by name).
  • “Read my last message”—Will provide the contact’s name as well as the message contents.
  • “Who owns this iPhone?”—Should give you the name stored in the owner’s contact entry.
  • “What is my email address?”—Also try phone number, Twitter handle, and so on.
Unfortunately, it seems that Siri has a limit on the amount of information divulged before requiring a passcode. Asking Siri to read the call log, then calling any contacts you find, might be the best course of action.

6. Take a Photo

Take Photo iPhone
Action: Take a photo of your contact information that will sync online.
Many iPhone users have iCloud Photos enabled. That feature saves every photo and video taken by devices using your Apple ID to iCloud. This allows you to access your images on any iOS device, or a Mac, with the same Apple ID. That’s a big plus when trying to return a lost iPhone to its owner.
You don’t need to have an unlocked iPhone to snap a photo or video. On the lock screen, select the camera icon or swipe from right to left to access the camera. You can then snap a photo. The best idea would be to take a picture of your contact information.
With any luck, the image will be sent to the iCloud Photos account of the owner and they’ll see it on another device they use.

Found an iPhone? Make Contact or Hand It In

Keep in mind that if you find a lost iPhone, Activation Lock will prevent you from using it if it’s protected by Find My iPhone. It’s essentially a paperweight for as long as you have it in your possession. So don’t expect to use an iPhone you’ve found.
If none of these methods work, you may want to pop the owner’s SIM card out and take note of their carrier and the number printed on the SIM card. You can then contact the carrier, quote the number, and they may be able to help contact the owner of the device.
After trying all these options, your best bet is to take it to the police station that’s nearest to where you found the iPhone. Explain that you’ve found the phone and you’ve tried making contact, but nothing’s working.

Tuesday, June 9, 2020

How to reset the Samsung Galaxy S10+

How to reset the Samsung Galaxy S10+

If you’re reading this article, you’re looking for a way to reset your Samsung Galaxy S10. The Samsung Galaxy S10+ is one of our favorite smartphones from 2019, but sometimes a reset may be necessary to improve performance, fix a bug, or to wipe the phone’s storage completely.

Why reset the Smasung Galaxy S10+?

As mentioned already, there are quite a few reasons why you may want to reset your smartphone. Below is a quick overview highlighting the differences between a restart and a reset and the different scenarios that may require either.
Restart: also know as a reboot, this function simply turns your device off and then back on again. A restart or a reboot can be helpful to solve common issues you may have with your Samsung Galaxy S10+ may include:
  • Unresponsive device
  • Slow device
  • Unexpected errors
  • App crashes
Reset: also known as a hard reset, factory reset, or system wipe, this function will restore your Samsung Galaxy S10+ to its original settings while also erasing all of your files, settings and personal data on the phone. A hard reset is advisable when:
  • Smartphone issues, app crashed or errors are not resolved with a restart
  • Your Galaxy S10+ is unresponsive
  • You are selling your phone or handing it off to another family member

Now that we have that out of the way, below are a handful of different methods with step-by-step instructions on how to restart or reset your Samsung Galaxy S10+.

If you have any additional suggestions we should add to the list, please share them in the comments.

How to restart your Galaxy S10 (reboot or soft reset)

Modern smartphones are designed to stay on all the time so that you don’t miss any important phone calls, text messages or notifications from the dozens of apps you have installed on your device. That being said, you may want to consider restarting your phone if you notice that it is running slowly, apps seem to crash for no reason or the device doesn’t seem to perform as it typically does.
Below are three different ways you can restart your Samsung Galaxy S10+.

Samsung Galaxy S10+ restart

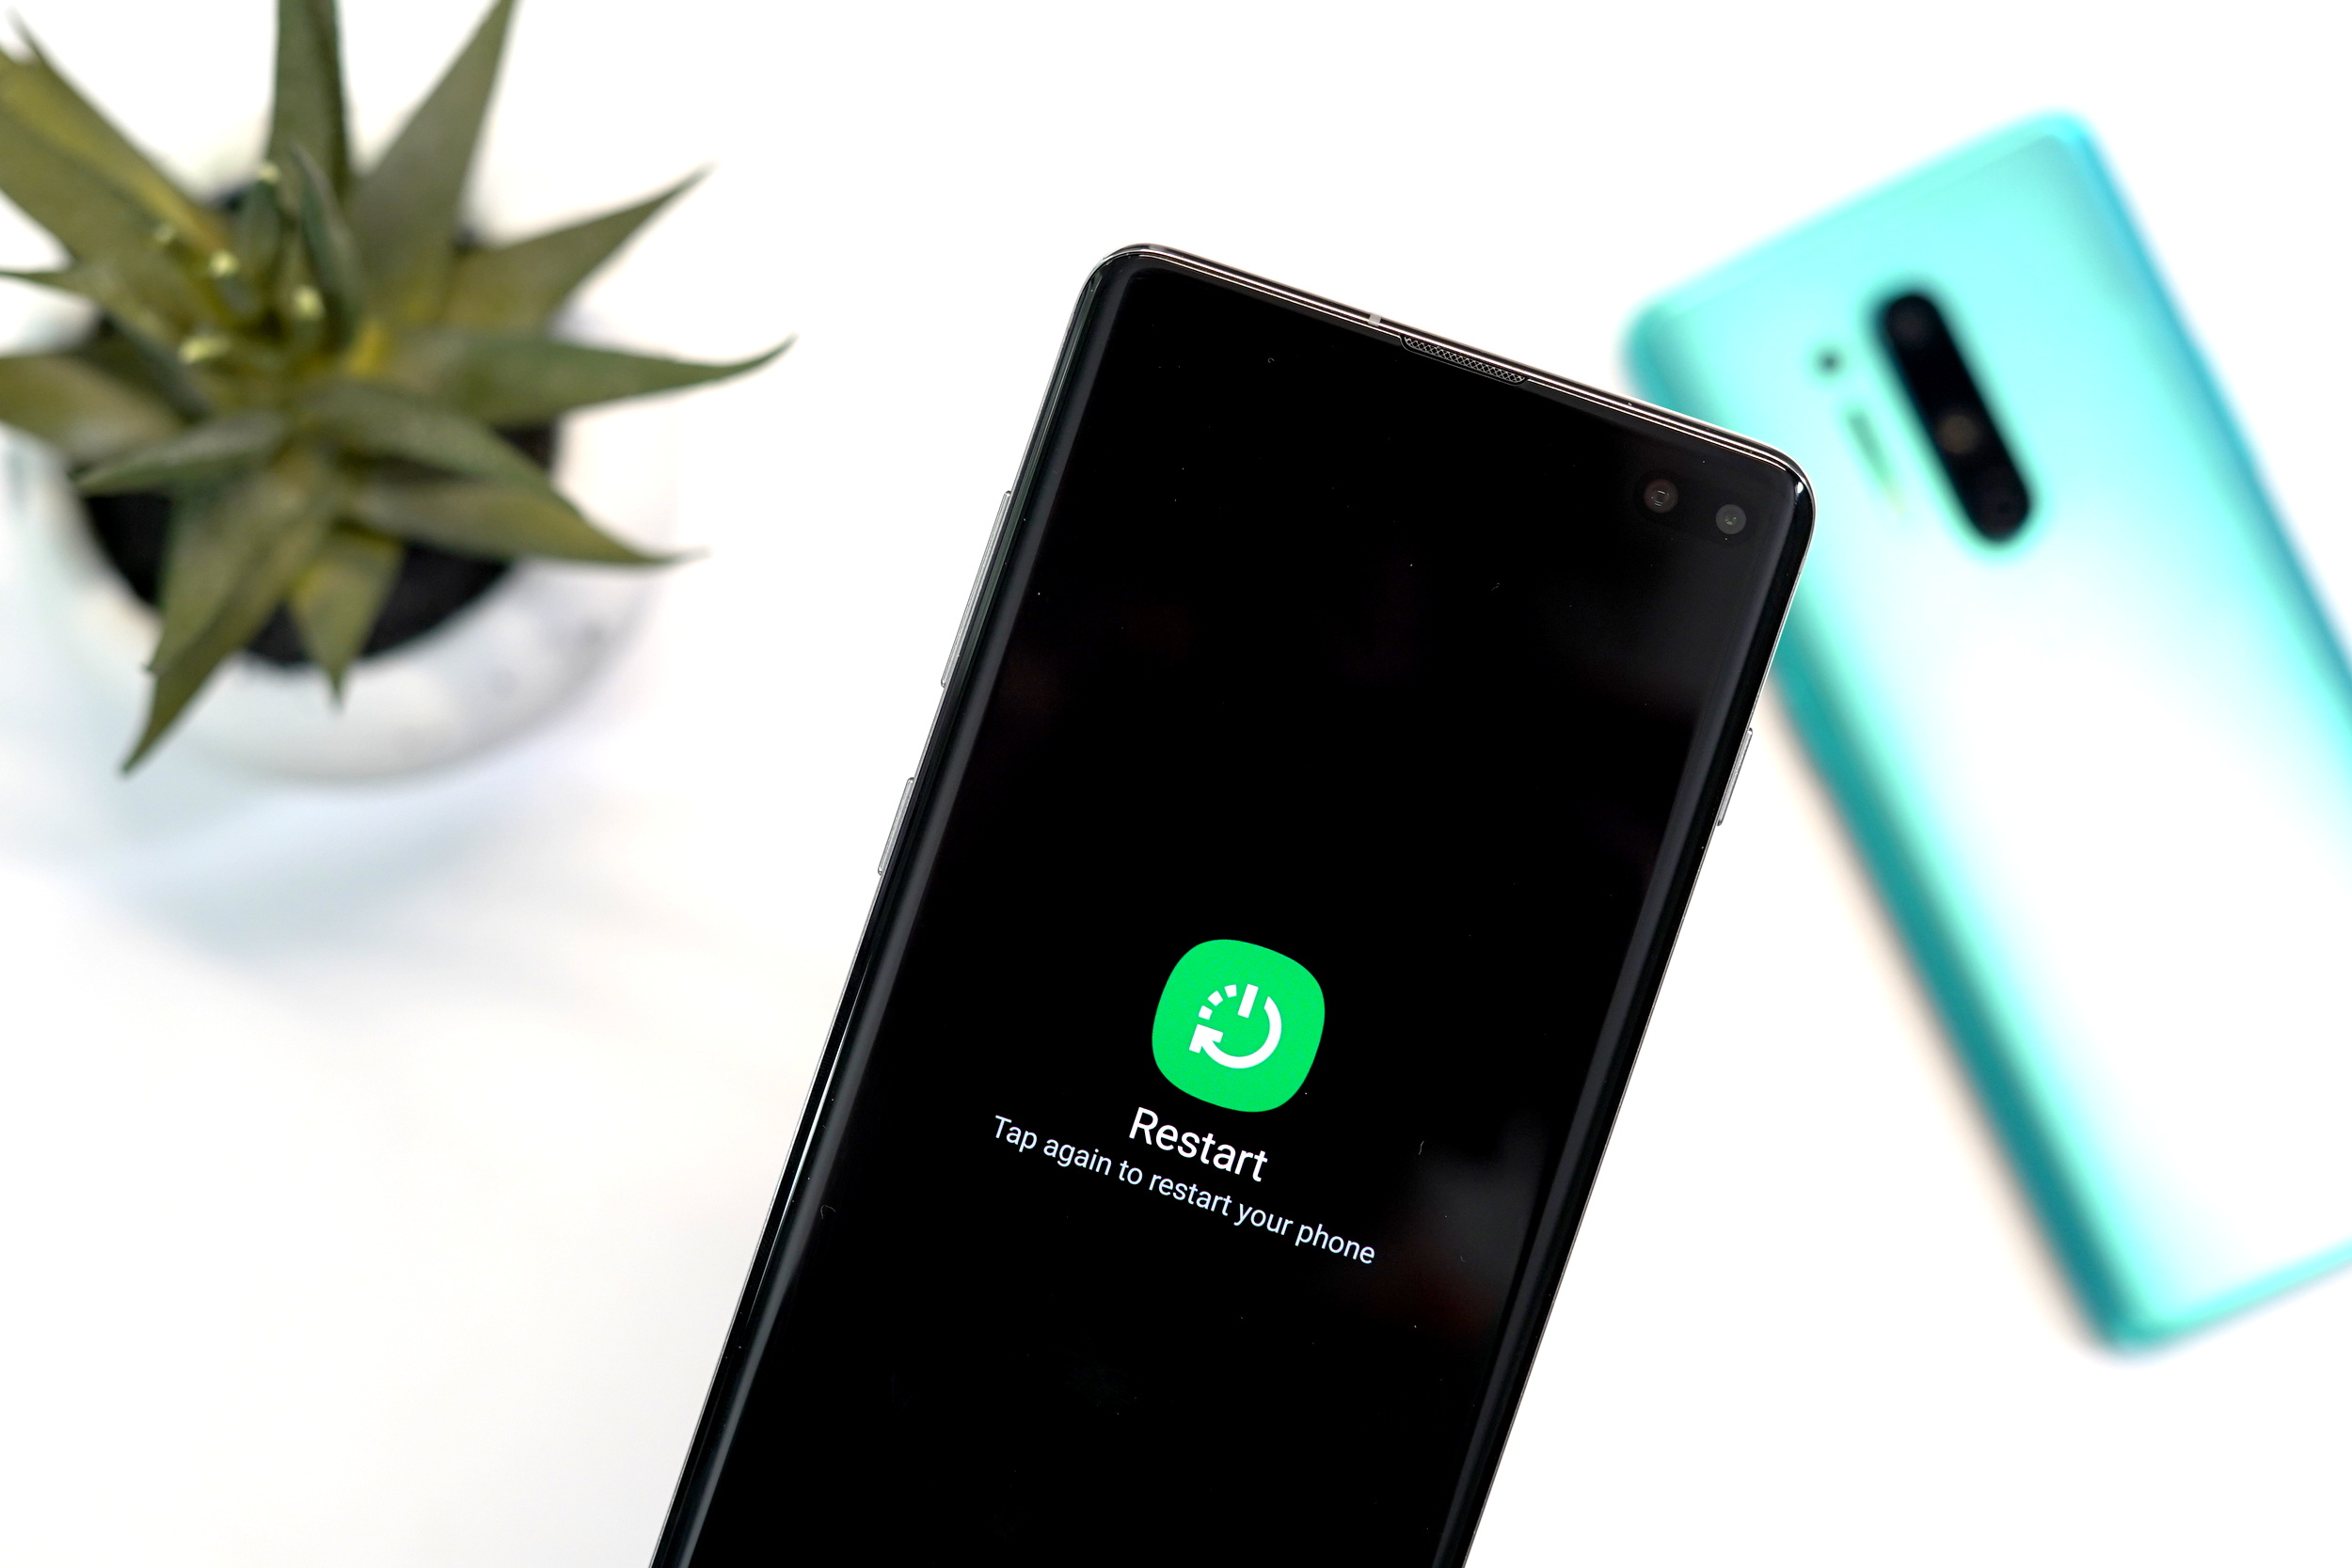
  1. Press and hold the Power button on the side of the Galaxy S10+
  2. When the power button menu appears, press Restart twice
  3. Your Galaxy S10+ will restart after a few seconds

Samsung Galaxy S10+ quick restart

This method works best if your phone is unresponsive, but you can also use it instead of the method listed above since it can be a bit quicker.
  • Simultaneously press and hold the Power and Volume down buttons for seven seconds
  • Your Galaxy S10+ will restart

Samsung Galaxy S10+ Schedule auto restart

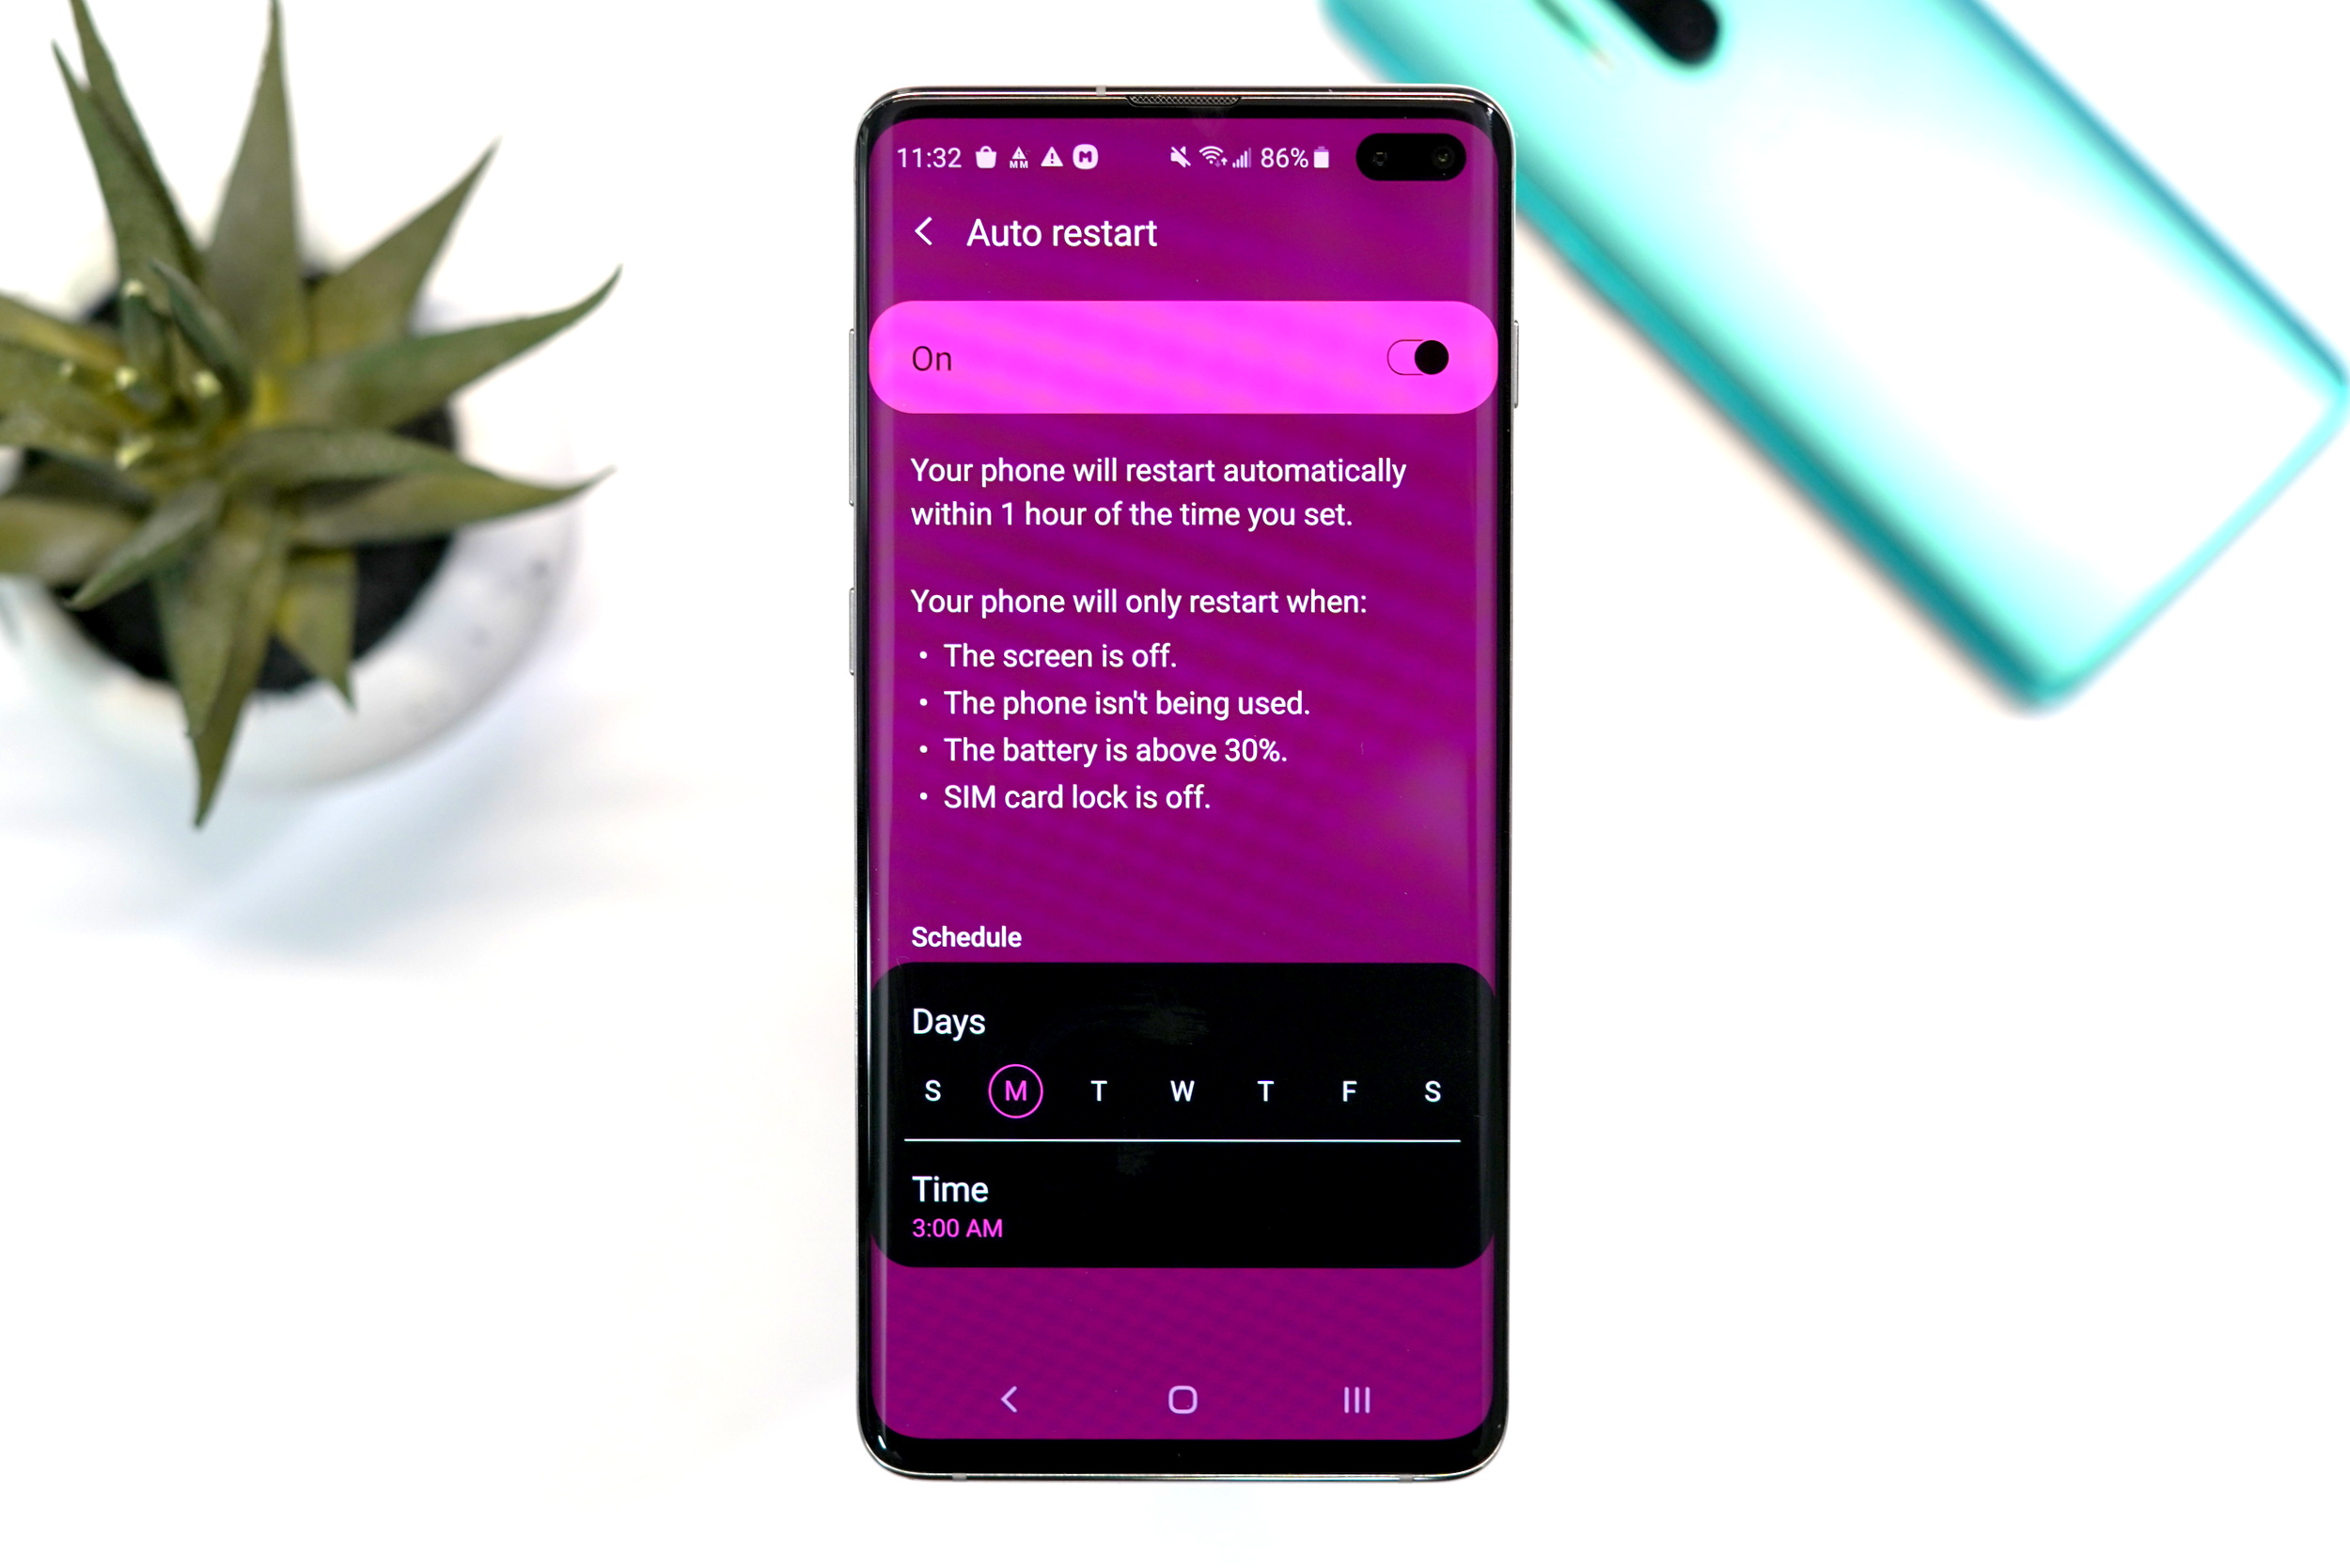
A new feature Samsung is building into its phones is an auto restart scheduler. This feature allows you to set a time and day of the week to automatically restart the phone. The restart scheduler allows you to schedule up to one auto-restart time per day.
  • Open Settings > Device care > Three-dot menu in top right corner > Advanced > Auto restart > Off/on toggle
  • Tap at least one day of the week in the schedule section
  • Tap Time to change the scheduled hour for the auto restart.

How to factory reset the Galaxy S10+ (hard reset)

Like the soft reset, the Galaxy S10+ has a few different ways to perform a factory or hard reset.

Samsung Galaxy S10+ simple factory reset

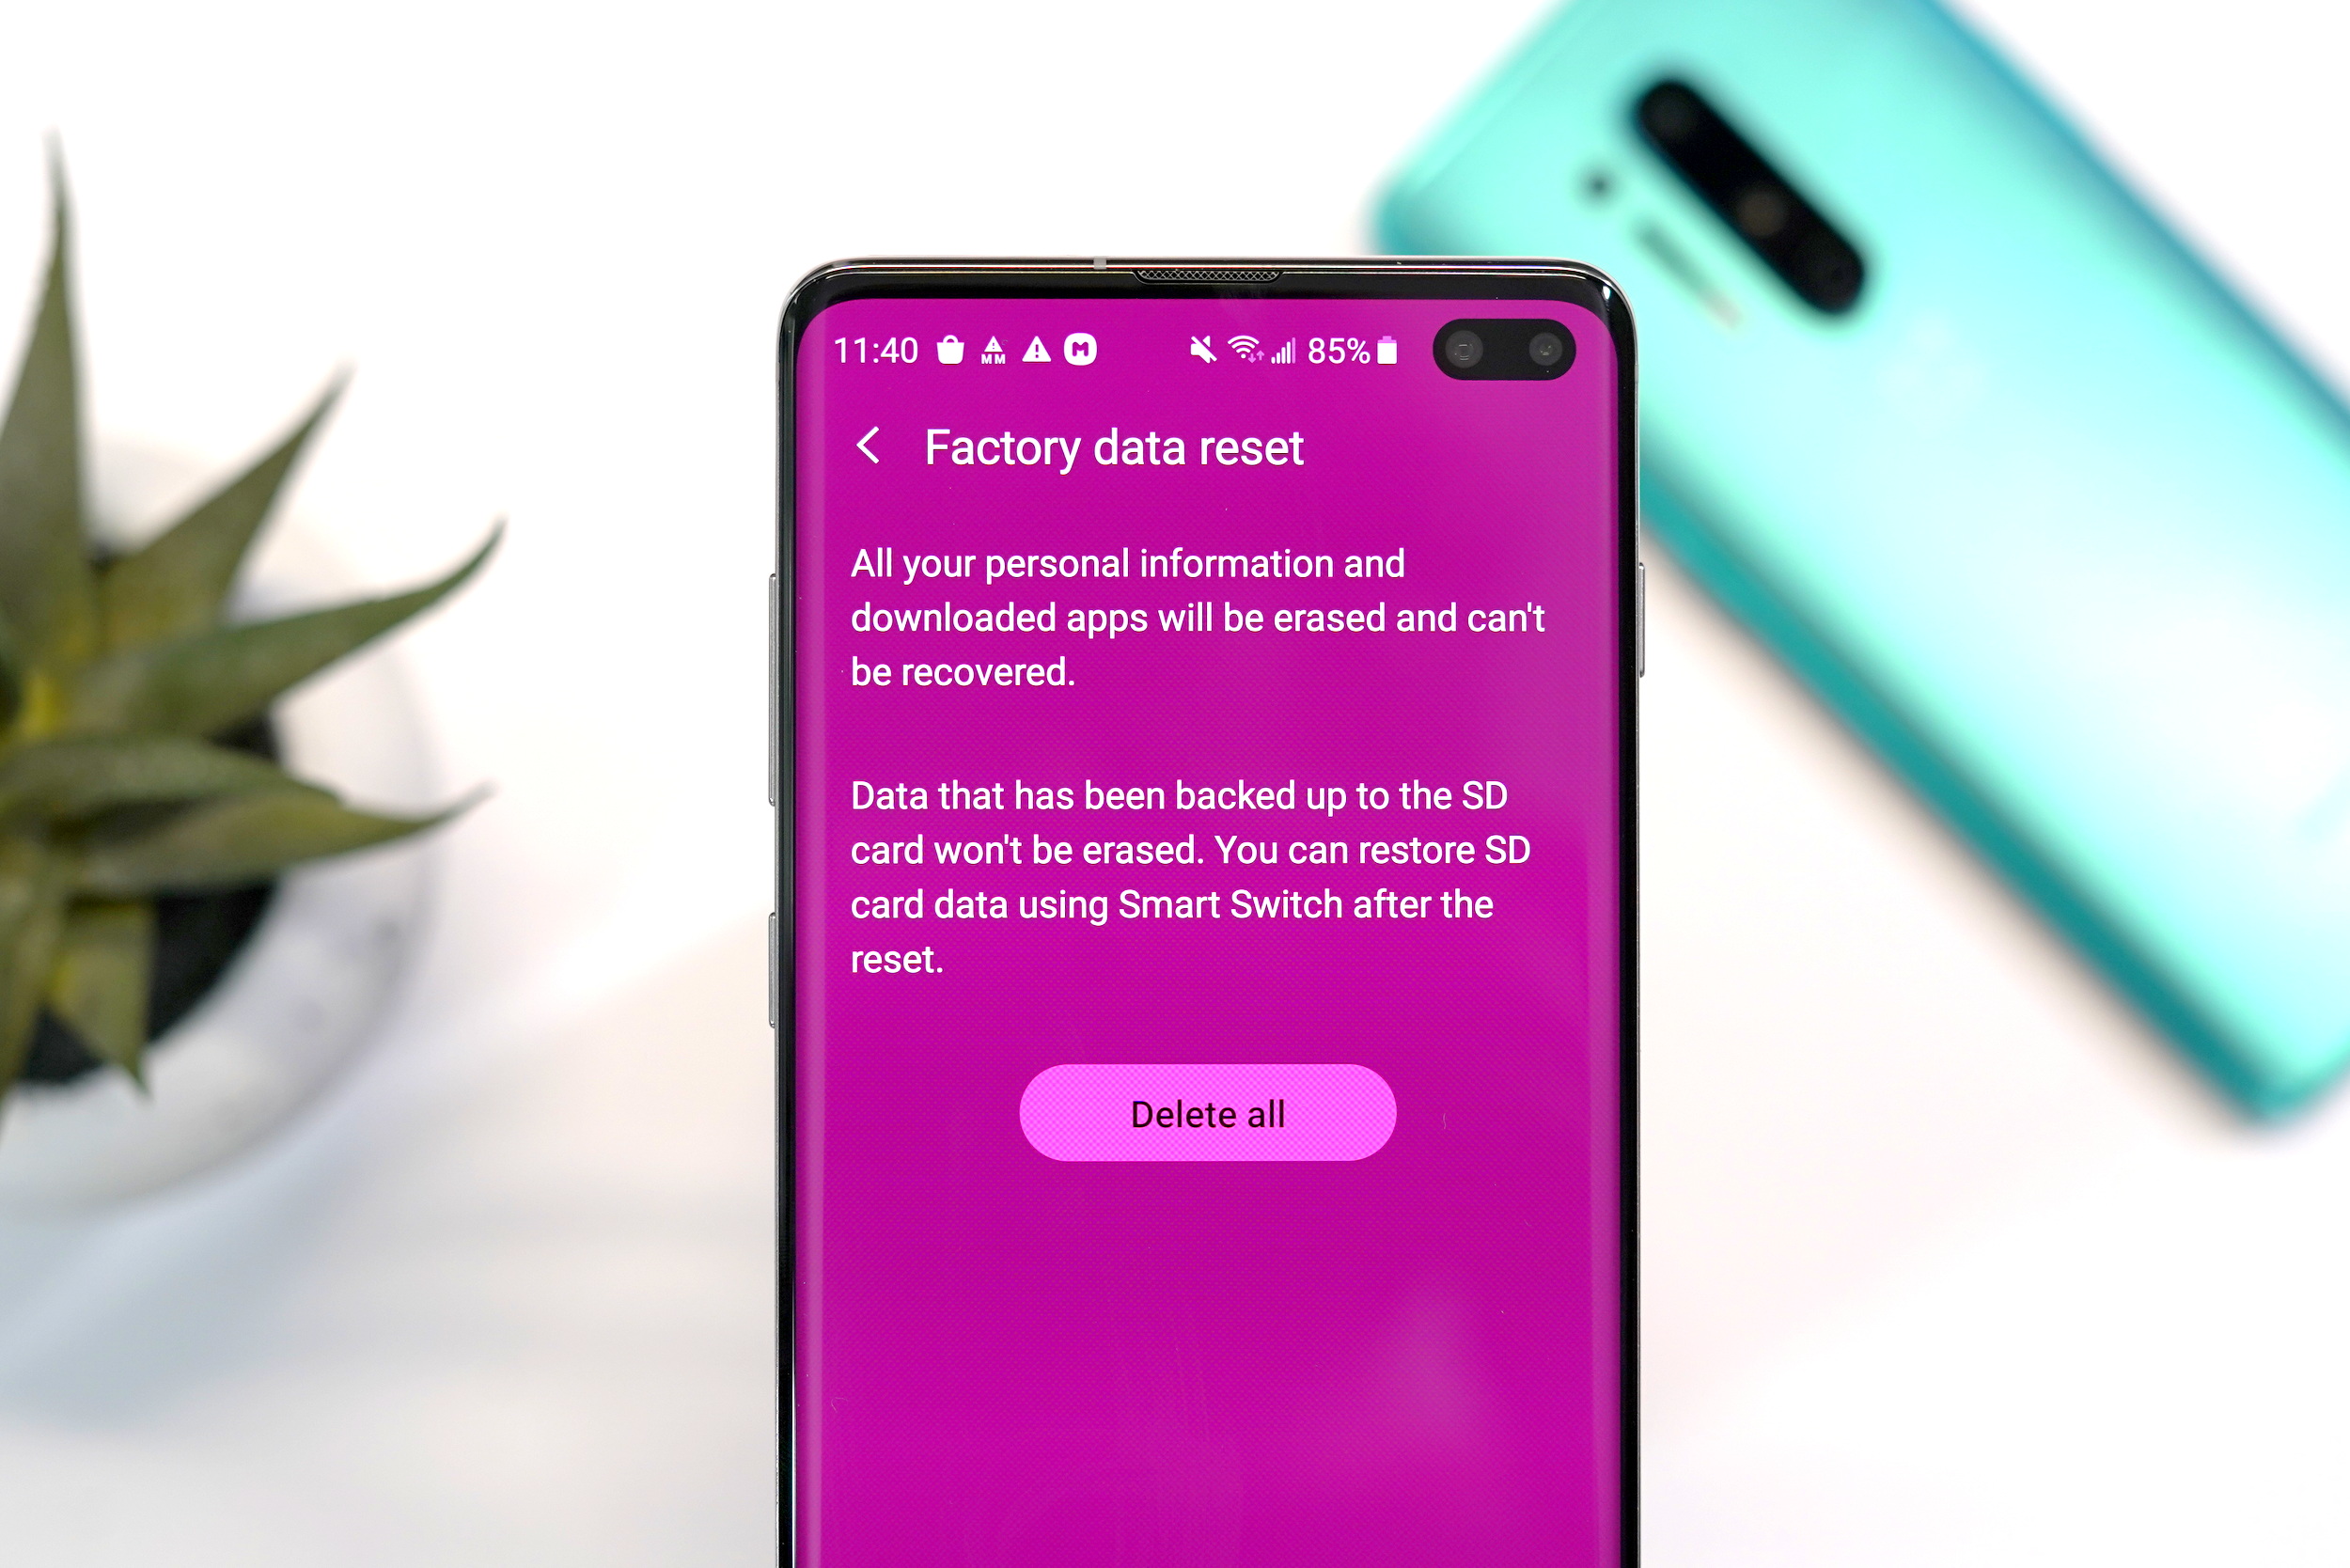
  • Open settings Settings > General Management > Factory Data Reset > Reset
  • Enter your PIN, Password or Unlock Pattern
  • Tap “Delete all”
  • Enter your Google Account password to start the factory reset process
  • The reset process will take several minutes
  • After the reset has completed, the phone will reboot to start the setup process

Samsung Galaxy S10+ Recovery mode factory reset

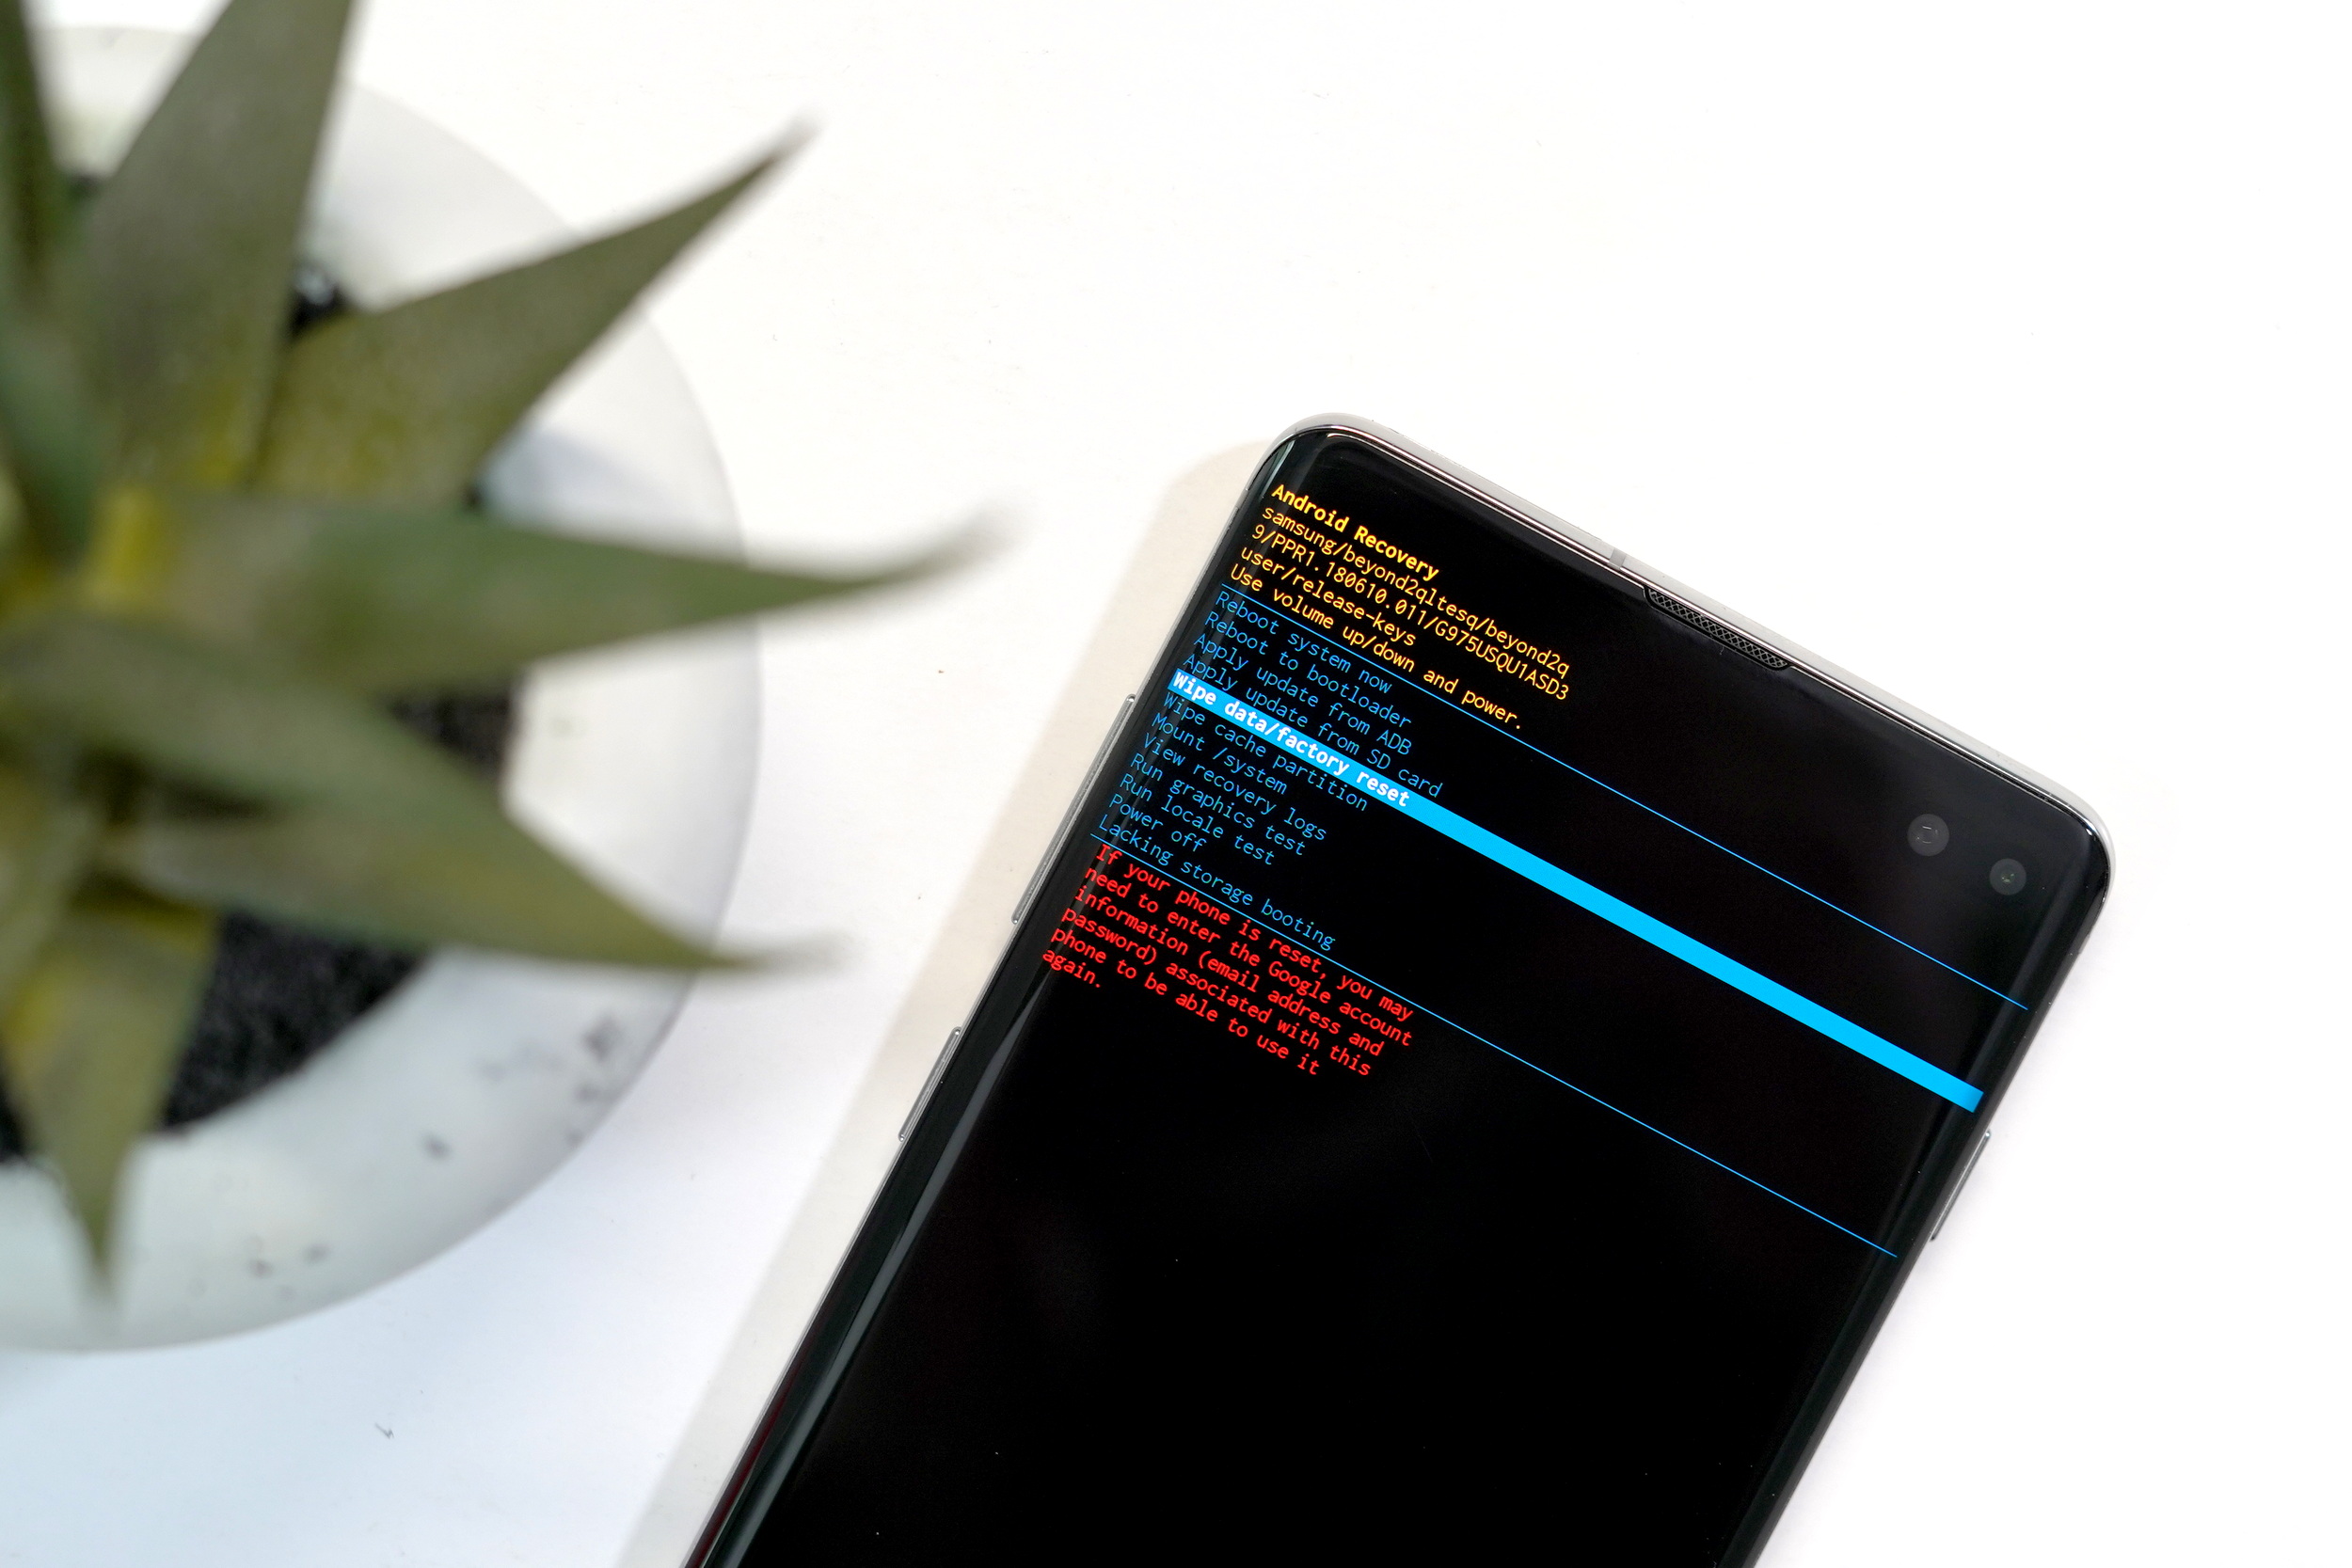
If your Samsung Galaxy S10+ is unresponsive or you are locked out of the device, you can perform a factory reset through the phone’s recovery system.
  • Turn off the Samsung Galaxy S10+
  • Simultaneously press and hold the Volume Up, Bixby and Power buttons for 15 seconds
  • When the recovery screen appears, you can use the Volume Up/Down buttons to navigate and power button to select
  • Highlight Wipe data/factory reset and press the Power button
  • Highlight Yes and press the Power button
  • The reset process will take several minutes
  • After the reset has completed, the phone will reboot to start the setup process
  • If the Galaxy S10+ reboots into recovery mode, highlight Reboot system now and press the Power button

Remote factory reset and wipe

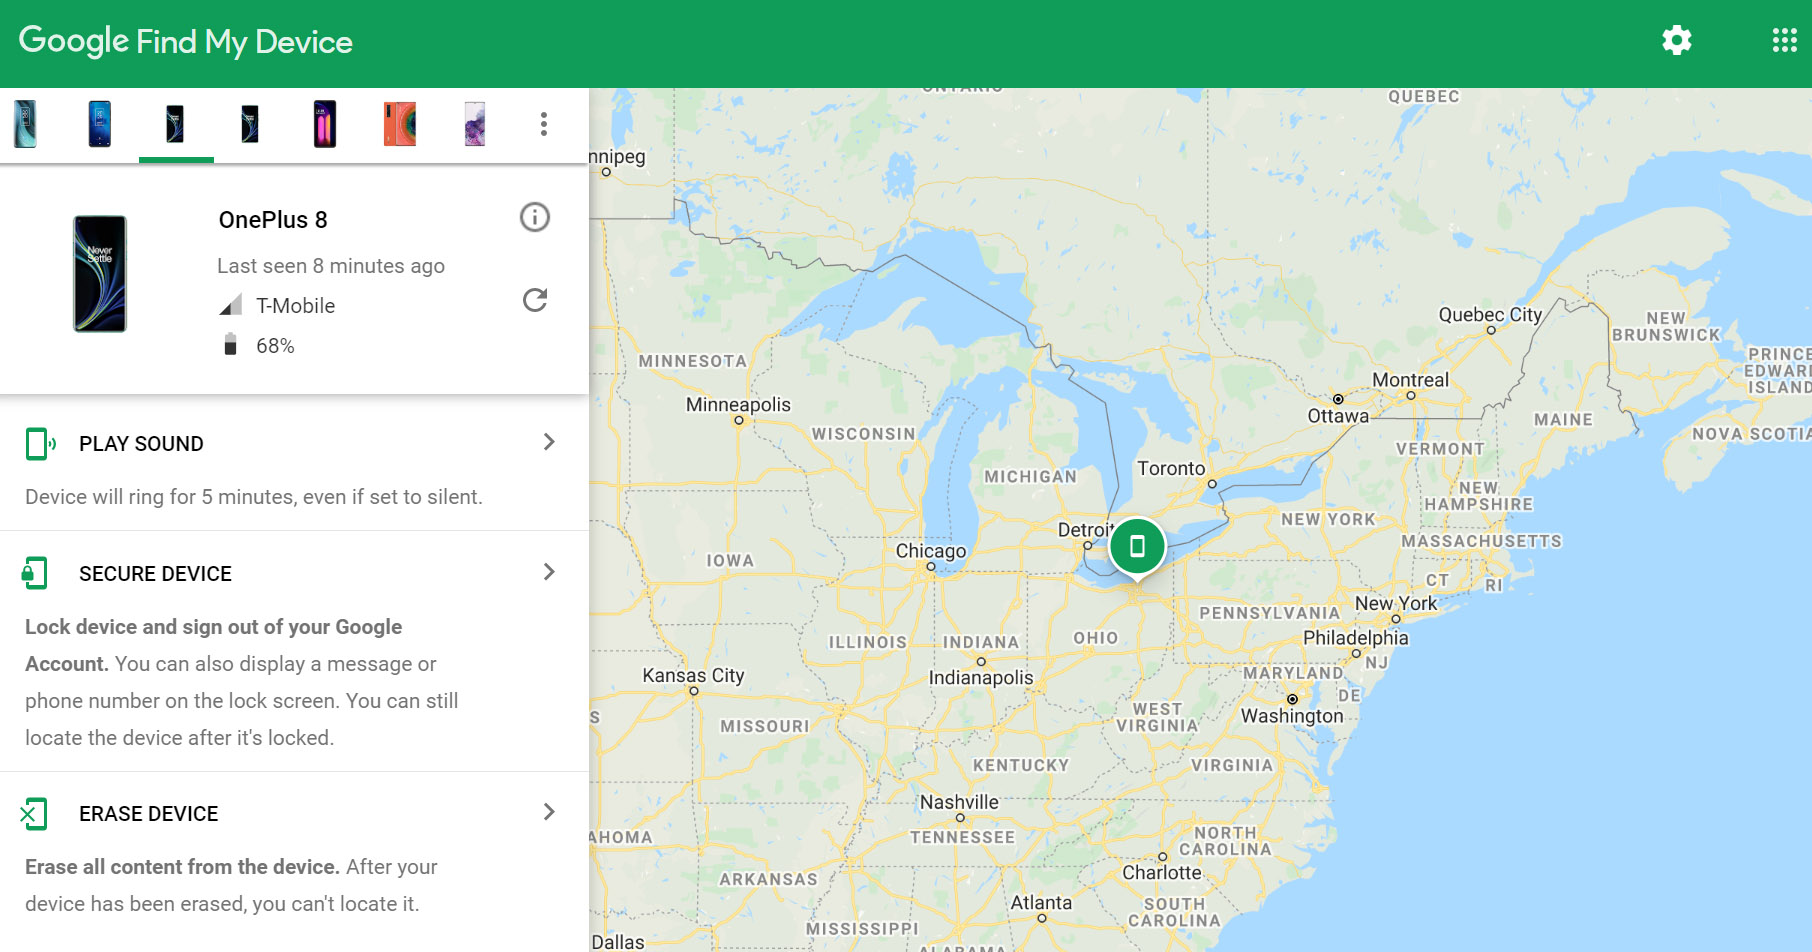
I the event that your Samsung Galaxy S10+ was stolen or lost, the Google Find My Device website allows you to track the location of your phone to help you find it. The service also includes a feature that allows you to factory reset the phone so that your information doesn’t fall into the wrong hands.
We have a detailed How to find your lost or stolen smartphone article, but if all you need to do is remotely reset an wipe your Galaxy S10+, simply follow the instructions below.
  • Visit the Google Find My Device website from a computer, smartphone or tablet
  • Log into your Google Account
  • Select your Galaxy S10+ from the device list and then select “Erase Device”
  • Select “Erase Device” again
  • Enter your Google Account password to begin the factory reset process
This will ensure that all your photos, video, messages, and account information are completely removed from the phone.

Sunday, May 31, 2020

How to reset your home screen layout (and delete all the app icons at once)

Home Screen Hell: it’s the place where all your app and game icons go to spend their miserable eternity. You’ve amassed so many pages and icons that after spraining both thumbs attempting to remove them one-by-one, you’ve officially given up. Well, it’s time to un-give up, because we’re taking you on a 1-minute journey to a hidden place called the Fountain of Sanity.

How to delete all your app icons:

  • Open your device settings
  • Tap on “Apps”
  • Tap on “Google App”
  • Tap on “Storage”
  • Tap on “Manage Space”
  • Tap on “Clear Launcher Data”
  • Tap “Okay” to confirm

We didn’t say it was hard, but boy is it a pesky place to find. Even the expert Android user would likely be searching in all the right places, but still come up empty handed. Let’s hope Google makes managing home screens an easier task with Android N, and we think they will.

Friday, April 17, 2015

Reset your GoPro WiFi password in less than 2 minutes

Reset your GoPro WiFi password in less than 2 minutes

gopro-hero3-iphone-app-wifi-remote
Well, I suppose you didn’t come here just out fo curiosity. Most probably, you’re desperately trying to connect to your GoPro’s WiFi network to check your footage or stream the “live feed” of your camera. I was in the exact same situation days ago. Some friends wanted to see how the video that my GoPro Hero 3 Black Edition was currently filming looks like. I said “sure, no problem we can see the video stream right on my phone”. Problem was, for some reason the GoPro’s WiFi login wasn’t saved on my phone anymore and I couldn’t remember its password. So, after two minutes my friends lost their interest and I gave up.
After checking the official guide to reset the WiFi password on  the GoPro’s website, I was a little disappointed, because it involved quite a few steps. So I searched a little longer and, luckily, found a quicker way to do it. Since this procedure isn’t the “official” way and wasn’t so easy to find, I want to share it here, so you can get back faster to the important thing – shooting cool stuff with your GoPro!

Resetting the WiFi password on a GoPro 4

If you own the 4th generation of the GoPro, then you’re lucky. Resetting the WiFi password can be done via the camera’s menu. All you need to do is go to your camera’s settings, select “RESET CAM” and then “RESET WI-FI”. That’s it!
Now you can pair your phone through the GoPro app with your camera the same way as you did it the first time.

How to reset the password on a GoPro 3 (all models including 3+)

Unfortunately, it’s not as easy with the 3rd generation and 3+ models. However, it doesn’t take longer than a minute or two. All you need is your GoPro with the microSD card inserted and the cable to connect it to your computer.
Okay, here’s what to do:
  1. Connect your GoPro to your computer. (Alternatively, you can also just insert your microSD card using an SD card adapter)
  2. Download the correct file from the list below
  3. Extract the zipped folder
  4. Copy the contents of the folder and paste its content to the root folder of your GoPro’s microSD card.
    • Hero 3+: Paste the whole “UPDATE” folder to your GoPro’s root folder. The files must be in a folder with the name “UPDATE”, otherwise it won’t work.
    • Hero 3: Paste only the files, not the folder, to the root directory of your GoPro.
  5. Unplug your GoPro. It should automatically turn off.
  6. Turn it back on. Your GoPro should display now that it’s updating. Once it’s done it will turn off again.
  7. You can turn it back on now and connect to its WiFi network with your device using the default login:
    • Network name (SSID): GoProHero
    • Network password: goprohero
In case you want to directly have a different SSID and password, you can change that by editing two lines in the “settings.in” file:
"ssid":"GoProHero",
"password":"goprohero"
Alright, I hope you managed to connect to your GoPro successfully. Now get back to it and shoot some great stuff!

Thursday, April 16, 2015

How to factory reset the Nexus 4 for better performance

How to factory reset the Nexus 4 for better performance

AndroidPIT Nexus Family


The reset process is almost identical on every Nexus device. 

We’ve loved our Nexus 4 since the moment we set eyes on it, but like any smartphone it can suffer from misbehaving apps, operating system oddities and other annoyances. If you’re finding that problems occur with the same app again and again then it’s a good idea to try deleting its app cache (if applicable) or uninstalling the app, rebooting your Nexus 4 and reinstalling the app again . But if you suspect something’s gone wrong with Android itself or you just want to make your Nexus 4 feel factory-fresh again, then a factory reset may be the solution. Here is how to factory reset the Nexus 4.


nexus 4 black
A factory reset can make your Nexus feel factory-fresh again. 

What to do before you reset the Nexus 4

A factory reset gets rid of everything apart from Android, so it’s essential that you have a backup copy of anything valuable. That could be your photos, your top secret plans for world domination or just a bunch of Wi-Fi passwords. It doesn’t matter what it is, but it’s important to make sure you won’t lose it when you reset your Nexus 4Make sure you’ve synced with your Google Account too, as that takes care of a lot of the legwork when it comes to putting all your stuff back on your phone after the reset.
As with any bit of system tinkering, make sure your Nexus has sufficient battery charge before performing the reset. Better still, plug it into the charger.


How to reset the Nexus 4

There are two ways to reset the Nexus 4. You can do it from the Settings menu, or you can do it by putting your Nexus into recovery mode. That latter option might be the only available option if your Nexus has frozen.
Let’s look at the Settings menu approach first. To reset your Nexus:
  • Go into the Settings menu
  • Go to Personal > Backup & Reset
  • Enter your password/PIN if required
  • Tap Factory Data Reset > Reset Phone
  • Again, you might be prompted for your password or PIN here.
  • Tap Delete Everything
  • Choose the Reboot option


androidpit nexus 5 reset software
The Settings menu option is the easiest way to reset your Nexus.

How to reset the Nexus 4 by putting it into the recovery mode

If your phone has frozen, won’t let you into Settings or you just prefer pressing buttons, you can also reset your Nexus 4 by putting your phone into recovery mode. Once again it’s a good idea to make sure your phone is charged or connected to a charger before proceeding.
If at any point the phone freezes during this process, press and hold the Power button to restart it.
  • Turn off your Nexus if it’s currently on
  • Press and hold the Volume Down and Power button simultaneously until the Nexus turns itself on
  • Using the Volume Down button to navigate, highlight Recovery Mode
  • Press the Power button to confirm your selection
  • You should now see an image of the Android robot with a red exclamation mark
  • Hold down the Power button and press and release the Volume Up button
  • Using the Volume Down button to navigate, highlight Wipe Data / Factory Reset. Once again, use Power to confirm the selection
  • Using the Volume Down button, highlight Yes - Erase All User Data and use Power to confirm your selection
  • Wait for the reset to complete and then select the reboot option
And that’s it.


android recovery closeup
We like the cute robot graphics in the reset process. / © ANDROIDPIT

What data and settings are restored via the Android Backup Service?

If you used the Android Backup Service to backup your Nexus, it can restore some settings and data for you automatically after you’ve reset your device. It can backup and restore:
  • Google Calendar settings
  • Stored Wi-Fi networks and passwords
  • Wallpapers
  • Gmail settings
  • Apps you’ve installed via Google Play and backed up on the Play Store app
  • Display brightness and sleep settings
  • Language and input settings
  • Date and time
  • Some third-party app settings and data


AndroidPIT Nexus 5 Lollipop Factory Reset
Android's backup service, shown here on Lollipop, can backup and restore key system settings and some apps' data. 

The reason we’ve said “some” third party apps is because the Android Backup Service can only backup apps that actually use it, and it’s up to the app developer(s) whether a particular app uses it and if it does, what settings and data are actually backed up. When it comes to backing up important data, documents, files or settings it’s always a good idea to assume the worst and ensure you have a backup copy of absolutely everything. Don’t assume that your favorite app uses the Backup Service and discover the hard way that it doesn’t!
Have you found resetting the Nexus 4 fixes performance and stability issues? Have you had happy or unhappy backup experiences? Let us know in the comments.

Featured

[Featured][recentbylabel2]

Featured

[Featured][recentbylabel2]
Notification
This is just an example, you can fill it later with your own note.
Done