Android Tricks 4 All: Restore
News Update
Loading...
Showing posts with label Restore. Show all posts

Wednesday, July 15, 2020

Found a Lost or Stolen iPhone? Here’s What to Do with  few steps you can take to return a lost iPhone to its rightful owner

Found a Lost or Stolen iPhone? Here’s What to Do with few steps you can take to return a lost iPhone to its rightful owner


Even with the best of intentions, it’s often difficult to know how to proceed when you find a lost or stolen iPhone. Fortunately, there are a few steps you can take to help return the device to its rightful owner.
There’s no exception when it comes to other people’s property, so holding onto something that isn’t yours could be theft. Plus, all modern iPhone models are useless thanks to the Activation Lock feature.
So here’s what to do if you’ve found a lost iPhone.

1. Is the Lost iPhone Charged?

Action: Buy or borrow a charger and keep the device on and charging.
Modern smartphone batteries aren’t great, so most of the time a lost device has a day (at best) before it runs out of battery. If there’s no charge, try holding the power button (a single button on the right-hand side) to see what happens.
Provided the iPhone still works, you’ll first need to charge it. If you don’t own an iPhone yourself, you’ll either need to borrow or buy a Lightning cable. You can pick up an AmazonBasics Lightning cable for a few dollars.

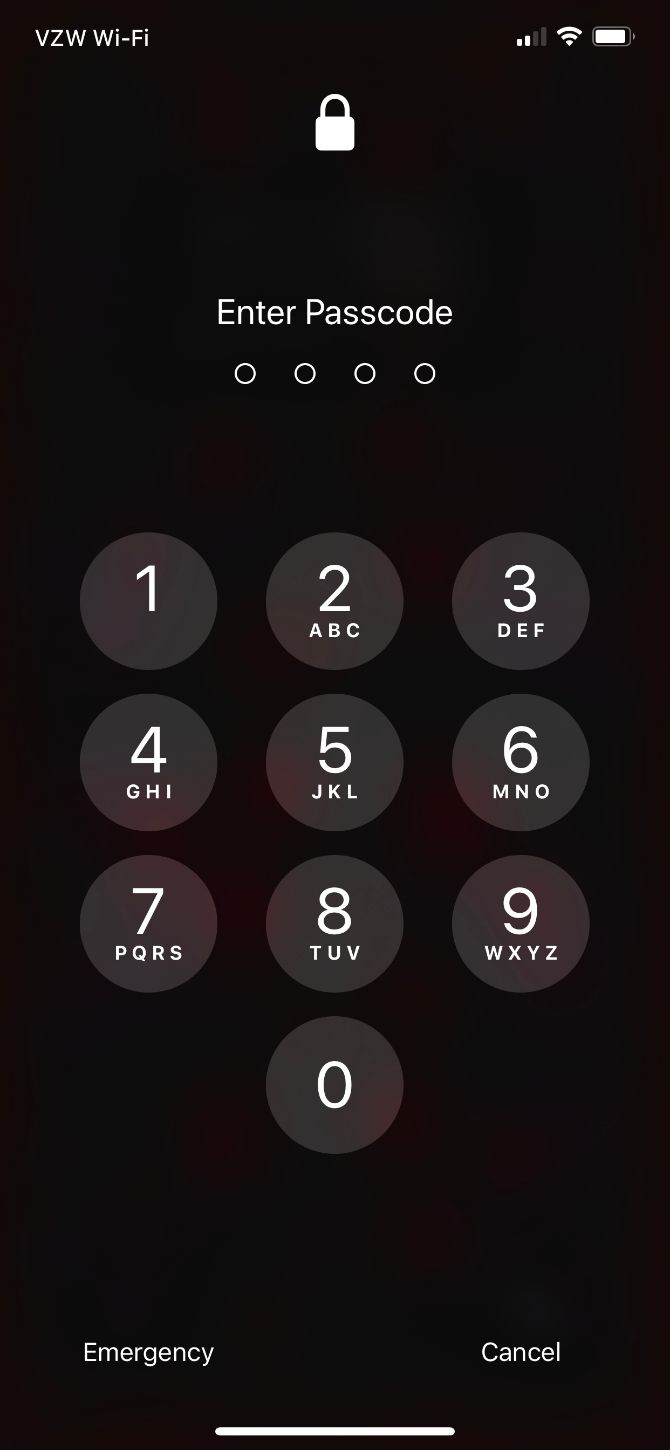
2. Does It Have a Passcode Lock?

Action: Check for a passcode, but don’t try to brute-force it. Check the call log and registered Apple ID for contact details if you can access them.
Once the iPhone starts up, you’ll see a lock screen. Pressing the Home button or swiping up at the bottom of the screen—depending on which iPhone model you’ve found—will likely prompt you for a passcode, Touch ID, or Face ID.
But there’s a small chance the phone will unlock. This means the owner didn’t set a passcode, which is something all smartphone owners should do.
ios 10 passcode
If the phone does unlock, you have two options to get more information. The first is to head Settings > iTunes & App Store to see what the owner’s registered Apple ID email address is. You can then send an email to the owner, informing them that you have their device.
The second is to head to Phone > Recent and check the call log. You should be able to deduce a suitable contact to call so you can inform them that you’ve found this iPhone. You should also be able to find the owner’s name listed at the top of the Contacts list in the Phone app.

3. Look to Medical ID for More Information


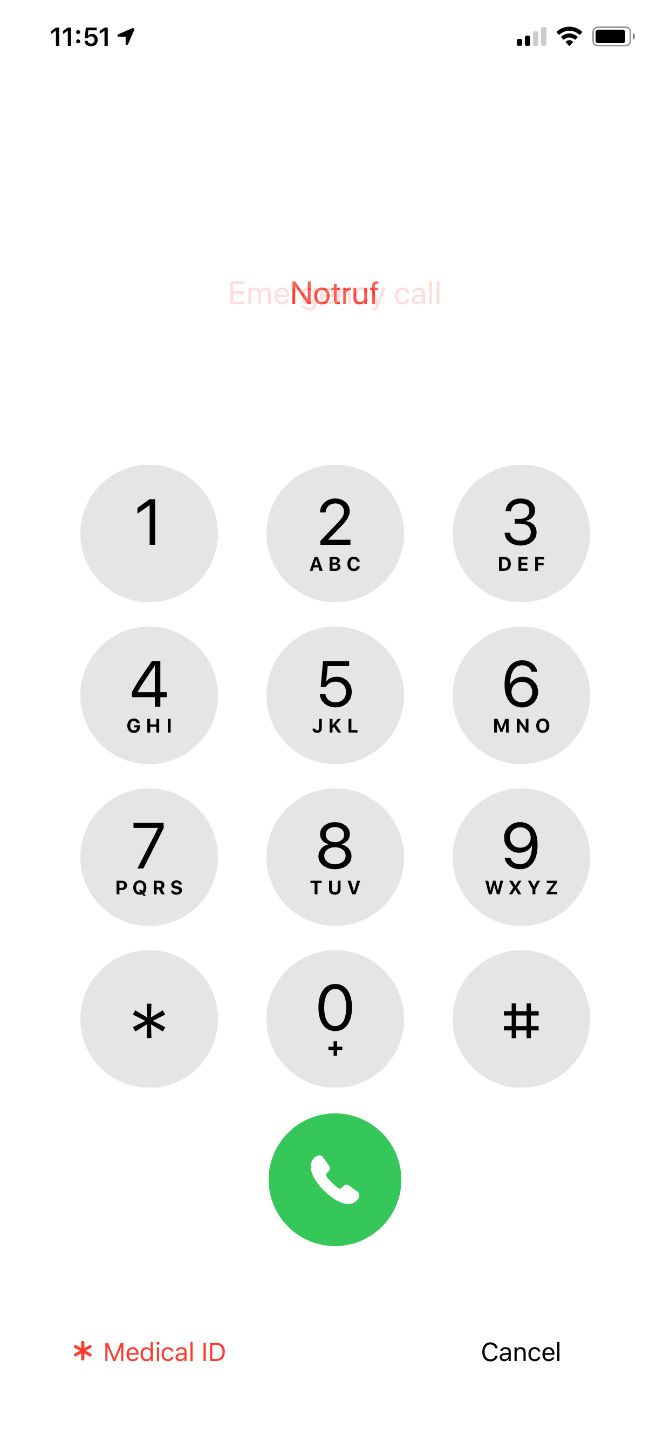
Action: Access the Medical ID feature, even with a locked iPhone.
If you’re still looking for the owner of a lost iPhone, try the Medical ID feature. While its main purpose is to provide important medical information to first responders in case of an emergency, it can also give you more clues about the identity of the owner.
To access the Medical ID function, access the lock screen on any iPhone and then select Emergency on the bottom-left side of the screen. You’ll then see a number pad on the screen. On the bottom-left of that screen, select Medical ID.
If the owner has set up the feature, you’ll see their name and more information about them. Hopefully, that will help you track down the owner.

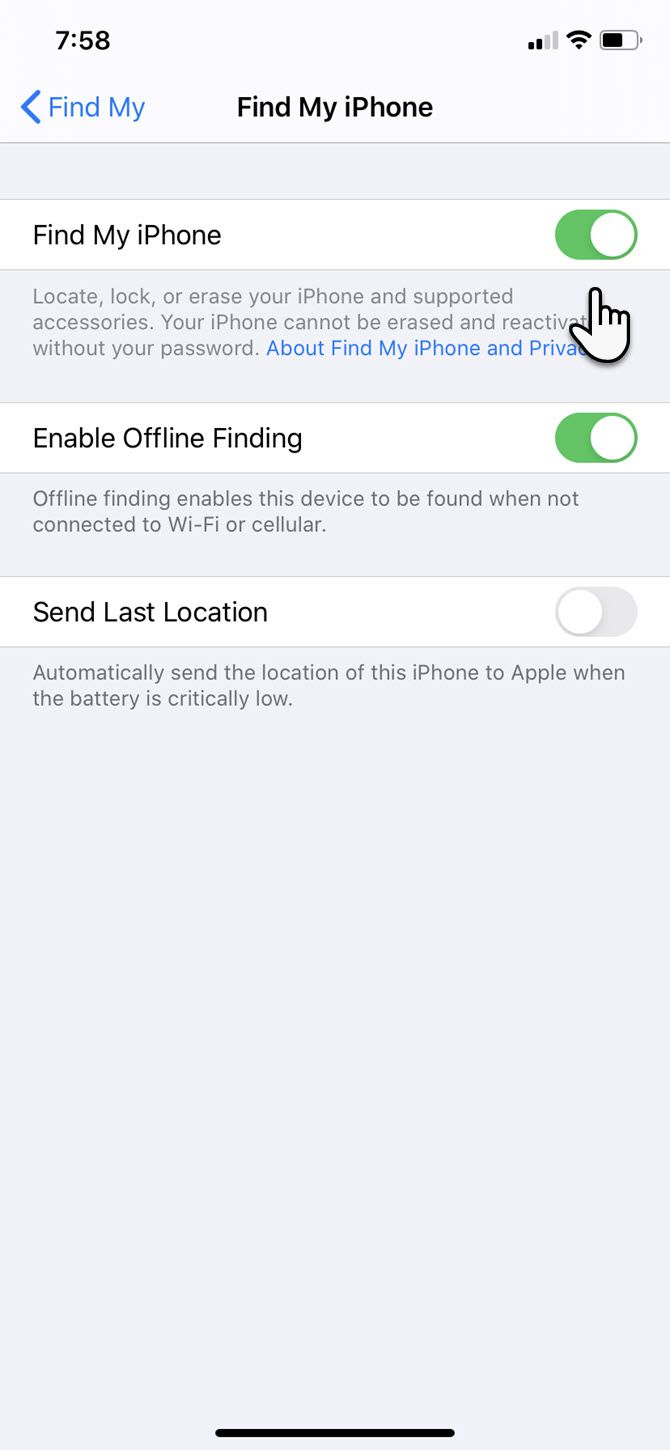
4. Is the Phone in Lost Mode?

Action: Look for a message and make contact using any details provided.
Someone else’s iPhone is useless to anyone other than the owner, provided Find My iPhone is enabled. A feature called Activation Lock prevents the iPhone from being used even after a software reset, and the same feature lets the rightful owner track down lost devices.
Find My
If the iPhone has been put into Lost Mode, the owner has logged in to iCloud.com and marked the device as lost. You should see a message informing you of this, along with a message left by the owner. This should include a contact number or email address you can use to track down the owner.
If the phone connects to the internet, its location will be sent to the owner via iCloud.
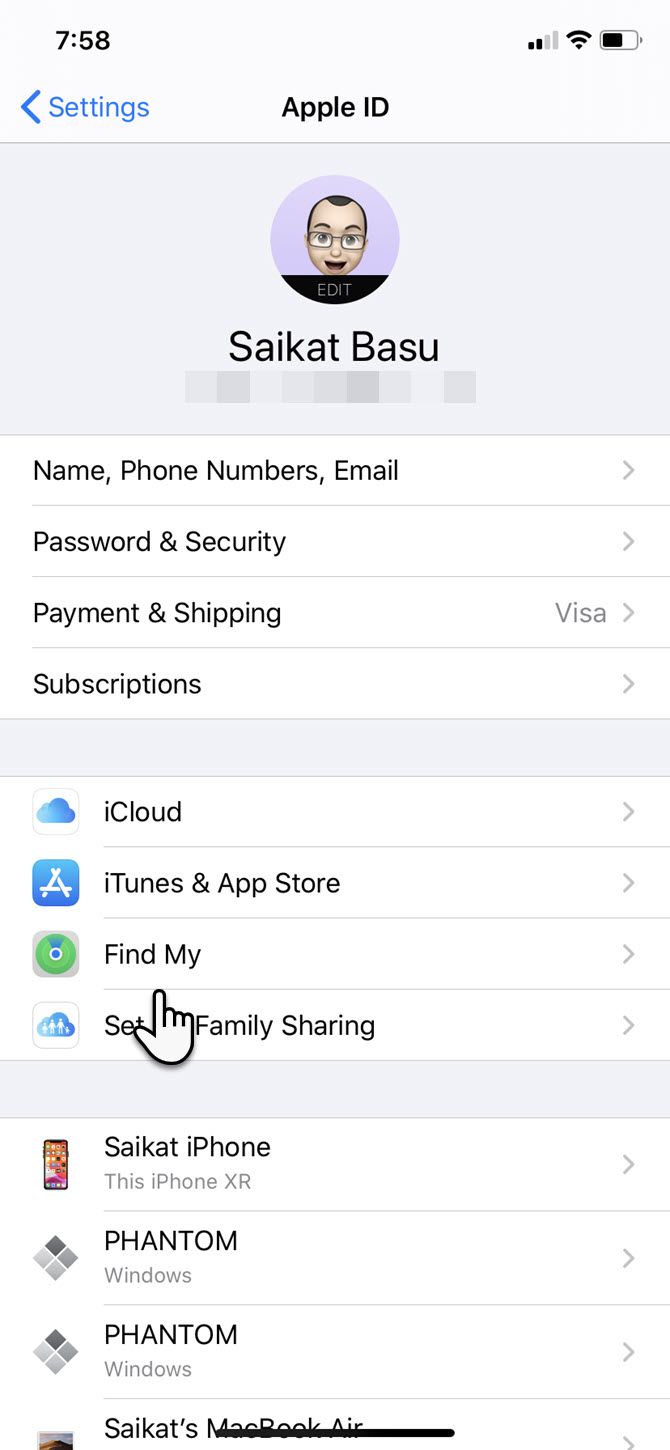
You should certainly have Find My iPhone enabled on your own device under Settings > [Name] > Find My. Make sure to take a closer look at our explanation of the Find My app and everything you need to know about it.

5. Try Asking Siri

Action: Grill Siri for information to locate the owner.
Provided the phone is online, Siri can do a lot even if the device is locked. This will only work if the phone was turned on when you found it, however.
After a restart, Siri is disabled until you first unlock it. Pressing and holding the home button will trigger Siri, which then gives you a chance to ask a question to help find the owner.
siri who owns this iPhone
A few ideas you could try:
  • “Call my wife”—Or husband, mom, dad, boss, etc.
  • “Read my call log”—This may show you a recent call, so you can then ask Siri to call the contact (by name).
  • “Read my last message”—Will provide the contact’s name as well as the message contents.
  • “Who owns this iPhone?”—Should give you the name stored in the owner’s contact entry.
  • “What is my email address?”—Also try phone number, Twitter handle, and so on.
Unfortunately, it seems that Siri has a limit on the amount of information divulged before requiring a passcode. Asking Siri to read the call log, then calling any contacts you find, might be the best course of action.

6. Take a Photo

Take Photo iPhone
Action: Take a photo of your contact information that will sync online.
Many iPhone users have iCloud Photos enabled. That feature saves every photo and video taken by devices using your Apple ID to iCloud. This allows you to access your images on any iOS device, or a Mac, with the same Apple ID. That’s a big plus when trying to return a lost iPhone to its owner.
You don’t need to have an unlocked iPhone to snap a photo or video. On the lock screen, select the camera icon or swipe from right to left to access the camera. You can then snap a photo. The best idea would be to take a picture of your contact information.
With any luck, the image will be sent to the iCloud Photos account of the owner and they’ll see it on another device they use.

Found an iPhone? Make Contact or Hand It In

Keep in mind that if you find a lost iPhone, Activation Lock will prevent you from using it if it’s protected by Find My iPhone. It’s essentially a paperweight for as long as you have it in your possession. So don’t expect to use an iPhone you’ve found.
If none of these methods work, you may want to pop the owner’s SIM card out and take note of their carrier and the number printed on the SIM card. You can then contact the carrier, quote the number, and they may be able to help contact the owner of the device.
After trying all these options, your best bet is to take it to the police station that’s nearest to where you found the iPhone. Explain that you’ve found the phone and you’ve tried making contact, but nothing’s working.

How to Turn Off Find My iPhone When You Sell Your Device

How to Turn Off Find My iPhone When You Sell Your Device

turnoff-find-iphone
iPhone theft or a misplaced phone will send alarm bells ringing. That’s why the Find My app on your iPhone and iPad is such an important security feature. From iOS 13 onward, Apple merged Find My iPhone and Find My Friends into this single app.
Find My is a vital radar to reduce your “lost and found” accidents. It’s also a critical hub to share your location with friends and family. But it’s also a feature you should turn off when you sell or give away your iPhone.
First, let’s answer why; we’ll then look at how to turn off Find My on your iPhone or iPad.

Why You Should Turn Off “Find My” When You Sell an iPhone?

There are three reasons to turn off Find My when you sell your iPhone, give it up for recycling, or hand it down to a friend or family member:
  • You cannot restore the iPhone or iPad to its original factory settings without disabling Find My.
  • Anyone with your Apple ID and password can track you through the Find My app on iCloud.
  • Activation Lock switches on to lock your device when you enable Find My, meaning the buyer cannot use it.
That’s why you must make sure to disable the feature before you pass on your device or send it in for service. You can turn off Find My from the app, as well as remotely from iCloud, by unlinking your device from your Apple account.

How to Turn Off Find My iPhone

The Find My app exists as a dedicated utility on your iOS device. In iOS 13, Find My Phone and Find My Friends were combined into one single app. Now, you can use it to share your location, mark a device as lost, and erase your data remotely.
But to turn it off, you have to head to a different place: the Settings menu on your iPhone:
  1. Open Settings.
  2. Tap on the Apple ID banner with your name (the first item on the Settings screen).
  3. Scroll down to Find My on the next screen.
  4. Now, tap on Find My iPhone/iPad. Toggle the Find My iPhone/iPad slider to the off position.
  5. You will need to enter your Apple ID and password to turn off Find My iPhone.
  6. Find My iPhone will now be disabled for this iOS device.
If you are planning to sell the device, you can now restore your iPhone to factory defaults. Do this using Settings > General > Reset > Erase All Content and Settings. However, it’s a good idea to first sign out of iCloud completely by tapping Sign Out at the bottom of the Apple ID page, which you can access by tapping your name at the top of Settings.

How to Disable Find My From iCloud

You cannot disable just the Find My service from iCloud. Before you give your device to someone, you’ll need to sign into iCloud and erase all content and settings. This completely erases everything on your iPhone, removes it from the linked Apple ID, and turns off Find My.
If you use two-factor authentication on your Apple ID, you’ll get a verification code on your Apple devices as an extra layer of security when signing into iCloud from a browser. You can also sign into Find My iPhone directly on the web.
Use the same Apple ID and password linked to the phone you’re selling and follow the steps below. iCloud displays the map with the location of your iPhone:
  1. Click the dropdown arrow next to All Devices at the top of the map and select the specific device from the list.Sign into iCloud Find My iPhone Screen
  2. Click Erase iPhone in the dropdown that appears for the specific device you selected. Since you are the owner of the Apple device and wish to give it away, don’t enter a message or number here.Erase iPhone option in Find My iPhone screen
  3. If your phone is off, a reset prompt will appear on the next boot. The phone will be remotely erased and you will get an email after it completes.
  4. After your device is erased, click the green link that says Remove from Account.
The device will now be erased and reset. Another user can now activate it after completing the steps on the Set up your iPhone screen.
Note: The full set of iCloud features includes Find My iPhone. If you do not see Find My iPhone when visiting iCloud.com on your computer, your account only has access to iCloud’s web-only features. To use Find My iPhone, sign into iCloud on your Apple device from Settings.

Turn Off Find My iPhone Without the Apple ID

You cannot do this.
Find My on your Apple devices isn’t only a recovery feature, but also a security layer. Your Apple ID is at the core of it, which protects your device in case of theft or loss. Apple Support gives you a few ways to recover or reset your Apple ID in case of a memory lapse.

Don’t Sell Your iPhone Until It’s Unlocked

If you still have Find My Turned on or haven’t reset your iOS device, it’s not ready to sell. Keep an eye out for these two signs:
  1. When the device hasn’t been unlinked from your iCloud account, the Activation Lock screen will appear during the setup process.
  2. If you haven’t erased all the data on the phone, you will see the passcode lock or home screen upon startup. Make sure you see the Set up your iPhone screen when you turn the device on.
Always erase all content and remove the device from your iCloud account before you give it to someone. Otherwise, the person you give it to will have to contact you and ask you to do it remotely from your iCloud account.
Of course, you can be on the other side of the equation and come across a lost phone. Here are a few steps you can take to return a lost iPhone to its rightful owner.


Tuesday, June 9, 2020

How to restore a Pixel device using a cloud backup

How to restore a Pixel device using a cloud backup

The Google Pixel is the peak of the Android experience but even the purest Android software can begin to slow down over time. With a combination of caching information, unused apps, and depleting storage, it is inevitable that over time the Google Pixel may not continue to perform how it did from day one.

As much as a slow device is annoying, all is not lost. Initiating a factory reset on a Google Pixel can help to restore things to normal and get your device performing like it did on day one. However, performing a factory reset to start things from scratch can be a daunting experience with many expecting that all their data would be lost. The Pixel has features built-in natively that ensure your data can be restored from the cloud following a factory reset, so here’s all the detail.

What backs up automatically

As soon as you log in to your Google account, certain things will upload automatically. Data in your Google Calendar, Contacts, and Photos and Videos will back up to the cloud. In addition, your installed apps and associated app data, call history, device settings, and SMS text messages will be uploaded but are limited to 25MB of data per app.

For anything not automatically backed up to the cloud, you can upload the content to Google Drive to store it safely in the cloud while you perform a factory reset.

Restore data & settings from the cloud

Following a factory reset on your Pixel, the device will reboot and take slightly longer to start up on first boot. Once the Pixel has rebooted, you’ll be presented with the welcome screen. Follow the below steps to restore your data from the cloud.

  • Tap start on the Pixel welcome screen.
  • Connect to the internet using either WiFi or Cellular.
  • Tap next when you see Copy apps & data.
  • Select Can’t use old phone.
  • Under Copy another way, tap Ok.
  • Then select A backup from the cloud.
  • Sign in to your Google account that you previously used on the device.
  • Follow the on-screen steps, which will walk you through the data to restore.

Restore app data

Despite the app itself re-downloading automatically, you may find that the data within the app itself may not restore fully. You may be asked to log in again or a game, for example, may not have saved progress.

  • Head into Settings.
  • Tap System > Advanced > Backup > App Data.
  • Turn on Automatic Restore.

Check your backup settings

If you are planning on performing a factory reset, you can verify what is set to backup by following the below steps. It’s always a good idea to check everything is checked that you intend on wanting to keep after the reset.

  • Open the Settings.
  • Tap Account and select your Google account.
  • Tap Account Sync.
  • Check that everything you want to be backed up is turned on.

Roundup

Google does a great job of minimizing the damage of a factory reset by ensuring that you can backup your data to the cloud to restore from following the reset. Restoring from a backup is obviously only one option; you can, of course, choose to set up your device as if it was brand new and start again from scratch. It’s always a good idea to perform a factory reset on your Pixel device to clear out the caches and delete old information, and now hopefully you can do so with the confidence you can restore from a backup stored in the cloud.

Featured

[Featured][recentbylabel2]

Featured

[Featured][recentbylabel2]
Notification
This is just an example, you can fill it later with your own note.
Done