Widgets can now occupy different parts of your home screen along with typical app icons.Stan Horaczek
Last week, Apple took to the virtual stage at its online Worldwide Developers Conference to announce a variety of upcoming software updates. Since then, I have been using a developer’s beta of the fledgeling operating system update to try out the high profile additions and dig up a few underrated updates.
Right now, you can install the early beta as well, but you’ll have to be a part of Apple’s official developer program which will cost you $100 for the year. You’ll also want to make sure you have a secondary device to test it on, because installing an early beta like this onto a phone you rely on every day comes with the potential for a complete software meltdown.
Here are some of the most promising new features to check out once iOS 14 officially launches later this year.
Translate
Downloading specific languages to your device allows you to translate without an internet connection.Stan Horaczek
Apple devotes a new app to its translation technology, which supports 11 different languages and offers several different layouts depending on your specific needs. The app can listen to a speaker and spit back their words in a different language with very little delay. But, it has some handy display modes that make it particularly useful for communicating with others.
Attention mode displays a large, clear version of what you’re saying, so if you want to hold it up to another person you can ask for help or quickly communicate a message to someone. Conversation mode allows two speakers to talk in real-time with their translated words appearing on their respective half of the screen.
The translations typically take place in the cloud, but you can download specific languages directly to your device and get access to all the features in those languages without a connection. That could come in extremely handy if you’re traveling and can’t rely on a steady signal.
I’ve had it crash a few times this week, mostly when switching between modes, but the actual translation seems quick and mostly accurate.
Home screen widgets
The Today View in iOS is a handy preexisting feature that allows you to get snapshots of what’s going on in your various apps. You access it by simply swiping right while you’re on the home screen to reveal a stream of information-packed widgets. If you’re not using it all the time, however, it’s easy to forget that it exists. In iOS 14, those widgets are making their way directly to the home screen so you can start your information bombardment as soon as you’ve unlocked the device.
Widgets now come in three different sizes depending on how much screen real estate you’re willing to devote to a specific app. You can peruse the Widget options for your specific apps via the Widget Gallery.
So far, there aren’t a ton of Widget options to try, but I have already started getting used to a few of them. I didn’t realize how often I opened the Weather app until the Widget absolved me of having to dive in to see what’s coming.
Once third-party widgets start pouring in, I worry home screens may get rather overwhelming, but responsible Widget arrangement could also mean quicker access to necessary information and less time spent poking around within apps.
App Library
With the home screen now taking on new Widget-hosting duties, the app grid is even more crowded. The new App Library lives after your last page of apps and arranges them into handy categories. Recently Added and Suggestions live at the top in order to make your most frequent apps quick to access.
You can hide pages of apps, so you can reduce your entire dashboard to curated collections of widgets and just rely totally on the App Library to find specific applications.
Message mentions
Group chats can get out of hand quickly when it comes to notifications, but now you can customize the chaos in order to keep it in check. Participants can now use the @ in order to directly address someone in the chat, just like in other apps, like Slack. That allows you to customize your notifications so your phone will only ping if someone is talking directly to you. Participants can also add replies in threads to specific messages so the entire conversation doesn’t become impossible to follow.
Bike directions in maps
At the WWDC keynote, Apple said that Maps users requested cycling directions more than any other feature. In iOS 14, Maps will now guide bike riders to their destinations via cycle-friendly routes that have dedicated bike lanes and relatively light traffic. The routes will also indicate when there are steep hills along the way so you can plan when to eat your Power Bar for maximum pedal power.
Right now, the directions are only available in a handful of cities like NYC and San Francisco, but Apple says it’s planning to roll them out to more places soon.
Adaptive lighting
Automation has motivated a huge chunk of the Home updates in iOS 14. The Adaptive Lighting update allows compatible light bulbs to automatically change their color throughout the day. So, if you want bright white light in the afternoon, and warmer, more mellow light in the evening, a simple automation can do that for you without having to think about it.
Plenty of other platforms allow you to create routines like this, but this is the kind of simple thing that Home has been conspicuously missing.
App Clips
Abandoned apps that you use once and then abandon tend to clutter up your device and go out of date. App Clips are designed to alleviate that problem. Users can access App Clips in a wide variety of ways including scanning a redesigned QR code, tapping an NFC-enabled beacon, or clicking a link from Maps, Safari, or Messages. Each Clip must be under 10 MB and doesn’t add itself to your home screen like a full app. They’re designed for one-off circumstances like if you’re paying to rent a scooter or make some other kind of micro transaction.
Once users are typically relying on 5G speeds, those 10 MB downloads will seem almost instantaneous.
Privacy labels in the App Store
Soon, each app in the App Store will have a simplified label that indicates what kind of data the software will collect about you and whether or not the developer plans to share it with others. It will also let you know if the data collected will be anonymous or directly linked to your identity.
This will likely be one of the more controversial updates, but if it’s done correctly, it could give users a much better picture of how much personal info they’re giving up every time they download a new app.
Recording indicator
A simple dot in the top right corner of the screen now indicates when the camera or microphone is recording you. Many conspiracy theories claim that apps constantly listen and watch in the background to target you with ads, but now Apple will let you know for sure when something is recording.
It’s hardly noticeable when you’re using it in everyday life, but I look forward to a time when the dot shows up and I have no idea why and it makes me paranoid forever.
Separate focus and exposure controls in the camera app
Apple’s camera hardware has been great for years, but the stock camera app is overly simplistic. Now, it offers more manual controls, including the ability to lock the focus in one spot and the exposure metering in another. That makes shots like silhouettes of dark shapes in front of dramatic sunsets much easier to execute. It’s a simple upgrade, but for photo nerds like me, it’s a notable one.
Tap the back to launch
As part of the accessibility additions in iOS 14, users can now tap on the back of the phone—you can use two or three taps—in order to perform certain actions. For instance, you can map three taps on the back of the device to take a screenshot. Apple has allowed users to shake the device in order to perform some tasks without actually touching the screen, but I have never found those particularly handy. This, however, seems much more practical at least in the short time I’ve used it so far.
Macs are more popular than ever before - but for people still making the switch from Windows to Apple’s OS for the first time there can be a lot to take in. Here are 20 of our top tips to help you master your Mac
1. Take a screenshot of a specific part of the screen
Taking a screenshot is all well and good, but more often than not you don’t actually need the whole screen in the capture. On Macs there’s a simple way to grab just the part of the screen you want: Cmd + Shift + 4.
From there, click and drag out a box over the part of your screen you wish to capture. Upon release the image will be saved to the desktop. If you do just want to grab the whole screen, press Cmd + Shift + 3 instead.
2. Rename large batches of files all at once
Renaming files is tedious at best. Renaming a hundred holiday snaps in one sitting is downright torturous. If you’re running the latest version of OS X – Yosemite – you can do it with one simple action.
Select all the files you want to rename and right-click them, then click Rename. This presents you with three options for renaming. Replace Text allows you to change, for example, the ‘IMG’ part of a set of files with something more relevant. Thus ‘IMG_01’, ‘IMG_02’ and so on become ‘Dad’s birthday_01’ and ‘Dad’s birthday_02’, or somesuch.
3. Run Windows on your Apple machine
Contrary to popular belief, it is possible to run a copy of Microsoft Windows on a Mac. It’s also surprisingly simple to do.
Navigate to the Applications folder on your Mac, and then to the Utilities folder. Within that is a programme called Boot Camp. It will now ‘partition’ your hard drive – this essentially means split it between Windows and Mac. You can choose how you split the ratio, but remember that storage allocated to one OS is not accessible by the other. Click Partition to start the process.
Upon restarting your Mac will ask for a Windows installation CD. If you don’t have one you will need to purchase one – it can be either Windows 7 or Windows 8. When it asks where it should install select the partitioned section of your hard drive.
Want some more help with your Mac?Our friendly tech team can help you with one-to-one support on a range of tech issues. Find out morehere.
Once completed your Mac will boot into Windows for the first time. Surreal eh? From now on, whenever you turn your machine on simply hold down the Option key and you can choose between Windows or OS X. Bear in mind there is no way to switch operating systems on the fly, so make sure you choose the right one or you’ll have to restart.
4. Add your signature to documents
If you’ve ever had to return an official document that’s been sent to you digitally you’ll know the pain of having to add your signature. With Mac OS X, there’s a much better way.
Open the document you need to sign within the Preview application. Click the pen icon near the top right-hand corner of the screen and select Create Signature from Built-in iSight. iSight is your Mac’s built-in webcam, which it will use to capture your signature. Sign your name on a plain white sheet of paper and hold it up to the camera. Align it properly using the guides on screen and the camera should automatically extract it. Click Accept to save it.
To use it in the future just follow the first steps of this guide, only instead of clicking the Create Signature option there will be a preview of your existing signature.
5. View all special characters
Click on the magnifying glass icon in the top right of your screen and search for a program called Character Viewer. Open it and you’ll be granted access to every special character Mac OS is capable of displaying. When you find the character you want double-click it to insert it into the text field you’re currently editing.
6. The Mac equivalent of Ctrl + Alt + Delete
Mac has it’s own equivalent of Ctrl + Alt + Delete. Should you find yourself unable to exit a program, hold down the Cmd + Option keys and press Esc. This will bring up the Force Quit dialog box, which will show you all running applications and allow you to forcefully terminate them.
7. Switch between multiple windows within the same program
Using the Cmd + Tab keys you can quickly switch between your open programmes. However if you have, say, three Word documents open at once that you wish to switch between, you’ll need a different shortcut.
Cmd + ~ will instantly switch between multiple windows of the same programme. This will work for any application.
8. Instantly look up a word in the dictionary or thesaurus
OS X’s reference tool is wonderfully integrated. You can access it from just about anywhere to look up whatever word may be causing you trouble. Select the word you wish to learn more about and press the Cmd + Ctrl + D keys. Alternatively, if you’re on a MacBook just click it with three fingers on your trackpad.
9. Start up your Mac silently
Even if you’ve never used a Mac before you may well be familiar with the iconic chime it lets off every time it starts up. Unfortunately, that sound is often quite the inconvenience. If you’re somewhere where silence is paramount, such as a class or library, just hold down the Mute key at startup.
10. Convert any sort of unit within Spotlight
Spotlight can find things both on your Mac and online, and also solve some basic queries without resorting to opening a new window. One such query is unit conversion. All you need to do is type in the figure you want converted, for example ’57kg’ and it will show you a list of conversions as a search result. This even works with currency, provided you’re connected to the internet.
11. Trouble finding your cursor? Make it grow
One of the most innovative features of the El Capitan update to OS X was the ability to make your cursor reveal itself if you’re having trouble finding it. Simply wiggle your mouse or run your finger rapidly back and forth across the trackpad to have it balloon in size. Once you’ve located it, simply stop and it will shrink back to normal.
12. Merge Finder windows
Gone are the days of having to open up a thousand Finder windows when attempting to manage files all around your Mac. If you find your screen filling up with new windows then click on the Windows option in the menu bar, then click Merge all windows. What was previously multiple windows will now appear as neat little tabs within one window.
13. Disconnect from a wi-fi network without turning off wi-fi
Hold down the Alt key and click on the wi-fi icon in your Mac’s menu bar. This will reveal all the options you usually see when clicking on it, plus a larger list of information underneath the name of the network you’re connected to. Directly underneath your network should be an option labelled Disconnect from [your network name]. Give it a click and you’ll disconnect – no need to restart your wi-fi.
14. Record your screen
Sometimes a simple screengrab isn’t enough, and you’ll want to capture something animated. To do this you can use a feature built in to QuickTime, a program that comes with every Mac as standard. Go to your Applications folder (if it’s not already on your shortcuts bar) and open it. Click File > New screen recording. This will allow you to record the whole of the screen, or just a portion of it. It’s super useful for things like tutorials – it can also capture sound.
15. Calculate sums in Spotlight
OS X may have a calculator widget built in, but there’s an even easier way to do quick calculations. Click on the Spotlight icon in the top-right corner of your screen, and then go to type in your sum. +, -, /, * and = correspond to the plus, minus, divide, multiply and equals functions on a conventional calculator. Your result will pop up in the Spotlight box beneath.
16. Quickly add a foreign or accented character
Those of you who are used to Windows computers may well be familiar with what a nightmare it is remembering and executing the shortcuts for common foreign characters, such as é or ü. Fortunately, OS X makes things infinitely easier.
To type a foreign character or character with an accent above it, first find the simple version of the letter you require (e.g. a for á or s for ß) and hold the key down. After a brief pause, you’ll be offered a choice of which variant on the letter you want in a little pop-up box above where you’re typing the letter. Select the one you want and it will be inserted into the text field.
17. No Delete key? No problem
Not every Mac keyboard comes with a Delete key (often stylised as ‘Del’). Instead of jumping to the end of the word you want to erase via backspace every time, just hold down the Function key and press Delete. This is mainly a problem that will affect MacBook users, but in the event that you’re using a separate keyboard with neither a Delete key or a Function key, holding down Control and pressing D also works.
18. Change volume silently
The volume keys on Apple keyboards are undeniably useful, but there’s one big problem with them – they make noise when you press them, meaning that any attempt to stealthily silence your Mac is immediately thwarted. Unbeknownst to many, though, you can actually mute those volume keys – just hold down Shift whilst pressing them.
19. Find a forgotten password for a website or program
For almost all of the programs on your Mac, as well as many of the websites you visit on it, your login and password details will be stored away, deep within your Mac’s keychain. Don’t worry, they’re encrypted and only accessible locally by the user they apply to.
If you forget one of these passwords, you can actually recover them from within your Mac – as long as you remember the password for your user account.
Open a new Finder window and head into your Applications. Within this folder should be another folder named Utilities. Open up a program within it called Keychain. You can now see every login stored on your computer. You can sort them by name or type, or you can search for the one you’re looking for using the search tool in the top-right corner.
If you want to view the password for any of the logins, you’ll be prompted for your username and login, just as you would be if you were to install a new program or make security changes to your Mac.
20. Annotate a PDF or image
With PDFs – the predominant file type of choice for business communications – it can be very frustrating that you have no way to easily edit them – until now. Double click on your desired PDF file and it should open up in Preview, the default PDF viewer on OS X (if not you can find it within your Applications folder. Open it and then select File > Open from the menu).
Now, click on View in the menu bar and select Show annotations toolbar. From now on, this toolbar will always display alongside PDFs you view. It lets you highlight, scribble, annotate and draw shapes. You can then save a fresh copy of your PDF (using File > Save As) and return it to the sender so they can see your changes.
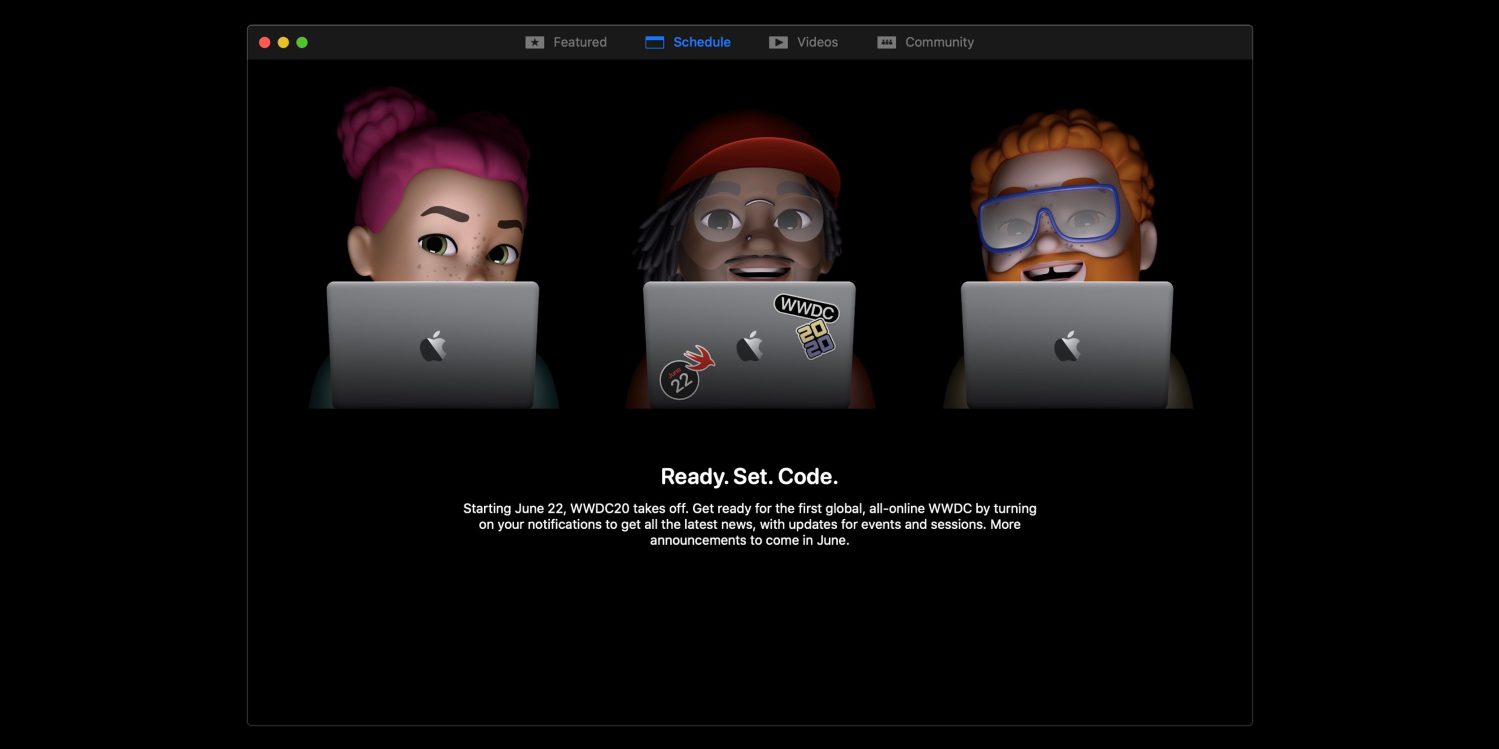
WWDC 2020 is set to start on June 22nd as a virtual event and Apple has said it’s planning to share more about what to expect through its Developer app later this month. However, a Mac version of the app is still missing. Fortunately, the unofficial WWDC app for Mac has been updated and is ready for this year’s digital WWDC with some notable new features.
Created by 9to5Mac’s Gui Rambo along with a small global team, the Unofficial WWDC app for macOS (free) is the best way to plan what you want to get out of the event, livestream current sessions, rewatch past ones, and connect with the Apple dev community on your Mac. This year with WWDC going virtual for the first time due to the pandemic, a Mac app will be more useful than ever.
At the end of 2019, Apple rebranded the WWDC app as the Apple Developer app. It will be a crucial piece of the WWDC 2020 experience and is available for iPhone, iPad, Apple TV, and Apple Watch, but a Mac app is still missing.
The Unofficial WWDC macOS app has a clean, native interface for the best WWDC experience on your Mac and has been updated today with a number of new features including an all-new Community tab that features content from Apple devs from a variety of sources and a new clip sharing tool to easily share small portions of sessions.
Two other handy updates include support for Universal links as well as transcripts in English, Chinese, Korean, and Japanese.
Amazon's Fire tablets are incredibly popular, mostly because they're incredibly cheap. However, none of them come with access to the Google Play Store, which is how most Android devices download and install applications. Instead, Fire tablets come bundled with the Amazon Appstore, which has a much smaller library and lacks any Google-made apps and services. No YouTube, no Chrome, and so on.
The good news is that it's not incredibly difficult to install the Play Store on a Fire tablet, and the whole process can take as little time as 10 minutes. This complete guide for installing the Play Store on Fire tablets has detailed instructions for every model produced since 2014, with added troubleshooting steps if you run into issues.
IMPORTANT INFO
Remove your tablet's microSD card if you have one installed. If you don't, the Play Store and its required may be automatically installed to the microSD card, which can cause issues. You can put the card back in once you're done.
There is no way to manage a Fire tablet through Google Family Link, even after the Play Store is installed.
Apps installed through the Play Store might not work with Amazon FreeTime app management. I haven't personally tested this, but that's what many people have reported in the comment section.
Some apps hide themselves from the Play Store on Fire tablets, because Fire tablets are not SafetyNet-certified by Google . Netflix is one app that does this. For those applications, you can try finding them on the Amazon Appstore .
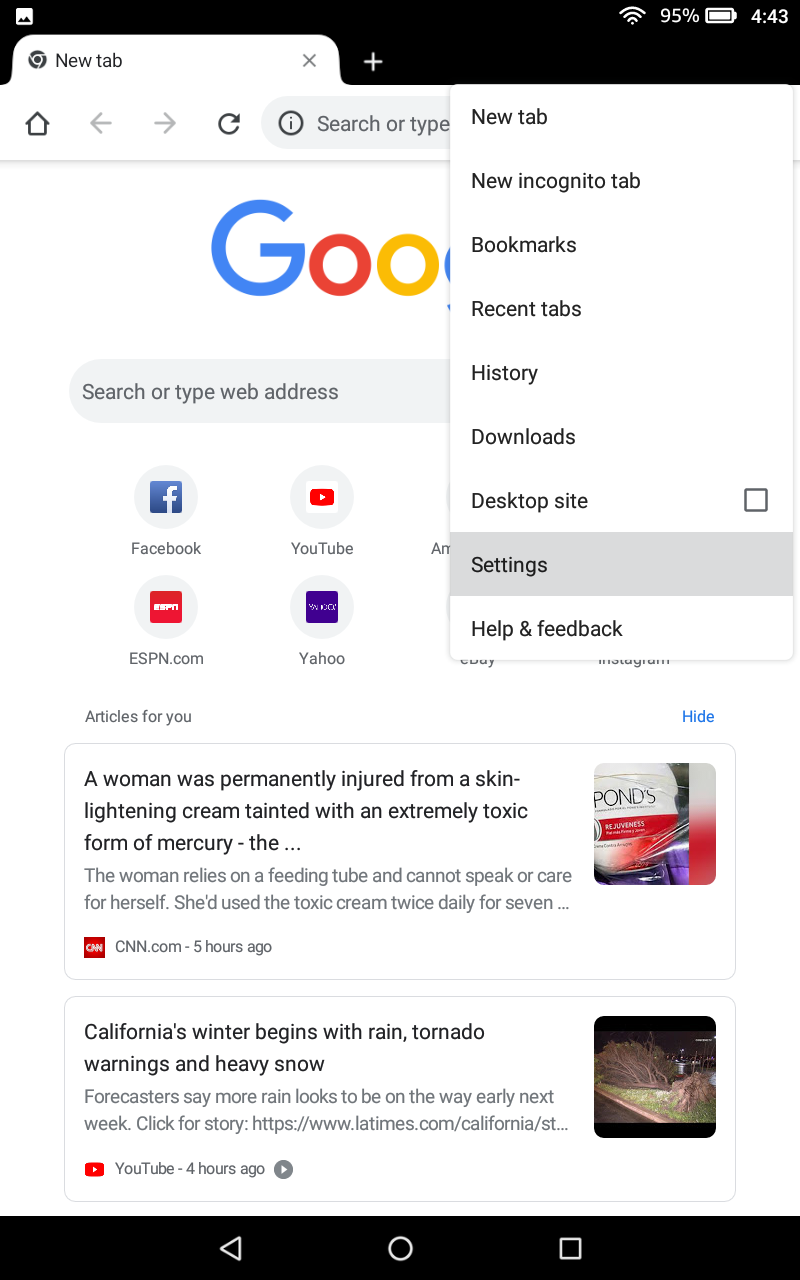
Enable installation from unknown sources
The first step in this process is to enable apps to be installed from outside the Amazon Appstore. This allows you to open and install applications from downloaded APK files, which is how we'll get the Play Store running.
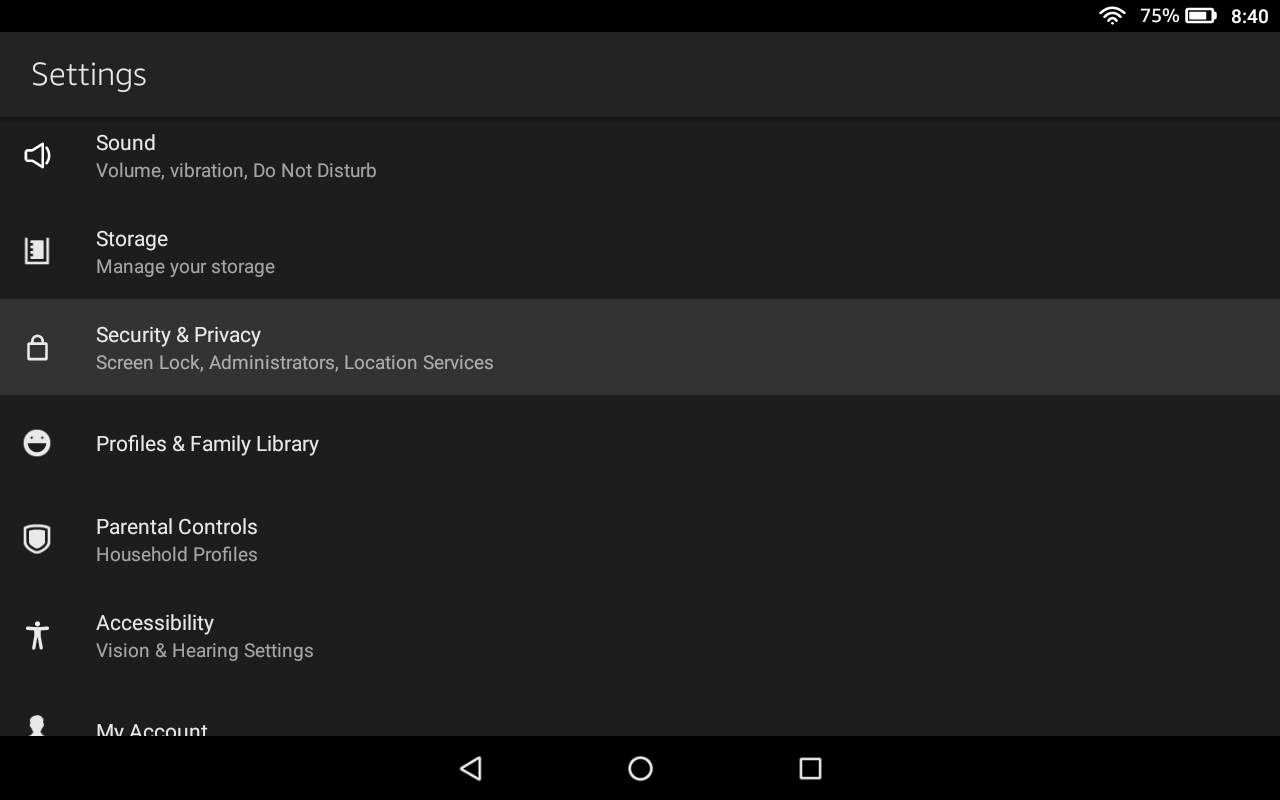
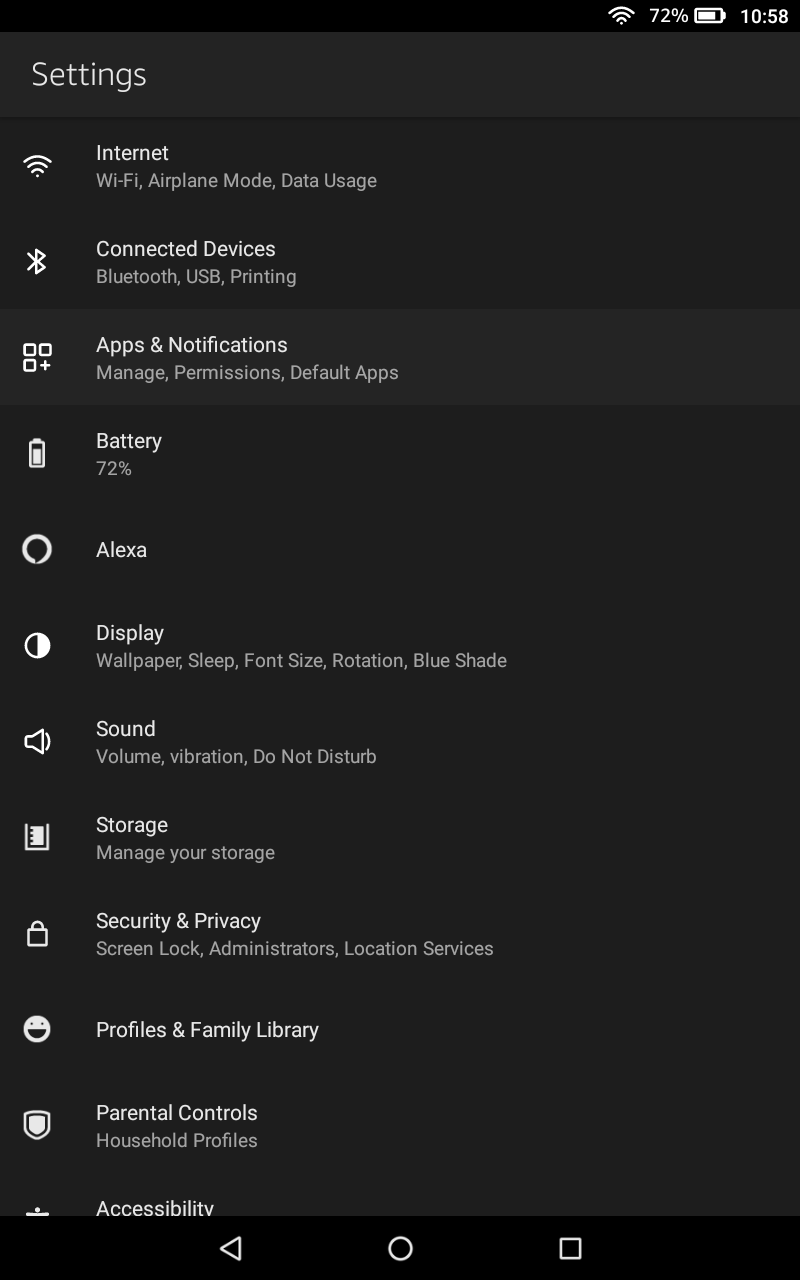
First, go to the main 'Home' page on your home screen and open the Settings app. Then tap the 'Security & Privacy category (older models might just say 'Security'), find the switch for 'Apps from Unknown Sources,' and turn it on.
If tapping 'Apps from Unknown Sources' brings up a list of apps, then you don't need to do anything. You may receive a popup when installing APKs, but you'll just have to tap the 'Allow' button when prompted.
Now you're ready to download and install the APKs needed to get the Google Play Store running.
Install the Play Store
The next step is to download the proper APK files for the Play Store. You technically have to install four different applications — Google Account Manager, Google Services Framework, Google Play Services, and finally the Google Play Store. The first three apps handle basic account services and add APIs, while the last app is the store itself.
Because different Fire tablets run different versions of Android with varying hardware, the exact APKs you have to install depend on what Fire tablet you have. If you're not sure which model you have, open the Settings app again, tap on 'Device Options & System' (it might also just be called 'Device Options'), and look at what is listed under 'Device Model.
For the Google Account Manager and Google Services Framework applications, find the appropriate links for your device from the table below, and tap the main 'Download APK' button on the linked page. Don't open the downloaded files yet, we'll do that later.
GOOGLE ACCOUNT MANAGER
Fire HD 10 (9th Gen), Fire 7 (9th Gen), Fire HD 8 (8th, 10th Gen)
For these last two applications, click the link for your device, then select the version closest to the top of the list which doesn't have "beta" in the name. Again, don't open the files yet, just download them.
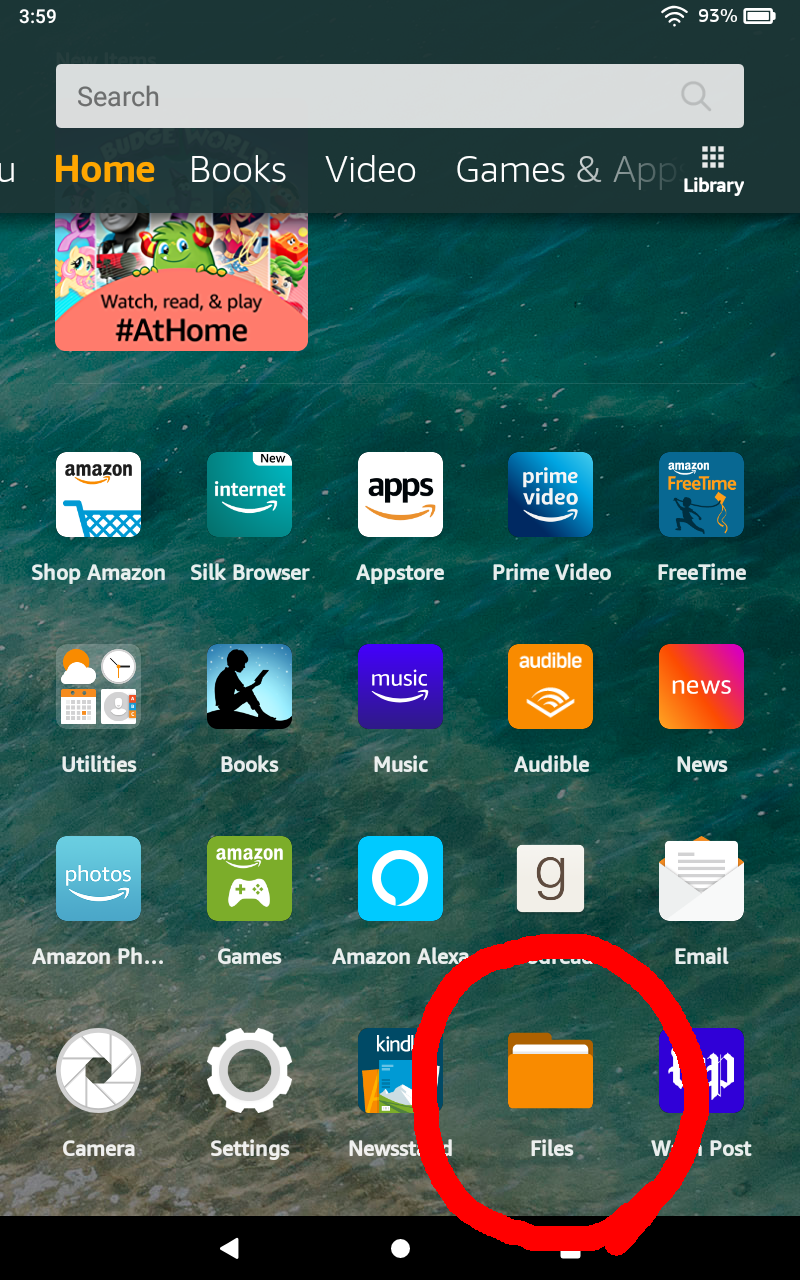
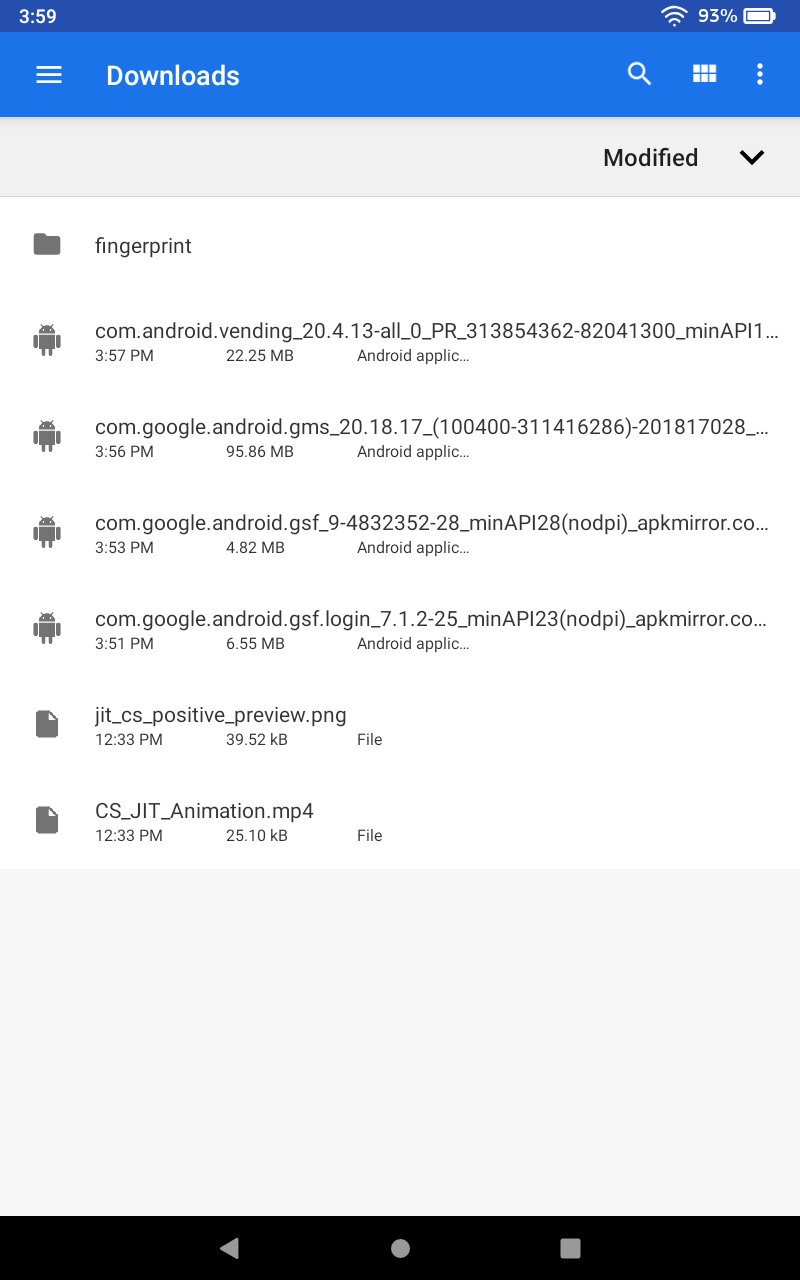
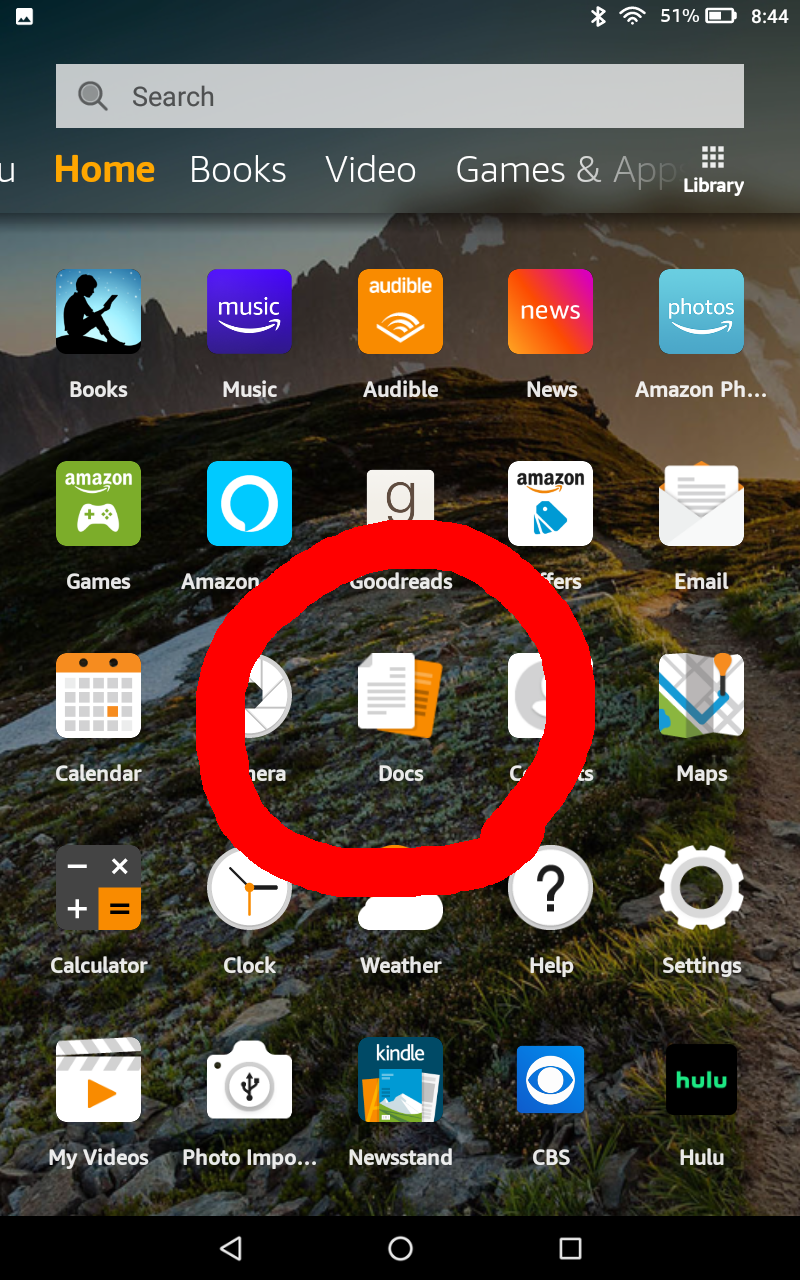
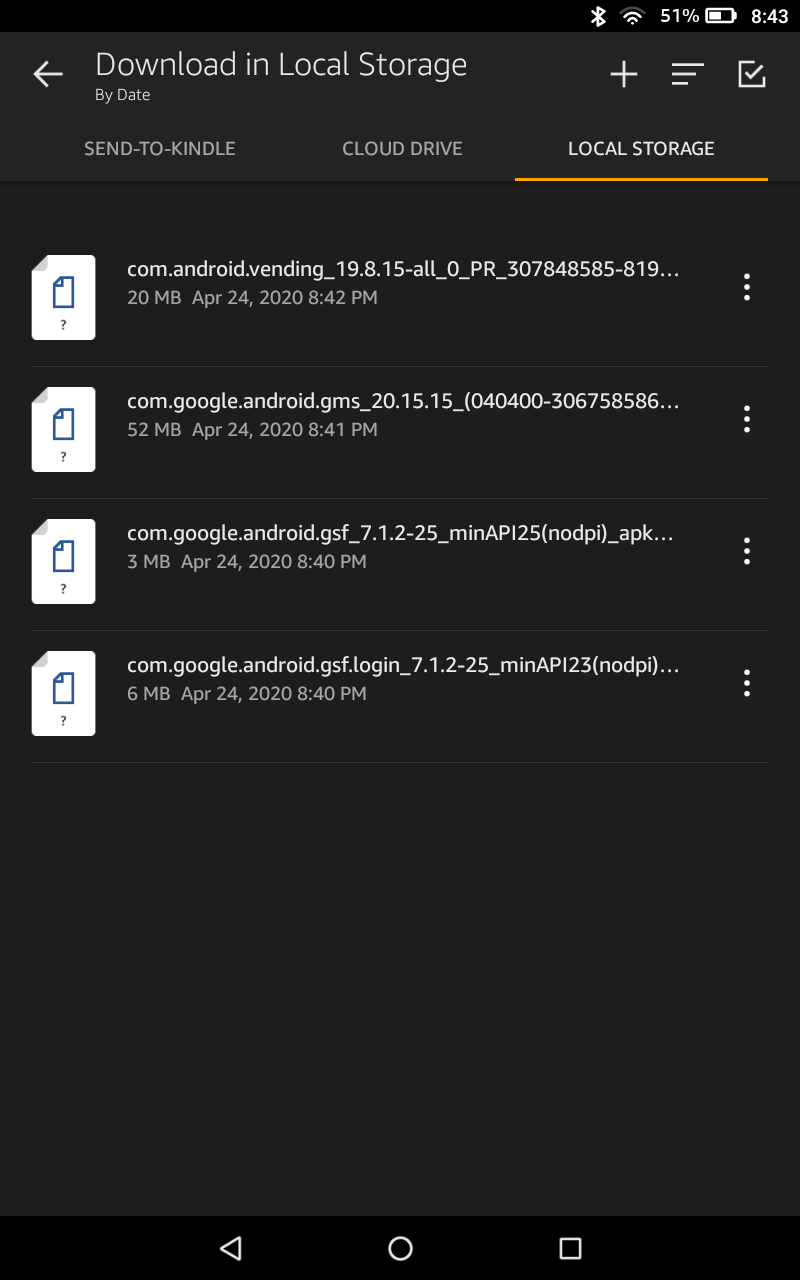
Now it's time to install the apps. Find the Files app on your tablet (it might also be called 'Docs' or 'Documents') and open it. Then, find your device's Downloads folder. On most Fire tablets, this is located in the side menu.
Finding downloaded APKs on a 2020 Fire HD 8
Finding downloaded APKs on a 2018 Fire HD 8
You should see all four APK files. If not, go back and see which one you missed (or just download all of them for good measure). Also, switch to the file list view if you haven't already, so you can see the full names of each APK.
Open the apps in the below order, and when the installation is complete, press 'Done' and not 'Open'. Installing the apps out of order will cause the Play Store to not work. Also, if you have an SD card, make sure to take it out during these installations.
com.google.gsf.login
com.google.android.gsf
com.google.android.gms
com.android.vending
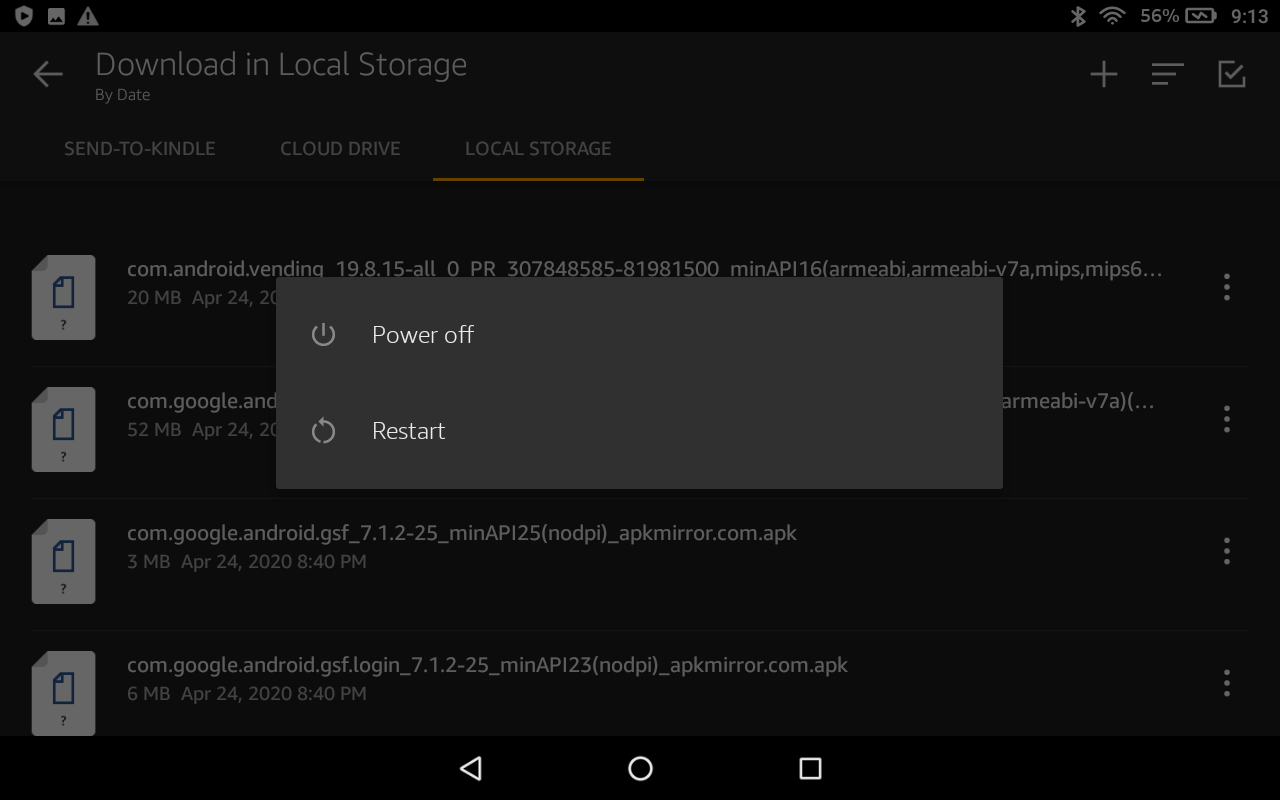
Once you have installed all four apps, hold down the power button, and tap 'Restart' to restart your tablet. Older tablets might only have the option to power off — if so, let the tablet shut down, then hold down on the power button to turn it back on.
Restart (or power off, and back on again) after you finish installing the Play Store.
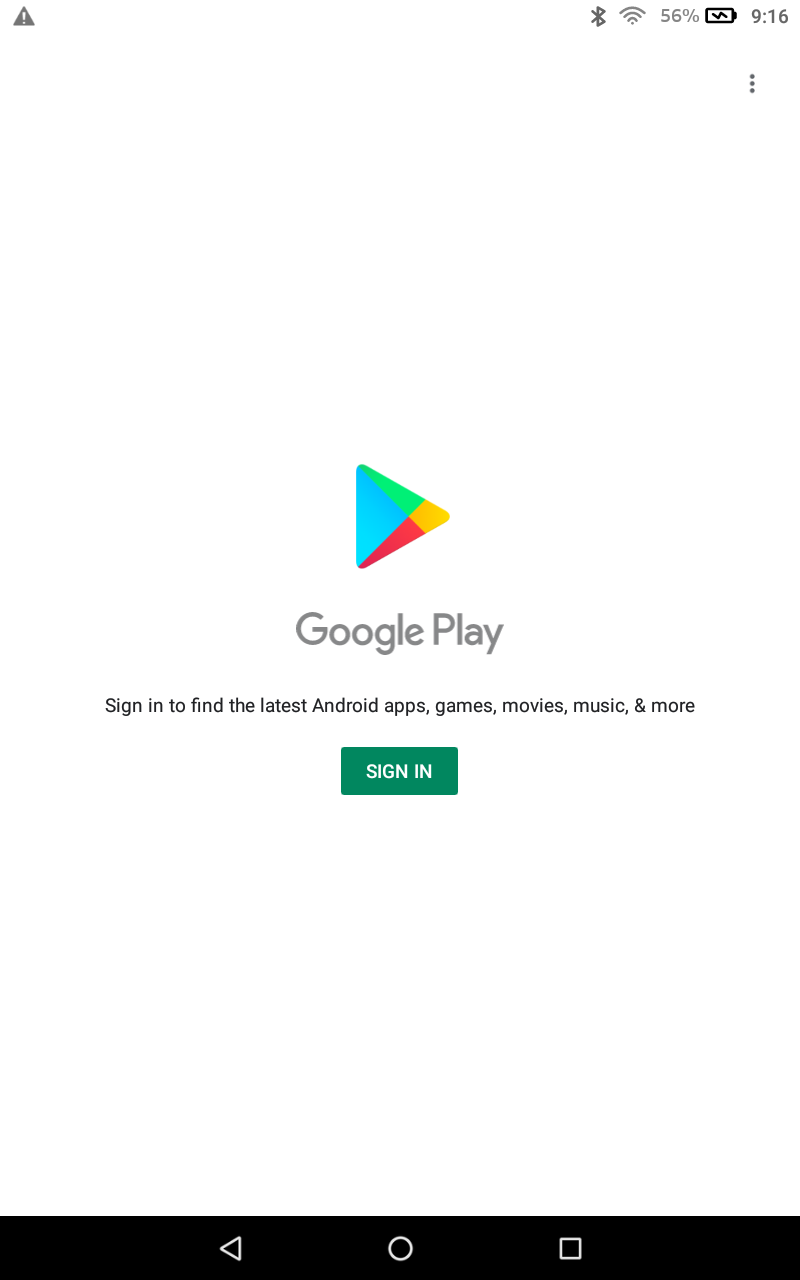
After your Fire tablet has booted back up, open the new Play Store app from the home screen. From there, the Play Store should ask you to login with your Google account, and then finally allow you to download and install apps.
Fixes for common problems
If the Play Store or other Google apps aren't working correctly, here are some fixes for common issues.
"This account already exists on your device"
If you get the error "This account already exists on your device" when signing into Chrome or another Google app, or if the app won't detect your Google account at all, follow these steps:
Completely close the app you're having issues with (e.g. swipe it away in the Recents/multi-tasking screen).
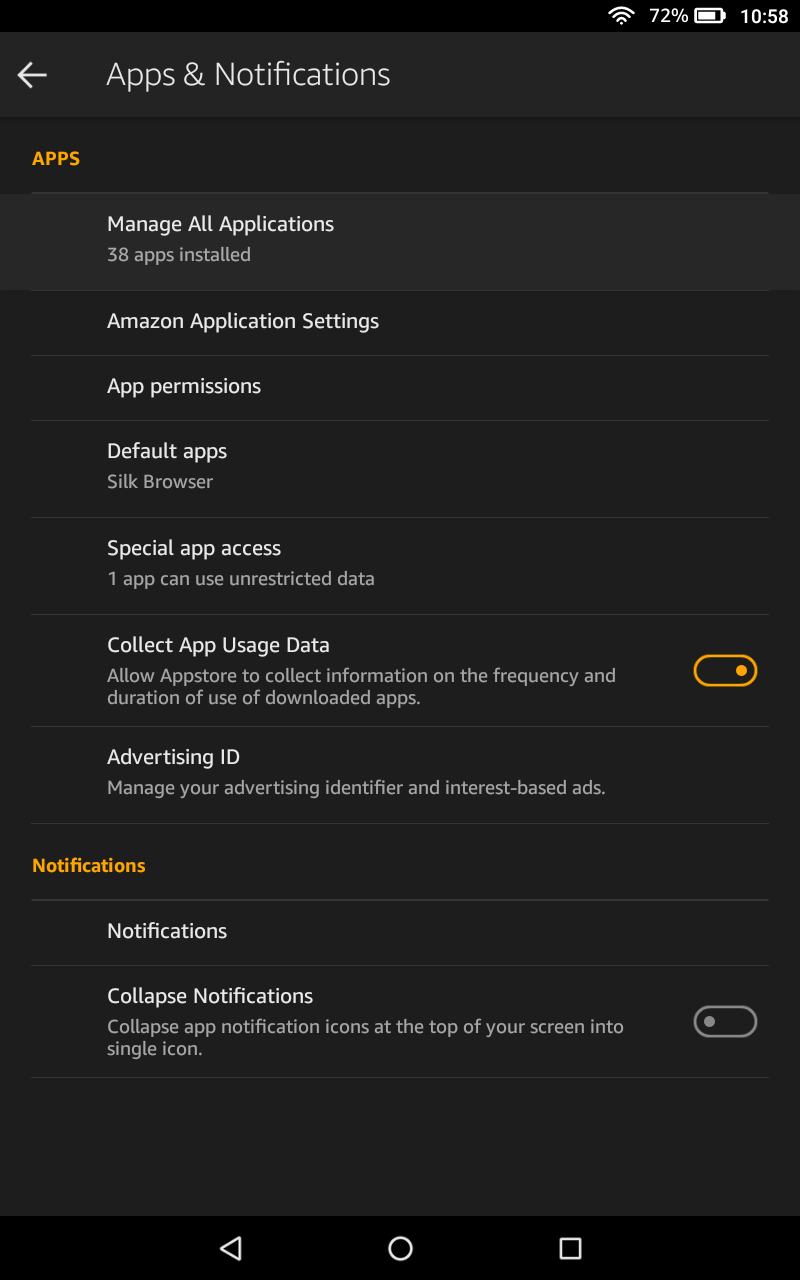
Open the Settings app, tap Apps & Permissions, then select 'Manage all applications.' These options might have different names, depending on your version of Fire OS.
Find the app you're having issues with in the list, tap on it, and select 'Permissions'.
Switch all available permissions to 'On'. Enabling the Contacts permission alone did the trick in my testing, but you might as well enable everything for good measure.
Open the app again.
In Chrome's case, you also have to open the browser, tap on the Settings menu, and tap the 'Continue as...' blue button at the top of the screen.
Troubleshooting
If you're having a different issue than the ones listed above, here are some generic troubleshooting tips.
Reboot your tablet
This might be obvious, but it's a good step to take. Hold down the power button, tap the 'Power Off' option, and turn your tablet back on by holding down the power button again. Once it has booted back up, open the Play Store from the home screen and see if it works.
Clear app data
When I initially wrote this guide, I wasn't able to sign into the Play Store until I cleared the app's local data. This will essentially reset the Play Store app to its original state, and should fix most problems you might encounter.
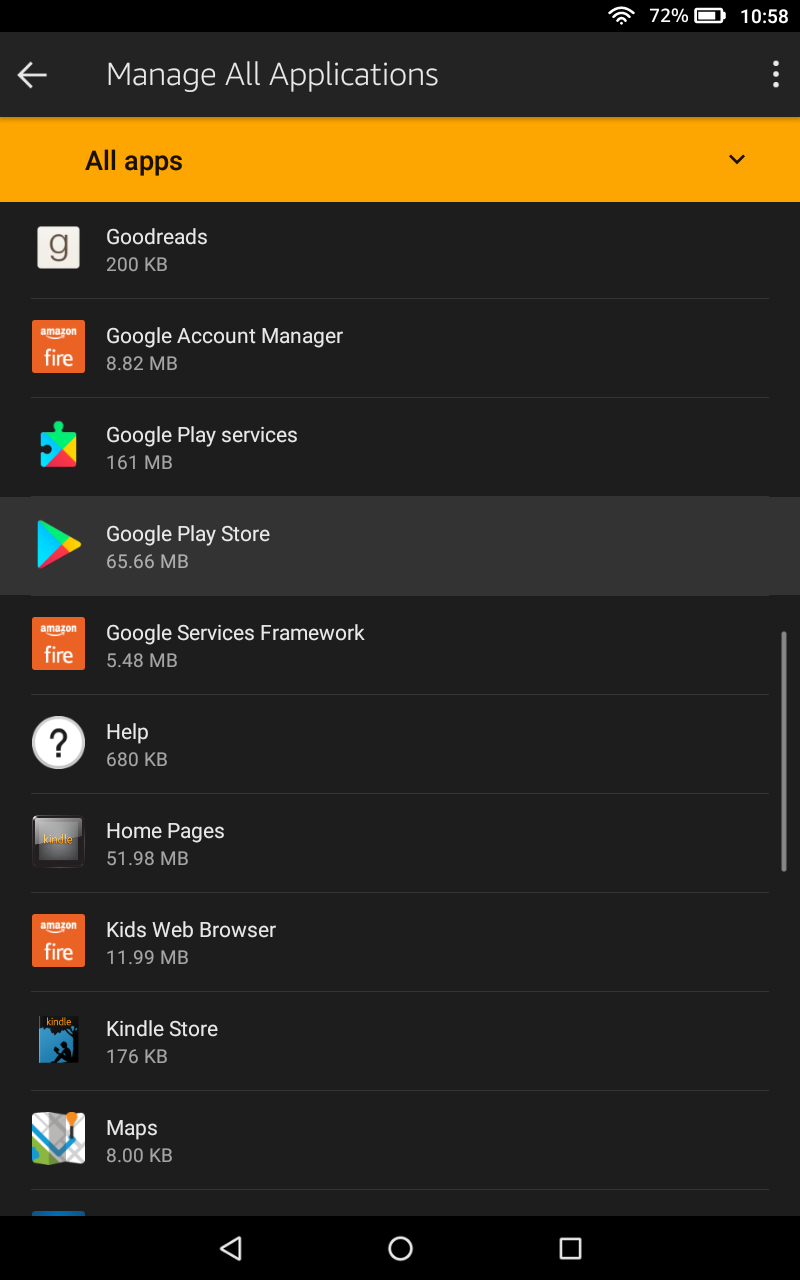
Open the Settings app, select the 'Apps & Notifications' section (or whatever else has 'Apps' or 'Applications' in the name), and tap 'Manage All Applications.' Find the Play Store in the list of apps and tap it.
You have to perform two steps on this info screen. First, press the 'Force Stop' button to stop the Play Store from running. Then press the 'Storage' menu option and tap 'Clear Data' (it might also be called 'Clear storage'). Now return to the Play Store app and see if it works.
If that didn't help, follow the above steps again, but restart your tablet before trying to open the Play Store. If that didn't work either, try force-stopping and clearing data for Google Play Services in addition to the Play Store.
Reset the tablet
If you still can't get the Play Store to work, your best option is probably to factory-reset your tablet and try again. Make sure you don't restore from a backup when you're setting up the tablet again, unless the backup was made before you tried to install the Play Store.
Stuff to do afterwards
Congrats, your Fire tablet now has the Google Play Store! Pat yourself on the back. Now that the hard part is over, here are some things you should do or keep in mind.
Install Google apps
Now that you have the Play Store, you can download all the Google apps you couldn't download before! Here are some suggestions — if you're reading this on your Fire tablet, the links will take you right to the app's Play Store page.