Is there a way that allows you using a locked iPhone while you are trying to fully bypass your iCloud Activation lock feature? Have you heard of iCloud DNS unlock? This is exactly what you need when for some reasons your iDevice [either iPad or iPhone] asks for the passcode which you can’t remember or get from the previous owner.
We won’t list all the reasons why the Activation Lock option on iOS 7 or iOS 8 blocks your access to your Home screen. This post has a different purpose. It is written to help you partly bypass the lock until the professional services or Apple provides you with the complete bypass of iOS Activation lock.
We won’t list all the reasons why the Activation Lock option on iOS 7 or iOS 8 blocks your access to your Home screen. This post has a different purpose. It is written to help you partly bypass the lock until the professional services or Apple provides you with the complete bypass of iOS Activation lock.
Unlock iCloud DNS Using iCloudDnsBypass Server
There is the website https://iclouddnsbypass.com/ where anyone who has a locked iPhone or iPad can partly bypass Activation lock for free. This server cannot fully unlock your gadget but it gives you the possibilities and options that are not available to those users who cannot get to their Home screen which keeps asking for the passcode.
What can you do using this DNS server?
Firstly, it allows you playing your iOS games. Secondly, it gives you a chance to take photos using your camera. Thirdly, with its help you can watch YouTube videos and even record videos to your Dropbox on the iCloud locked Apple iPhone 6 / 6 Plus / 5S / 5c / 5 / 4S or iPad.
The server is pretty popular. It has over 57,000 iDevices connected to it and more and more users join it since it supports all versions of mobile firmware, including iOS 8, iOS 7, iOS 6 and so on. The good news is that blacklisted iPhones are supported as well.
So if you have Find My iPhone feature ON in Cloud and doesn't have access to files on iPhone use this DNS routing method and enjoy!
Who has created iCloudDnsBypass server?
The idea and the DSN / HTTP servers belong to Ukrainian developer July Ighor. They are coded on C+++ and can hold thousands of gadgets with ease. The service is secure and doesn't use Proxy service. It usues DNS routing only.
To start using this DNS server that doesn’t ask for any additional 8.8.8.8 servers that are believed to slow down Apple services, you have to download it [it supports Windows computers only] using this link. Here is a step-by-step instruction on how to use the server.
Shortly here is what you’ll have to do:
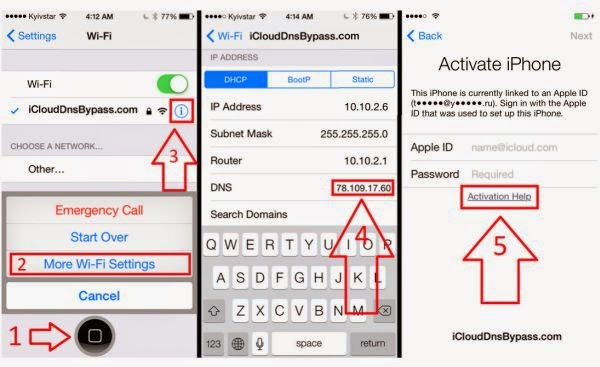
Step 1. Download the DNS Server in order to bypass iCloud Activation lock on the iDevice and install it.
Step 2. Click on your Home button and select More Wi-Fi Settings where you will see iCloudDnsBypass.
Step 3. Configure your local DNS server or use 78.109.17.60 and you are good to go.
Issues and Fixes
If your provider doesn’t let you connect to custom DNS server after you tried to reboot, you can still use the dedicated DNS developed by July Ighor. After you launch the application you have to choose your context menu and just store local DNS IP to your iPhone or iPad. This should solve the problem.
Users who get error 80 while trying to connect to their local DNS IP should click on Help button and see what is possible to do [such error means that you have another application that is already using the same port].
That’s it. Enjoy iOS games, music, YouTube and record videos / take images to Dropbox even if you are iCloud locked for a while