Pixel art is a form of digital art that was born from the need to communicate imagery on the limited storage space of 8 or 16-bit computers and video game consoles.
Sometimes, the process of creating pixel art is called "spriting," which comes from the word "sprite." This is a computer graphics term used to describe a two-dimensional bitmap that is integrated into a larger scene (usually a video game).
Are you interested in creating some pixel art of your own? Here's everything you need to know to get started.
The Essential Tools for Pixel Art
Contrary to popular belief, powerful or expensive software doesn't guarantee quality art! Choosing a program is only a matter of preference.
If you're a Windows user, you can even use something as basic as Microsoft Paint. Here's a more extensive list of some tools that you can use to create pixel art.

All you really need to make pixel art are the following tools (so make sure your program of choice has them):
- Pencil: your basic drawing tool that, by default, places one pixel.
- Eraser: erases or removes pixels that you have drawn.
- Eyedropper: copies the color of the pixel you select for you to reuse.
- Bucket: fills an empty area with one solid color
Other useful tools include selection, line, recolor, and rotation tools. They aren't absolutely necessary, as you can accomplish the same effects using the tools listed above.
You want to steer clear of brushes, blurs, gradients, and other automatic tools to ensure you have control over every pixel on the canvas.
As for hardware, anything to control your cursor is perfectly fine. A trackpad or a mouse is great for precision and details. A graphics tablet, meanwhile, might be your preference for better control over long strokes.
How Big Should Your Sprite or Canvas Be?
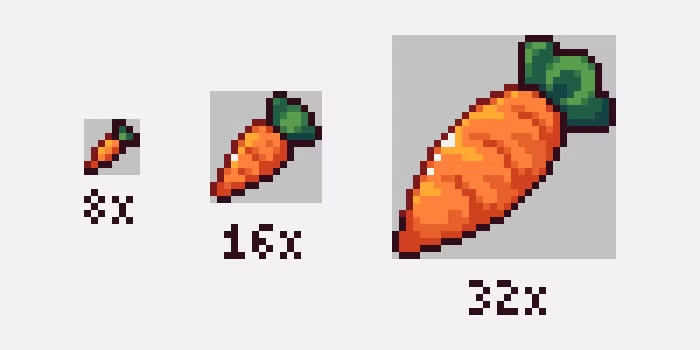
There is no wrong answer for sprite size. But multiples of eight in powers of two are most common (e.g. 8×8, 16×16, 32×32, etc.) because old computers could not display them properly otherwise.
Personally, we recommend starting small, because it can help you quickly learn the basics. After all, pixel art came about because artists wanted to make the most out of every pixel and color used, as their hardware could only handle so many.
You're forced to get creative when you have to work within limitations. Focus on getting good at maximizing the space of a tiny sprite. After that, you can then level up to bigger sizes to squeeze even more detail in there.

And if you want to put a character in a scene, then you're going to have to think about canvas size too.
A good way to go about this is to consider the ratio between your sprite and the rest of the screen. How big or small do you want your character to be in comparison to the world they're in?
Game developers, it's worth knowing that a majority of monitors these days have an aspect ratio of 16:9. This means that for every 16 pixels in width, there are nine pixels in height.
Whatever resolution you ultimately decide on, you typically would work in a much smaller canvas size, then scale up to that bigger resolution when you're finished.

At the same time, you want to resize by whole numbers when scaling your pixel art, or else things might look a little wonky. It's important to make sure that your math checks out before you start creating pixel art!
Let's say you wanted to achieve the standard resolution of 1080p. You could work on a 384×216 canvas, and then scale up 500 percent larger.
Scaling should also be the last thing you do. You don't want to scale upward, and then continue drawing with your one-pixel pencil tool. That will leave you with different pixel ratios, which never looks good.
The Spriting Process

So you've got your canvas open—what now? Well, just like every other form of art, the possibilities are endless. There isn't just one way to do it.
To give you a starting point, here's a step-by-step tutorial of how you might want to begin your project. You are completely free to follow along exactly, skip some steps, or add steps of your own.
1. Start With a Rough Sketch
Start your sprite by dragging the Pencil tool around, drawing in the same way you'd draw with pen and paper. It doesn't need to be perfect.
Whatever mess you make, we'll clean up later. All we're aiming for in this early stage is to get your idea and its composition on the canvas.
2. Clean Up the Line Art
Now it's time to make things a little more presentable. We're going to take your rough lines and chisel away at them to clean up stray pixels.
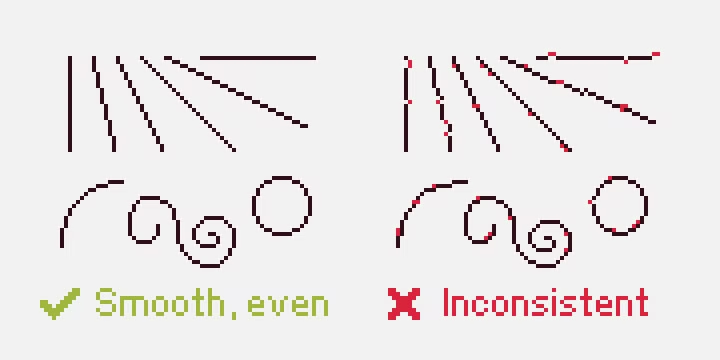
Single pixels, or a group of pixels that break up the consistency of a line, are called "jaggies." Jaggies are exactly what we're trying to avoid.

Oftentimes, the problem is simply that a segment of the line is too long or too short, creating an awkward jump. You want to use a uniform length of pixels for a smooth-looking transition on a curve. Don't surround a row of pixels with bigger ones.
It's impossible to avoid jaggies altogether (unless your artwork consists only of basic shapes), but you want to try and keep them at a minimum.
3. Introduce Colors
It's time to grab your Bucket tool and fill in your sprite's line art with colors.
Normally, you want to limit yourself to a color palette. Back in the day, sprite size often dictated how many colors were on the palette as well. If a sprite was 16×16, that meant the artists had 16 colors to work with. Thankfully, technology has advanced since, and we're no longer limited to this rule.
The best palettes have varying hues that complement each other, different saturation values, and a mix of light and dark. Unless you already know how to use color theory properly, putting your own palette together can be tricky.
If you want someone else to do the thinking for you, Lospec is a great online database full of ready-made color palettes.
4. Add Details, Highlights, and Shadows
This is the best part of the whole process! It's where your art really starts to jump off the page. Now that we have the basic idea down, we can add all the little things to give your flat art the illusion of form.
Pick your light source, and start shading areas that are farthest from that light source with a darker color. Highlights should be placed in areas that are directly hit by light.

You can choose to keep your line art black or color it, but this all depends on your personal preference or art style.
5. Save Your Art
It's time to save your work! Scale to your desired size, and then choose a file format. In most cases, you'll want to save it as a PNG if your image is static.
But if your art has animation, save it as a GIF. What matters is that both formats support big areas of solid color and transparency.
Stay away from JPEGs unless you know what you're doing. It's a lossy file format that's meant for digital photos and other pictures that have smooth gradients.
Pixel Art: Easy to Learn, Hard to Master
Pixel art differs from digital drawing because of the constraints brought about by its grid-like nature.
That being said, it uses many of the same principles, so painters and other artists can pick it up fairly quickly. With lots of practice, anyone can become great at pixel art.
![How to Find IMSI Number on iPhone [Helps with iOS Unlock][Updated] data:post.title](https://blogger.googleusercontent.com/img/b/R29vZ2xl/AVvXsEjLjHwhnfUXNJTuiylqmlurhLRVAEVi803j6xcnvN8EZwF5_XUynz1y0Ko-vwpx6O3nT5hogTELahedGzgQpXM5Y99fcBliinyBu8ACw8_DVV3FpPLkIqR0u7v_HM39rAkpV5MyJiG1h5s/s72-c/find+imsi+iphone.jpg)