One of the best photo editors in the world for making composites is Photoshop. That's because there are dozens of helpful tools that have nearly an infinite number of uses when it comes to blending images together.
In this tutorial, we will show you how to combine three images together to create a fantastical composite.
Getting Started
Composites are made up of two or more images. It's a good idea to have all the necessary image files loaded into Photoshop to make the composite process easier.
We will be using three images to create our final composite. You can download these image files from Pexels to follow along:
1. Cut Out Subjects From Backgrounds
The most common task for making composites involves "cutting out" your subjects from their backgrounds. That's what we'll be doing for each of our climbers.
Our image of the woman making the funny face will be our main image that we'll add everything to.
These steps should be followed for each of the two climbers. Once they’re cut out, we will add both to the main image of the woman in the second part of this tutorial.
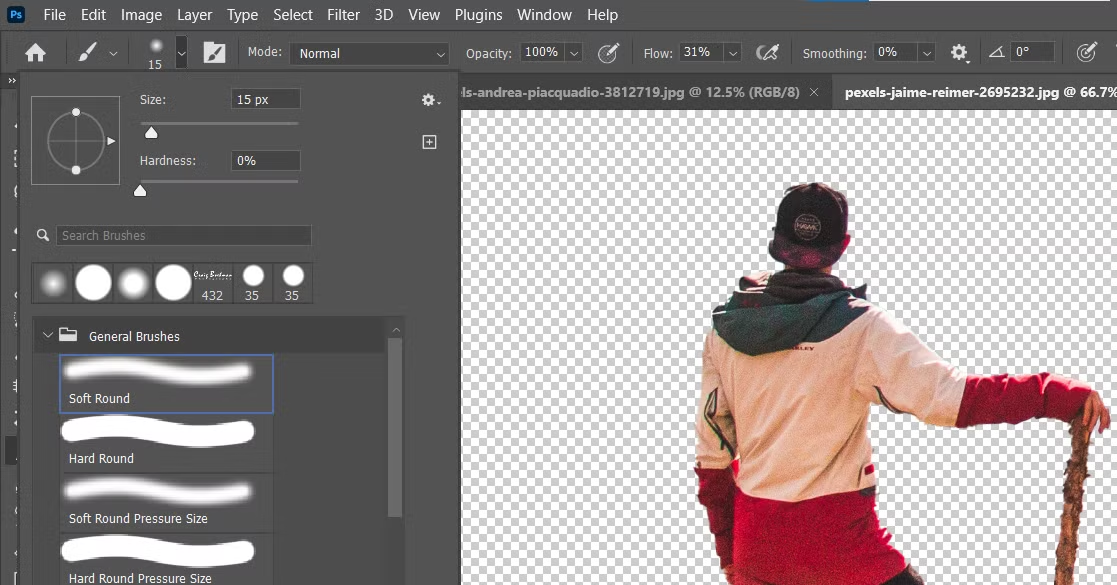
- Once the image of the climber is imported into Photoshop, go to Select > Subject.
- Go to Select > Select and Mask.
- Use Ctrl and the Plus (+) key to enlarge the image. Then, use the Spacebar and center the image with your mouse to view the details of the selection. The default selection color is red.
- Select the third Brush tool from the top left menu. Make sure the Plus (+) symbol is highlighted.
- With your mouse, paint Red onto any areas that should've been selected. In this example, part of the man’s foot and his walking stick need to be painted.
- Use the Bracket tools [ and ] to increase or decrease the brush size. If you make a mistake, click Ctrl + Z to undo your previous action.
- Go to the Output To dropdown menu at the bottom of the control panel on the right.
- Select New Layer with Mask and click OK.
- You should now be left with the cutout of the climber, and only see a checkered background indicating transparency. Repeat these steps for the image of the second climber.


Note:
If your selection of either climber is still in need of work, you can press B for the Brush tool to paint in missing portions or erase unwanted pixels. It's best to use a Soft Brush for this kind of work.
When painting, make sure the Foreground color is set to White to add to the selection. Alternatively, change the Foreground color to Black to erase from the selection. Toggle the X key to switch between colors.

Note that the second climber image will require you to make corrections either during the selection process or afterward using the above method.
2. Composite All Three Images Together
For the compositing portion, we will be adding the two climbers to the image of the woman. The climber who is standing will be shrunk and placed on the woman’s nose.
The second climber will be placed on the right side of the woman’s lip.
For the last step, we will add effects to bring all the elements together to make it look more natural. More advanced users may want to continue blending these images together using more complex techniques, but we’ll show you how to make a quick and passable version.
- Load the image of the woman into Photoshop.
- Navigate to the image of the climber who is standing. Left-click it, and hold the selection layer of the climber. Simply drag it with your mouse to the file of the woman at the top of the screen.
- When done correctly, your screen will switch back to that of the woman. Then, release the left-click. A new layer with the climber will show on top of the original image of the woman.
- With the Background copy of the climber selected, press Ctrl + T for the Transform tool. Click within the blue rectangle to position the man over the woman’s nose. Use the handles on the blue box to shrink the man down to a miniature version, as shown below. Then, press the Checkmark at the top to accept the changes.
- Next, we will repeat steps two through four for the second climber. But this time, we will place the climber on the right side of the woman’s lip. You’ll notice that we will have to flip the image so that the climber is facing the right way. To do this, press Ctrl + T, right-click in the image, and select Flip Horizontal.
- Pressing Ctrl + T, position the second climber as shown.
- We will want to crop this image so that the final image will better show all of its elements. Press C for the Crop tool. Select Square for ratio, and use the handles to crop the image as shown. Then, click on the Checkmark to finalize the changes.
- Double-click on the Hand tool to increase the image to full size.
- Using the Heal brush, clean up the ghost lines from the selections of the climbers. Use the Bracket keys [ ] to increase or decrease the size of the brush. It's best to make the brush size only large enough to erase the lines as you go.


3. Use Anthropics Smart Photo Editor to Enhance Your Composite
If you want to take your composite to the next level, it’s best to make all elements of the image appear as though they belong together naturally. This means putting in a bit more time to pull off the perfect composite.
We can achieve this using the Smart Photo Editor by Anthropics. It offers a free trial that you can use for this tutorial. If you’re happy after taking it for a test spin, there’s an option to buy.
Let’s finish this up!
- With the top Background copy selected, press Shift + Ctrl + Alt + E to create a Stamp Visible layer of all our layers.
- Right-click on Layer 1, and select Convert to Smart Object.
- Go to Filter > Anthropics > Smart Photo Editor.
- Select Effects Gallery in the top-right menu.
- In the search box, type Snow, and press Enter.
- Select Winter Landscape by Tom. If you don’t see this option on the first page, type this in the search box. Once selected, press OK.
- Reselect the Effects Gallery as shown in step four. Scroll to page three, and select Greys dec rad. If you don’t see it, enter this text into the search menu and select it from there. Then, press OK.
- Reselect the Effects Gallery as shown in step four. Go to page eight, and select Cooling Filters by AndrewB2012. If you don’t see it, enter this text into the search menu and select it from there. Then, press OK.
- At the top of the menu, go to File > Save and Return. This will export the image back into Photoshop.
- Go to the Create New Fill or Adjustment Layer icon at the bottom right corner of your Photoshop screen. Select Color Balance layer.
- Enter the following values for the sliders in the Tone dropdown menu. Under Midtones, select Cyan/Red: +25, Magenta/Green: -20, Yellow/Blue: +20.
- Under Shadows, choose Cyan/Red: -10, Magenta/Green: -10, Yellow/Blue: -15.
- For Highlights, select Cyan/Red: -20, Magenta/Green: +15, Yellow/Blue: -15.


Let's have a look at how our fantastical composite turned out.
Before:

After:

There are other tools in Photoshop that make use of blend modes to create lighting effects. These easy-to-use features and methods go a long way in making your funny ideas look more professional.
Composites Take Time and Care
Creating composites may take a lot of time if you're trying to make the blending look natural. In our tutorial, there are still many things that can be done to create a more natural look. But for the sake of time, we wanted to show you how easy it is to get started by combining three simple images together.
Fortunately, Photoshop has all the tools to make composites both realistic and fantastical. There are also numerous plugins available that will help you add finishing touches to your composites that you may never have thought of.
Image Credit: Andrea Piacquadio/Pexels