The Wake-On-LAN tool is quite a handy feature—it works like an internet-based power switch for your device. Once set up, you can use it to turn your PC on and off remotely.
However, it's really frustrating when this tool doesn't work as intended. So, how do you troubleshoot Wake-On-Lan when it won't turn your device on and off remotely? Let's find out.
1. Enable Wake-On-Lan
When you encounter this error, you should first start by ensuring that Wake-On-Lan is enabled. Here's how you can do this:
- Press Win + R to open the Run command dialog box.
- Type devmgmt.msc and then click OK to open the Device Manager.
- Locate the Network adapters option and double-click on it to expand it.
- Right-click the Realtek network adapter and then click Properties.
- In the next window, navigate to the Advanced tab and then select Shutdown Wake-On-Lan under the Property options. If you can't find this option, try clicking a different network adapter in the previous step.
- Next, click the Value drop-down menu on the right-hand side pane and then select Enabled.
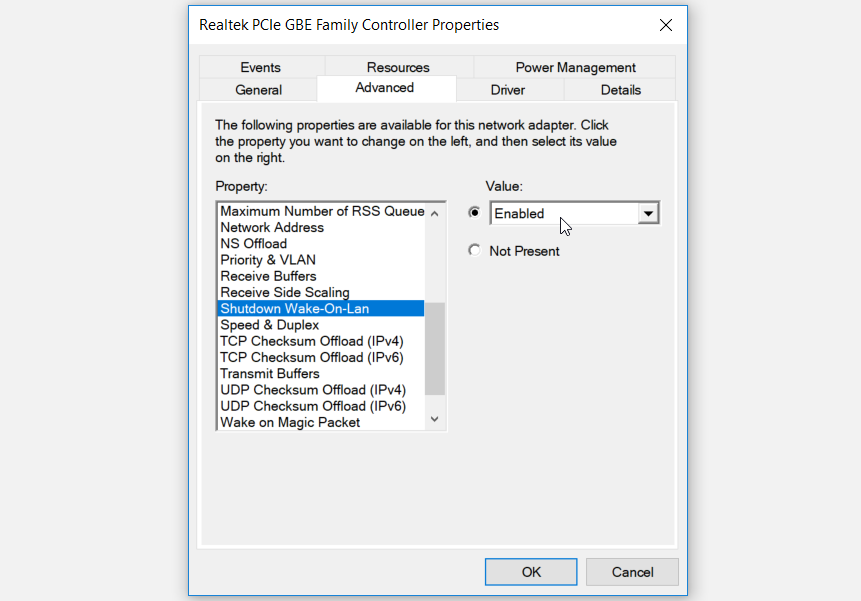
When you finish, locate Wake on Magic Packet and Wake on a pattern match under the Property options. From there, enable these features as per the previous steps.
Finally, click on the WOL & Shutdown Link Speed under the Property options and then set its Value to 10 Mbps First.
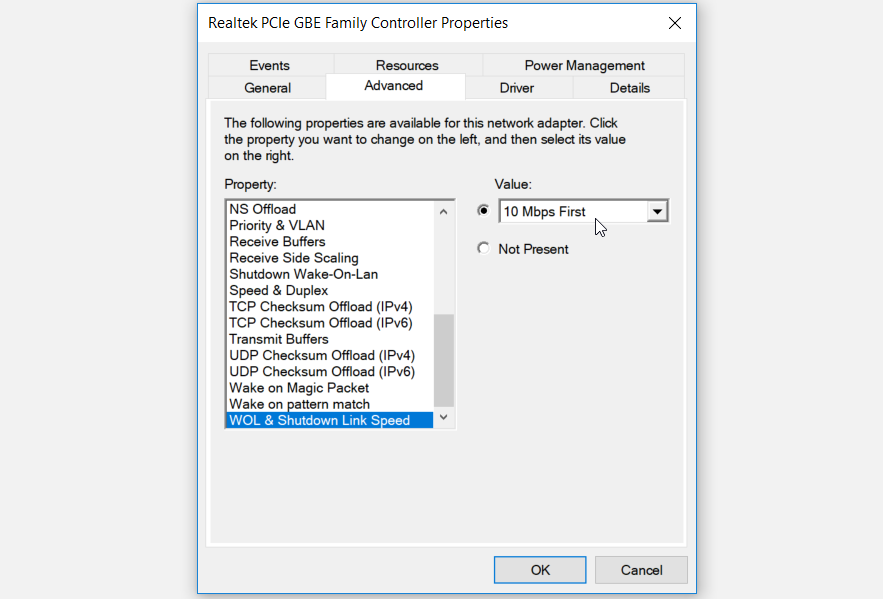
Press OK, close the Device Manager and then restart your PC.
2. Configure the Power Settings
You can also tackle this issue by configuring a few power settings on your device. Let's take a look at the settings you should tweak:
- Press Win + X and then select Device Manager from the options.
- Expand the Network adapters option, right-click your PC's network adapter, and then select Properties.
- Navigate to the Power Management tab and then check the boxes for these three options:
- Allow the computer to turn off this device to save power
- Allow this device to wake the computer
- Only allow a magic packet to wake the computer
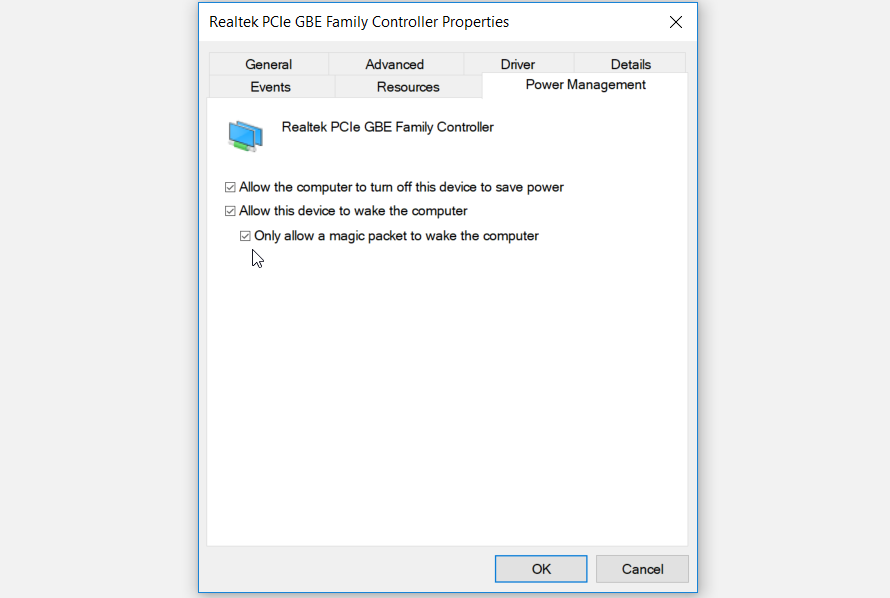
When you finish, click OK to save these changes. Finally, close the Device Manager and reboot your device.
It's also worth disabling your PC's normal sleep settings to avoid any issues while using Wake-On-Lan. So, here's how you can turn off your sleep settings:
- Press Win + R to launch the Run command dialog box.
- Type powercfg.cpl and press Enter to open the Power Options window.
- Click Change plan options.
- Set the Turn off display option to Never on both the On battery and Plugged in options.
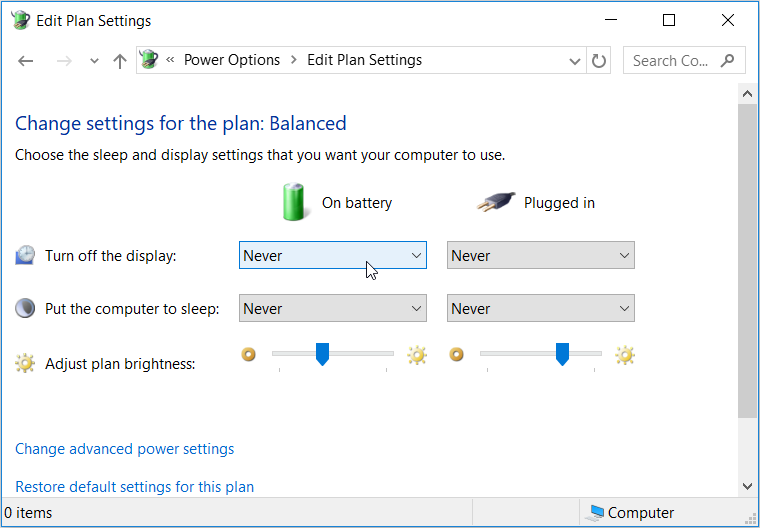
Configure the same settings for the Put the computer to sleep option and then close the settings window when you finish.
3. Restart or Reinstall the Network Drivers
Corrupted Network drivers are one of the reasons you might be experiencing problems with the Wake-On-Lan feature. To resolve this issue, you can either restart or reinstall these drivers.
Let's take a look at how you can restart the Network drivers:
- Press Win + X and select Device Manager from the options.
- Double-click the Network adapters option to expand it.
- Right-click your computer's Network adapter and select Disable device.
- From there, right-click the Network driver, select Enable device, and then restart your PC.
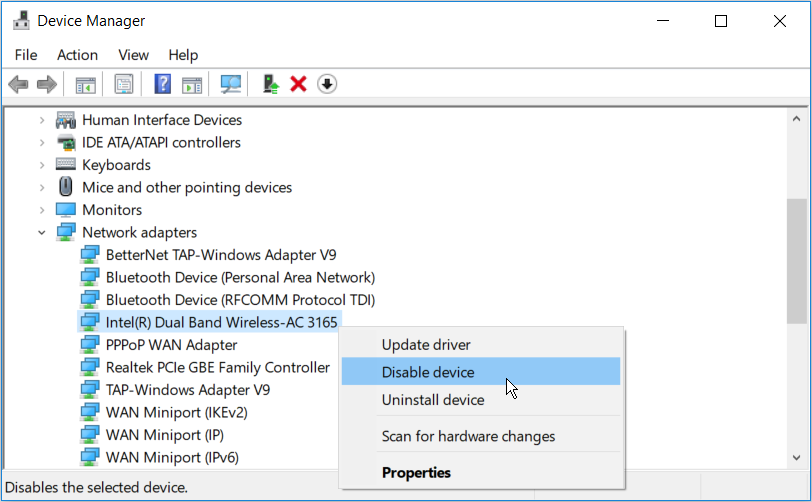
If the issue persists, you can now try reinstalling the Network drivers. Here are the steps for reinstalling these drivers:
- Open the Device Manager and expand the Network adapters as per the previous steps.
- Right-click your computer's Network adapter and then select Uninstall device.
- When you finish, navigate to the Action tab and select Scan for hardware changes. Restart your PC when the process is complete.
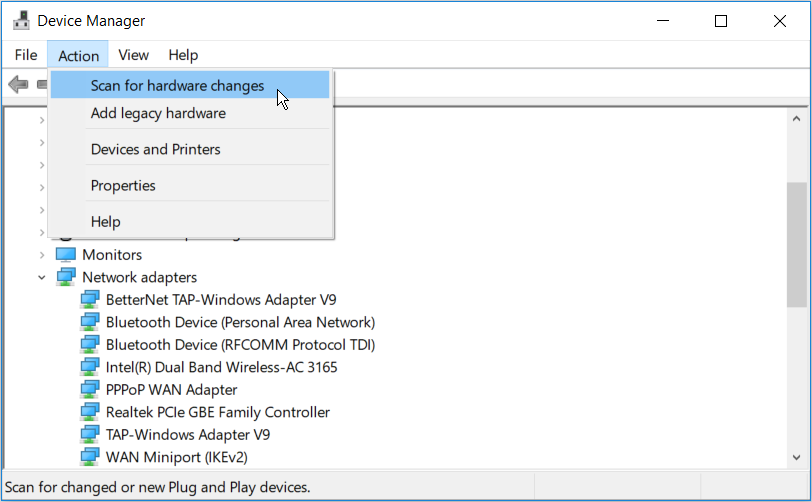
4. Use Windows' Troubleshooters
You could also tackle this issue by using a few built-in troubleshooters on your Windows device. So, we'll check out some of the tools that could come in handy in this situation.
Firstly, since this issue might be caused by internet connection problems, the Internet Connections troubleshooter could help. Now, here's how you can run this tool:
- Navigate to Win Start Menu PC Settings > Update & Security and then click Troubleshoot on the left-hand side pane.
- Next, click the Internet Connections troubleshooter on the right-hand side pane and then press the Run the troubleshooter button.
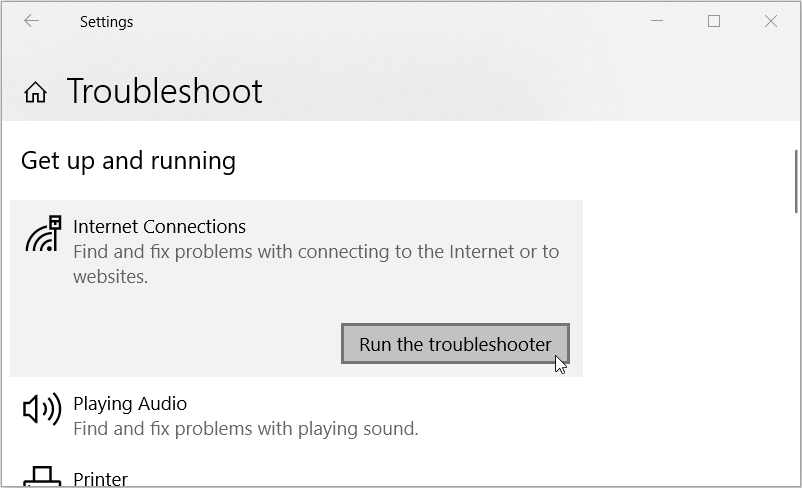
When you finish, you can run the Network Adapters troubleshooter. This will help find and fix problems with all of your PC's network adapters. So, here are the steps for running this tool:
- Open the Troubleshoot window as per the previous steps.
- Click the Network Adapters troubleshooter and then press the Run the troubleshooter button.
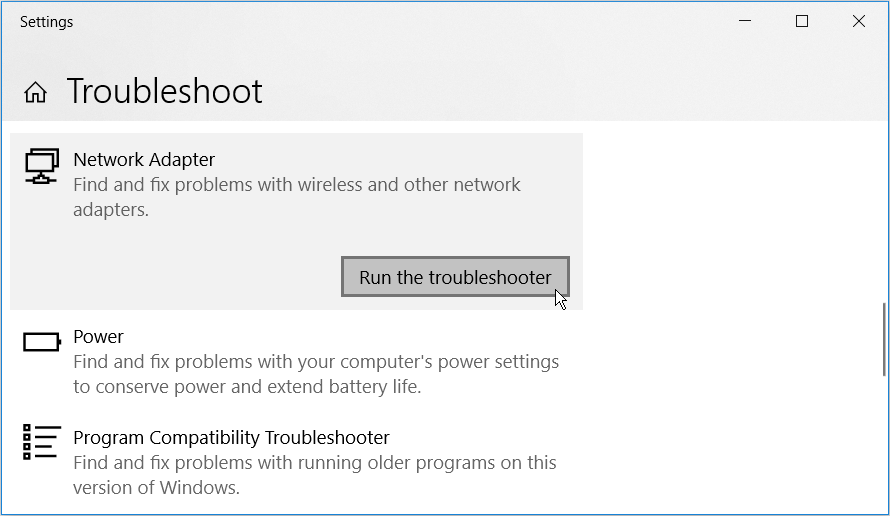
Lastly, try running the Incoming Connections troubleshooter. This comes in handy for finding and fixing incoming computer connections. To run this tool, here's what you need to do:
- Open the Troubleshoot window as per the previous steps.
- Click the Incoming Connections troubleshooter and then press the Run the troubleshooter button.
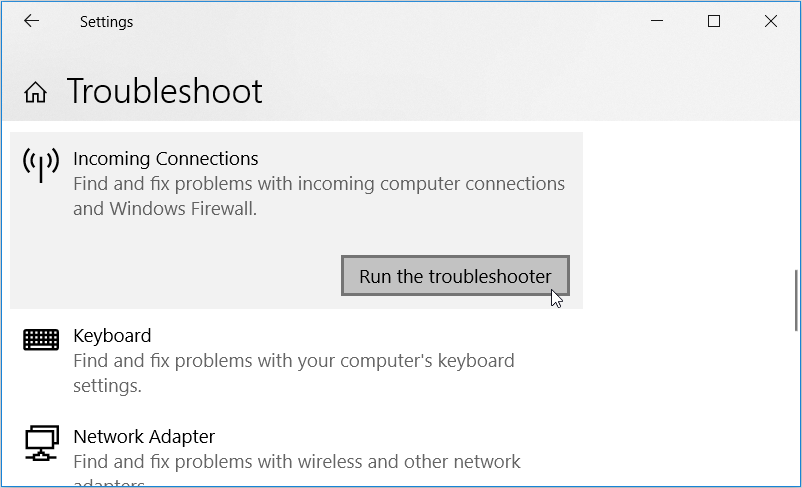
When you finish, restart your PC to apply all these changes.
5. Enable the Net BIOS over TCP/IP Feature
The NetBIOS feature allows computers on a local area network to communicate with network hardware and transmit data across the network. Meanwhile, the NetBIOS over TCP/IP networking protocol allows legacy computer applications relying on the NetBIOS API to be used on modern TCP/IP networks.
So, if your PC uses the NetBIOS API, or even if you're unsure, it might be worth enabling the NetBIOS over TCP/IP feature to avoid any network issues while using Wake-On-Lan.
So, here's how you can enable NetBIOS over TCP/IP on your device:
- Press Win + R to launch the Run command dialog box.
- Type ncpa.cpl and press OK to open the Network Connections window.
- Right-click on your Network adapter and then click Properties.
- Double-click the Internet Protocol Version 4 (TCP/IPv4) option.
-option.png)
In the next window, click the Advanced button towards the bottom-right of the screen.
In the Advanced TCP/IP Settings window, navigate to the WINS tab and then check the Enable NetBIOS over TCP/IP box.
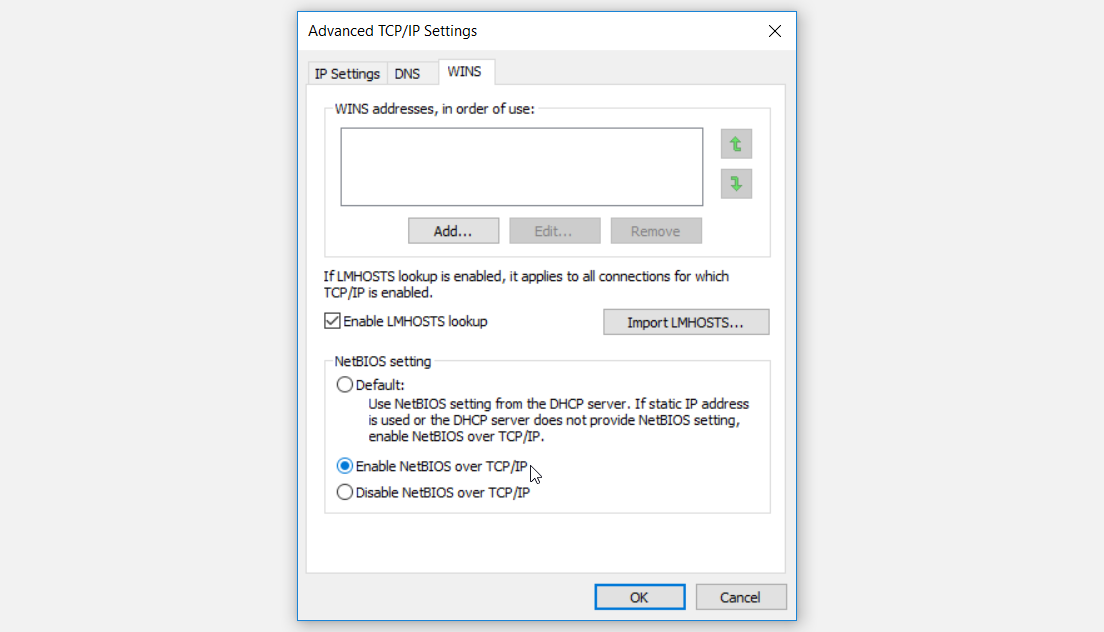
Finally, click OK to save these changes.
6. Edit the Windows Registry
You can also troubleshoot the Wake-On-Lan feature by making some edits in the Windows Registry. Let's find out how:
- Press Win + R to launch the Run command dialog box.
- Type Regedit and press Enter to open the Registry Editor.
- Click the Edit tab on the top-left corner of the screen and select Find.
- In the next screen, type S5WakeOnLAN and then press the Find Next button.
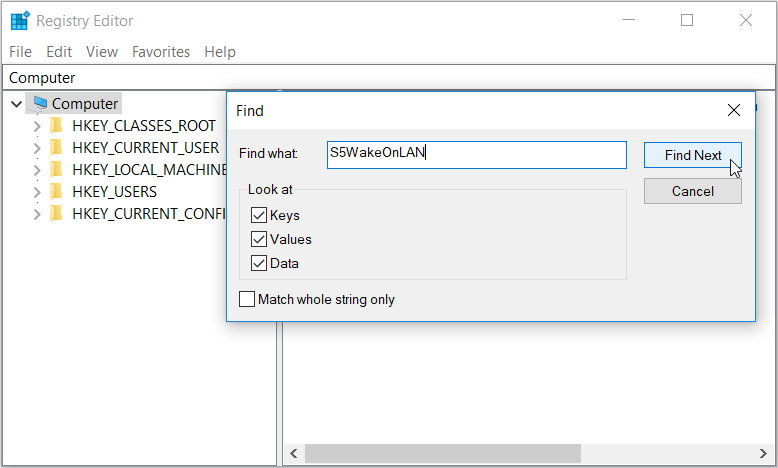
Next, double-click the S5WakeOnLAN value, set its Value data to 1, and then click OK.
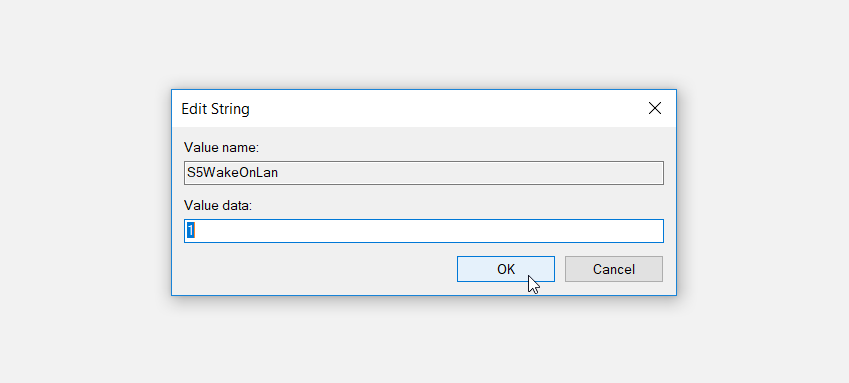
In the same window, locate the following values and then set the Value data of each to 1 as per the previous steps:
- WakeOnMagicPacket
- WakeOnPattern
- PowerDownPll
Close the Registry Editor and restart your PC when you finish.
If the issue persists, try adding a new value in the same location and then set its Value data to 1. Here are the steps you need to follow for this:
- Using the previous steps, navigate to the folder/key containing the S5WakeOnLAN value.
- Next, right-click anywhere on the right-hand side pane, select New, and then select DWORD (32-bit) Value.
- Name the new key as AllowWakeFromS5 and press Enter.
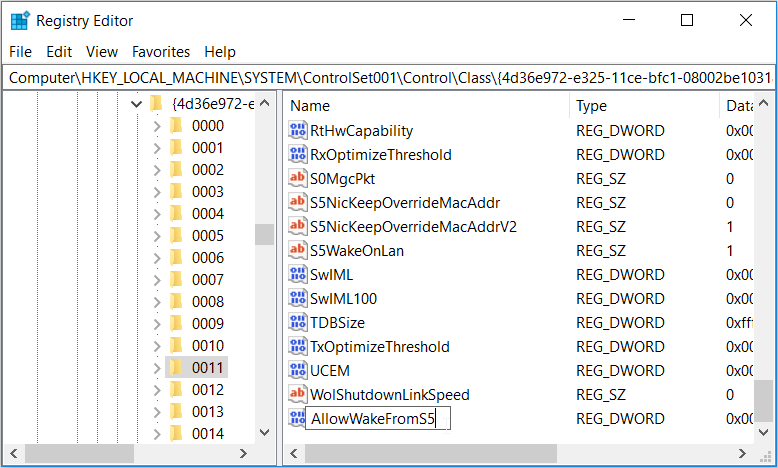
Double-click the new key, set its Value data to 1, and then click OK. Close the Registry Editor and restart your PC when you finish.
Easily Turn Your PC On and Off Remotely With Wake-On-LAN
The Wake-On-Lan feature makes it incredibly easy to turn your PC on and off remotely. Should you encounter issues with this tool, just apply any of the methods we've provided. And if you encounter other PC sleep issues, there are tonnes of solutions that can help you tackle those problems too.