Android Tricks 4 All: How2
News Update
Loading...
Showing posts with label How2. Show all posts

Sunday, July 5, 2020

Four ways to fix an unresponsive iPhone home button

Four ways to fix an unresponsive iPhone home button

iPhone Home Button Not Working? Here are 4 Ways to Fix
No matter how anal you are about keeping your iPhone safe and intact, there is still a chance your home button will eventually suffer the effects of normal wear and tear.
The iPhone 5, which features a change to the anatomy of the home button, may solve this problem, but previous iPhone models are still susceptible to this common phenomenon.
If you're still within the provided one-year warranty and your phone doesn't show signs of accidental damage, head on over to Apple. As long as you're covered by warranty, the company will replace your phone or perform any necessary repairs.
Those who got hit with the home button plague after their warranty period can give the following four fixes a try. Just be warned: if you improperly perform methods 2 and 3 and damage your phone, we don't take responsibility.
Method 1: Calibrate (and possibly restore)
If you're lucky, your slow-to-respond home button is due to a software glitch. To find out, you'll need to calibrate your home button. Here's how:
Open up a stock app, like the Clock. Hold down the sleep button until "Slide to power off" appears. When it does, let go of the sleep button and hold down the home button. After about 5-10 seconds, the app will close.
If this solved your problem, you are one lucky iPhone owner. If it didn't you may want to try restoring your iPhone before continuing to the second method.
Method 2: Realign the docking port
There is a chance that through normal wear and tear, your phone's docking port got misaligned, moving the home button along with it. Although a repair shop might suggest you replace the home button,  YouTuber offered a different solution.
Plug a USB cable into your iPhone. Then, gently push down on the 30-pin connector, so that it pushes up behind the home button. While you apply the pressure, click the home button. Remove the cable, and see if that fixed the problem.
Method 3: Clean the home button
A splash of soda, sticky hands, dirt in the bottom of your purse or pocket -- any of these things can damage your iPhone's home button.
For this fix, you'll need 98-99 percent isopropyl alcohol, which can be found at hardware stores. Using a cotton swab, eye dropper, or tissue, apply 2-3 drops of the isopropyl alcohol directly to the home button, avoiding the screen. Then, with a narrow, dull object (like the eraser on the back of a pencil), repeatedly tap the home button so that the alcohol seeps into the frame.
Wipe clean, and wait about 10-15 minutes before checking to see if that did the trick.
Method 4: Enable the on-screen home button
If the previous three methods did not work, it sounds like perhaps you have a completely defunct home button. In this case, your home button's connectors may have been misaligned and would require professional repair. (Or, if you're willing to brave it, iFixit shows you how to DIY.)
The good news is, you can still use your phone using its on-screen home button. Normally, this is used as an accessibility option, but it's also a common solution for those with non-functioning home buttons.
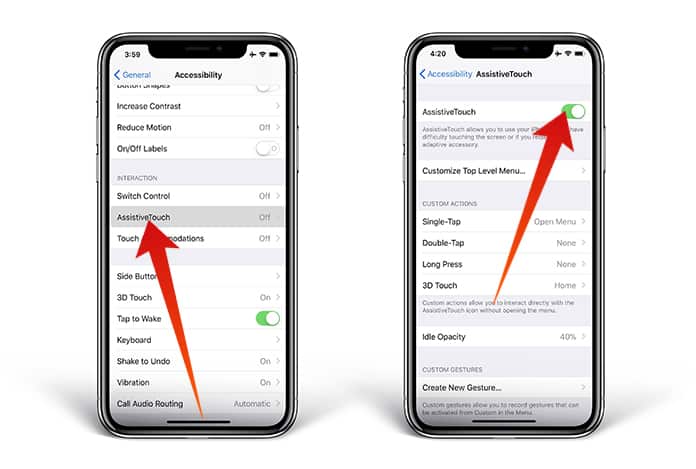
To enable the on-screen home button, go to Settings > General > Accessibility > Assistive Touch. Turn Assistive Touch on, and you'll see a small circle appear on screen.
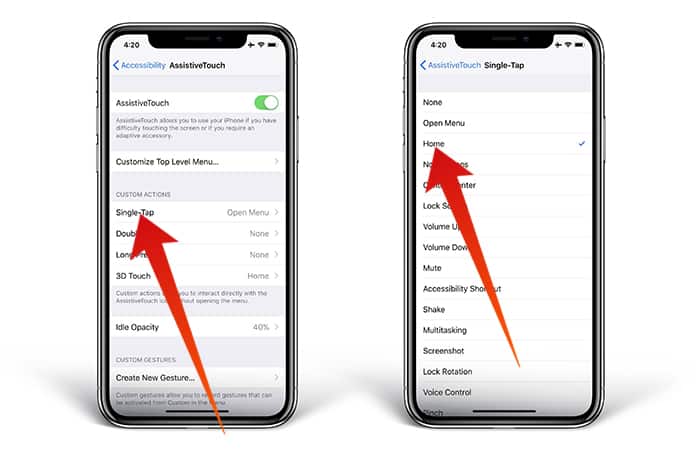
Tapping that circle gives you four options: Home, Siri, More (for things like multitasking and playback controls), and Favorites. In your case, ignore Favorites, but tap this on-screen button whenever you need to access your home screen, activate Siri, or get all the options you'd normally see when you double-tap the home button.
If the on-screen home button ever gets in the way, simply tap and hold to drag it anywhere else along the frame of your screen.
It's hardly an ideal solution, but it'll hold you over until you're ready to purchase a new phone or get your current one fixed.
Why is my Android device running slow? Here's how to speed up your phone

Why is my Android device running slow? Here's how to speed up your phone

android cpu frequencyWhen you first got your shiny new Android handset you were probably blown away by how fast it was. But over time you may well have noticed that your phone is starting to run slow. Don't worry - it doesn't mean that there's anything wrong with it. Here are some top tips you can use to help speed up your Android phone and get things running quickly again.


Real-time system and app performance on Android with Trepn Profiler. / © 


Just about every phone on the market is liable to suffer from slowdown at some point in its life. Your Galaxy S5 could slow to a crawl, or your Moto X (2014) may motor less than it used to. You may notice that apps take longer to load than they used to, that there is a lag between tapping an option and an app responding, or things may just feel generally sluggish. You don’t need to put up with this. Try some of the following techniques to make your phone run faster.

AndroidPIT Trepn Profiler main menu overlay
The first thing to do is identify the problem. Qualcomm's Trepn Profiler can help. 

Identify the problem

The first thing you want to do is find out what is causing the problems: an app, multiple apps, the system itself? Trepn Profiler by Qualcomm will show you the real-time CPU load for individual cores, an overview of network traffic for both data and Wi-Fi, GPU loads and RAM usage (just for starters).
Trepn can also produce app-specific or system-wide profiles and contains various methods for displaying accumulated data. You can save your profiled data for offline viewing and analysis and even have performance overlays on running apps. Once you've figured out your specific issue, you can move on to the solutions below.

AndroidPIT Trepn Profiler performance graph app profiler
Real-time CPU usage for individual cores (left) and app profiling options (right). / © ANDROIDPIT

Running out of space

All those photos you've taken and all of those apps you’ve installed can take their toll. Your phone needs a little breathing room to run smoothly and if you're running low on space, things can slow down.

speedup1a
Android includes various ways to free up space and help speed up your device.

You can check how much space you have left by heading to the Storage section of Settings. One of the first ways to free up space is to tap Applications can see which apps you can uninstall.

speedup2
If you've been using your phone for a while, there are probably several apps you can remove. / © ANDROIDPIT

Tap the entry for an app you no longer need and then tap Uninstall. You can repeat this process as many times as necessary for any apps you feel you can live without.
There are other ways you can free up space as well. The files you have downloaded are probably still sitting in storage wasting space and can be removed. In storage, tap Downloads, select the files you want to remove and then tap the Bin button.

speedup3
Downloads and app caches occupy valuable space that could be put to better use. 

Many of the apps you have installed use data caches in an attempt to speed up operations. This is effective up to a point, but if you are running short of space, it can actually be counter-productive. To free up this space, hit the Cached data option and then tap OK to confirm.

speedup4
Free up as much space as possible, and you might be surprised at the difference it makes. More files ripe for deletion can be found in the Miscellaneous files section. Tick the boxes next to any types of file you'd like to remove – backups, files that have been received via Bluetooth, playlist files, and so on – and then tap the bin button. You can keep an eye on how much space you have freed up by looking at the Available space section.

You can also disable the apps that came pre-loaded on your phone but you really don’t use all that much. If you have rooted your Android, you can get rid of these apps easily. If not, you can simply go to the app properties and disable the app to prevent it from running and using up your phone’s resources.

speedup5
Widgets can be a waste of resources, so kill any you don't really need. / © 

Cut back widgets

All those widgets you have running on your home screen may be useful, but they also take up their fair share of resources.
If you have any widgets running that you don’t really need, consider disabling them. There's no harm in having some active, but you will notice an element of slow down with too many running at the same time. Just be a little selective.

speedup6a
Those fancy extras offered by your launcher of choice could be slowing down your device! 

Animations and extras

Depending on the launcher you are using, you may find that there are various animations and special effects in place. These may look great, but they can also slow things down.
Check in your launcher's settings to see if there is a way to disable any of these unnecessary extras, and you could earn yourself a speed boost.

speedup7
Terminating unused apps and freeing up RAM will help with the speed of your device.

Close apps and free up RAM

Multi-tasking several apps makes it easy to switch between different tools, but there can also be an impact on performance. You can quickly close down any apps you are no longer using by calling up the running apps list Pressing and hold the home key and then swipe away any apps you want to exit.
While you are at this screen, tap the pie chart button to the lower right of the screen and then move to the RAM section. Tap the Clear memory button and any background processes that are running unnecessarily will be closed down.

speedup8
Sometime, something as simple as a restart is all that's needed for a speed boost.

Restart your device!

A quick and simple fix for a slow device is to simply restart it. This can clear out cache, stop unnecessary tasks from running, and get things running smoothly again.
Just hold down the power button, select the Restart option, and then tap OK to confirm.

Dig deeper


Don't forget you can also keep tabs on the apps using lots of battery by going to Settings > Battery. You can also monitor RAM usage in Settings > Apps (or App Manager, depending on your brand of phone) and there's even more nerdy goodies in Process Stats in Developer Options – if you don't have this setting enabled, go to Settings > About Phone and tap Build Number seven times until a notification pops up.
We've shared some other great apps for monitoring system performance on Android, apps to give your Android a performance boost and tips to increase available RAM on Android. From what we can see Trepn Profiler deserves a rightful place amongst these other A-listers.
Do you have any tips and techniques you use to speed things up? Do you have any apps you use optimize the process?

Thursday, June 11, 2020

Wednesday, June 10, 2020

How to Add a Virtual Home Button on iPhone X/XS/XR/XS MAX/11/11 Pro/11 Pro MAX

How to Add a Virtual Home Button on iPhone X/XS/XR/XS MAX/11/11 Pro/11 Pro MAX

How to Add a Virtual Home Button on iPhone X/XS/XR/XS MAX/11/11 Pro/11 Pro MAX

The home button has always remained an essential features in iPhones; that is until the latest installment, which is the iPhone 11. It features no home button and has a completely touch based display which lends it a certain beauty. However, for other users the lack of a home button may come as a drawback or it may be a feature that they miss.
virtual home button iphone x

Luckily for such people, it is possible to have a virtual home button on your iPhone X, XS, XR, XS MAX, 11, 11 Pro or 11 Pro MAX. Anyone who has ever used an iOS device must surely know of the ‘Assistive Touch‘ feature which is incredibly user friendly. For the uninitiated, this feature basically allows you to use your device in a more convenient manner because with it you can restart your device, take screenshots, change the volume and much more.

Steps to Add a Virtual Home Button on your iPhone X/XS/XR/XS MAX/11/11 Pro/11 Pro MAX

In addition, you can even create customized actions for the virtual button. If all this sounds like something you would want read on to learn how to add the virtual home button:

Step 1: Go to Settings -> General -> Accessibility.

add virtual home button on iphone x

Step 2: Tap on the Assistive Touch feature which should appear after you scroll down a bit and toggle it to on.

How to Customize Action Icons with Assistive Touch

It is possible to use the virtual home button for different customization options which gives a lot of flexibility to the user. To get started just follow the steps below:

Step 1: Go to Settings -> General -> Accessibility -> Assistive Touch.

Step 2: Next, you just need to assign custom actions to directly interact with the Assistive Touch icon. This can include options like SOS, Restart or even Screenshotting. In total there are 22 actions from which to choose from.

iphone x home button

How this works is that basically if you select the custom action to be Screenshot then whenever you tap the virtual home button it will take a screenshot. It’s really that simple!

Reducing Opacity of Assistive Touch

The iOS 11 allows the user to reduce the opacity of the Assistive Touch button when it isn’t being used. What this does is that it doesn’t stay as prominent or distracting when it isn’t required or being used. Let us know how your experience with Assistive Touch goes.

Tuesday, June 9, 2020

The ultimate guide for installing the Google Play Store on Amazon Fire tablets Updated for the Fire HD 8 10th Gen

The ultimate guide for installing the Google Play Store on Amazon Fire tablets Updated for the Fire HD 8 10th Gen

Amazon's Fire tablets are incredibly popular, mostly because they're incredibly cheap. However, none of them come with access to the Google Play Store, which is how most Android devices download and install applications. Instead, Fire tablets come bundled with the Amazon Appstore, which has a much smaller library and lacks any Google-made apps and services. No YouTube, no Chrome, and so on.
The good news is that it's not incredibly difficult to install the Play Store on a Fire tablet, and the whole process can take as little time as 10 minutes. This complete guide for installing the Play Store on Fire tablets has detailed instructions for every model produced since 2014, with added troubleshooting steps if you run into issues.

IMPORTANT INFO

  1. Remove your tablet's microSD card if you have one installed. If you don't, the Play Store and its required may be automatically installed to the microSD card, which can cause issues. You can put the card back in once you're done.
  2. There is no way to manage a Fire tablet through Google Family Link, even after the Play Store is installed.
  3. Apps installed through the Play Store might not work with Amazon FreeTime app management. I haven't personally tested this, but that's what many people have reported in the comment section.
  4. Some apps hide themselves from the Play Store on Fire tablets, because Fire tablets are not SafetyNet-certified by Google . Netflix is one app that does this. For those applications, you can try finding them on the Amazon Appstore .

Enable installation from unknown sources

The first step in this process is to enable apps to be installed from outside the Amazon Appstore. This allows you to open and install applications from downloaded APK files, which is how we'll get the Play Store running.
First, go to the main 'Home' page on your home screen and open the Settings app. Then tap the 'Security & Privacy category (older models might just say 'Security'), find the switch for 'Apps from Unknown Sources,' and turn it on.
If tapping 'Apps from Unknown Sources' brings up a list of apps, then you don't need to do anything. You may receive a popup when installing APKs, but you'll just have to tap the 'Allow' button when prompted.
Now you're ready to download and install the APKs needed to get the Google Play Store running.

Install the Play Store

The next step is to download the proper APK files for the Play Store. You technically have to install four different applications  Google Account Manager, Google Services Framework, Google Play Services, and finally the Google Play Store. The first three apps handle basic account services and add APIs, while the last app is the store itself.
Because different Fire tablets run different versions of Android with varying hardware, the exact APKs you have to install depend on what Fire tablet you have. If you're not sure which model you have, open the Settings app again, tap on 'Device Options & System' (it might also just be called 'Device Options'), and look at what is listed under 'Device Model.
For the Google Account Manager and Google Services Framework applications, find the appropriate links for your device from the table below, and tap the main 'Download APK' button on the linked page. Don't open the downloaded files yet, we'll do that later.

GOOGLE ACCOUNT MANAGER


Fire HD 10 (9th Gen), Fire 7 (9th Gen), Fire HD 8 (8th, 10th Gen)Google Account Manager v7.1.2
Fire HD 10 (7th Gen and older), Fire HD 8 (7th Gen and older), Fire 7 (7th Gen and older), Fire HD 6, Fire HDX 8.9Google Account Manager v5.1

GOOGLE SERVICES FRAMEWORK


Fire HD 10 (9th Gen), Fire HD 8 (10th Gen)Google Services Framework v9-4832352
Fire 7 (9th Gen), Fire HD 8 (8th Gen)Google Services Framework v7.1.2
Fire HD 10 (7th Gen and older), Fire HD 8 (7th Gen and older), Fire 7 (7th Gen and older), Fire HD 6, Fire HDX 8.9Google Services Framework v5.1
For these last two applications, click the link for your device, then select the version closest to the top of the list which doesn't have "beta" in the name. Again, don't open the files yet, just download them.

GOOGLE PLAY SERVICES


Fire HD 10 (9th Gen, 2019), Fire HD 8 (10th Gen)Google Play Services (64-bit ARM, nodpi, Android 9.0+)
Fire 7 (9th Gen, 2019)Google Play Services (32-bit ARM, nodpi, Android 6.0+)
Fire HD 8 (8th Gen, 2018)Google Play Services (64-bit ARM, nodpi, Android 6.0+)
Fire HD 10 (7th Gen and older), Fire HD 8 (7th Gen and older), Fire 7 (7th Gen and older), Fire HD 6, Fire HDX 8.9Google Play Services (32-bit ARM, nodpi, Android 5.0+)

GOOGLE PLAY STORE


All modelsGoogle Play Store (universal, nodpi)
Now it's time to install the apps. Find the Files app on your tablet (it might also be called 'Docs' or 'Documents') and open it. Then, find your device's Downloads folder. On most Fire tablets, this is located in the side menu.
Finding downloaded APKs on a 2020 Fire HD 8
Finding downloaded APKs on a 2018 Fire HD 8
You should see all four APK files. If not, go back and see which one you missed (or just download all of them for good measure). Also, switch to the file list view if you haven't already, so you can see the full names of each APK.
Open the apps in the below order, and when the installation is complete, press 'Done' and not 'Open'. Installing the apps out of order will cause the Play Store to not work. Also, if you have an SD card, make sure to take it out during these installations.
  1. com.google.gsf.login
  2. com.google.android.gsf
  3. com.google.android.gms
  4. com.android.vending
Once you have installed all four apps, hold down the power button, and tap 'Restart' to restart your tablet. Older tablets might only have the option to power off — if so, let the tablet shut down, then hold down on the power button to turn it back on.
Restart (or power off, and back on again) after you finish installing the Play Store.
After your Fire tablet has booted back up, open the new Play Store app from the home screen. From there, the Play Store should ask you to login with your Google account, and then finally allow you to download and install apps.

Fixes for common problems

If the Play Store or other Google apps aren't working correctly, here are some fixes for common issues.

"This account already exists on your device"

If you get the error "This account already exists on your device" when signing into Chrome or another Google app, or if the app won't detect your Google account at all, follow these steps:
  1. Completely close the app you're having issues with (e.g. swipe it away in the Recents/multi-tasking screen).
  2. Open the Settings app, tap Apps & Permissions, then select 'Manage all applications.' These options might have different names, depending on your version of Fire OS.
  3. Find the app you're having issues with in the list, tap on it, and select 'Permissions'.
  4. Switch all available permissions to 'On'. Enabling the Contacts permission alone did the trick in my testing, but you might as well enable everything for good measure.
  5. Open the app again.
In Chrome's case, you also have to open the browser, tap on the Settings menu, and tap the 'Continue as...' blue button at the top of the screen.

Troubleshooting

If you're having a different issue than the ones listed above, here are some generic troubleshooting tips.

Reboot your tablet

This might be obvious, but it's a good step to take. Hold down the power button, tap the 'Power Off' option, and turn your tablet back on by holding down the power button again. Once it has booted back up, open the Play Store from the home screen and see if it works.

Clear app data

When I initially wrote this guide, I wasn't able to sign into the Play Store until I cleared the app's local data. This will essentially reset the Play Store app to its original state, and should fix most problems you might encounter.
Open the Settings app, select the 'Apps & Notifications' section (or whatever else has 'Apps' or 'Applications' in the name), and tap 'Manage All Applications.' Find the Play Store in the list of apps and tap it.
You have to perform two steps on this info screen. First, press the 'Force Stop' button to stop the Play Store from running. Then press the 'Storage' menu option and tap 'Clear Data' (it might also be called 'Clear storage'). Now return to the Play Store app and see if it works.
If that didn't help, follow the above steps again, but restart your tablet before trying to open the Play Store. If that didn't work either, try force-stopping and clearing data for Google Play Services in addition to the Play Store.

Reset the tablet

If you still can't get the Play Store to work, your best option is probably to factory-reset your tablet and try again. Make sure you don't restore from a backup when you're setting up the tablet again, unless the backup was made before you tried to install the Play Store.

Stuff to do afterwards

Congrats, your Fire tablet now has the Google Play Store! Pat yourself on the back. Now that the hard part is over, here are some things you should do or keep in mind.

Install Google apps

Now that you have the Play Store, you can download all the Google apps you couldn't download before! Here are some suggestions  if you're reading this on your Fire tablet, the links will take you right to the app's Play Store page.

Featured

[Featured][recentbylabel2]

Featured

[Featured][recentbylabel2]
Notification
This is just an example, you can fill it later with your own note.
Done