When you first got your shiny new Android handset you were probably blown away by how fast it was. But over time you may well have noticed that your phone is starting to run slow. Don't worry - it doesn't mean that there's anything wrong with it. Here are some top tips you can use to help speed up your Android phone and get things running quickly again.
Just about every phone on the market is liable to suffer from slowdown at some point in its life. Your Galaxy S5 could slow to a crawl, or your Moto X (2014) may motor less than it used to. You may notice that apps take longer to load than they used to, that there is a lag between tapping an option and an app responding, or things may just feel generally sluggish. You don’t need to put up with this. Try some of the following techniques to make your phone run faster.
The first thing to do is identify the problem. Qualcomm's Trepn Profiler can help.
Identify the problem
The first thing you want to do is find out what is causing the problems: an app, multiple apps, the system itself? Trepn Profiler by Qualcomm will show you the real-time CPU load for individual cores, an overview of network traffic for both data and Wi-Fi, GPU loads and RAM usage (just for starters).
Trepn can also produce app-specific or system-wide profiles and contains various methods for displaying accumulated data. You can save your profiled data for offline viewing and analysis and even have performance overlays on running apps. Once you've figured out your specific issue, you can move on to the solutions below.
All those photos you've taken and all of those apps you’ve installed can take their toll. Your phone needs a little breathing room to run smoothly and if you're running low on space, things can slow down.
Android includes various ways to free up space and help speed up your device.
You can check how much space you have left by heading to the Storage section of Settings. One of the first ways to free up space is to tap Applications can see which apps you can uninstall.
Tap the entry for an app you no longer need and then tap Uninstall. You can repeat this process as many times as necessary for any apps you feel you can live without.
There are other ways you can free up space as well. The files you have downloaded are probably still sitting in storage wasting space and can be removed. In storage, tap Downloads, select the files you want to remove and then tap the Bin button.
Downloads and app caches occupy valuable space that could be put to better use.
Many of the apps you have installed use data caches in an attempt to speed up operations. This is effective up to a point, but if you are running short of space, it can actually be counter-productive. To free up this space, hit the Cached data option and then tap OK to confirm.
Free up as much space as possible, and you might be surprised at the difference it makes. More files ripe for deletion can be found in the Miscellaneous files section. Tick the boxes next to any types of file you'd like to remove – backups, files that have been received via Bluetooth, playlist files, and so on – and then tap the bin button. You can keep an eye on how much space you have freed up by looking at the Available space section.
You can also disable the apps that came pre-loaded on your phone but you really don’t use all that much. If you have rooted your Android, you can get rid of these apps easily. If not, you can simply go to the app properties and disable the app to prevent it from running and using up your phone’s resources.
All those widgets you have running on your home screen may be useful, but they also take up their fair share of resources.
If you have any widgets running that you don’t really need, consider disabling them. There's no harm in having some active, but you will notice an element of slow down with too many running at the same time. Just be a little selective.
Those fancy extras offered by your launcher of choice could be slowing down your device!
Animations and extras
Depending on the launcher you are using, you may find that there are various animations and special effects in place. These may look great, but they can also slow things down.
Check in your launcher's settings to see if there is a way to disable any of these unnecessary extras, and you could earn yourself a speed boost.
Terminating unused apps and freeing up RAM will help with the speed of your device.
Close apps and free up RAM
Multi-tasking several apps makes it easy to switch between different tools, but there can also be an impact on performance. You can quickly close down any apps you are no longer using by calling up the running apps list Pressing and hold the home key and then swipe away any apps you want to exit.
While you are at this screen, tap the pie chart button to the lower right of the screen and then move to the RAM section. Tap the Clear memory button and any background processes that are running unnecessarily will be closed down.
Sometime, something as simple as a restart is all that's needed for a speed boost.
Restart your device!
A quick and simple fix for a slow device is to simply restart it. This can clear out cache, stop unnecessary tasks from running, and get things running smoothly again.
Just hold down the power button, select the Restart option, and then tap OK to confirm.
Dig deeper
Don't forget you can also keep tabs on the apps using lots of battery by going to Settings > Battery. You can also monitor RAM usage in Settings > Apps (or App Manager, depending on your brand of phone) and there's even more nerdy goodies in Process Stats in Developer Options – if you don't have this setting enabled, go to Settings > About Phone and tap Build Number seven times until a notification pops up.
We've shared some other great apps for monitoring system performance on Android, apps to give your Android a performance boost and tips to increase available RAM on Android. From what we can see Trepn Profiler deserves a rightful place amongst these other A-listers.
Do you have any tips and techniques you use to speed things up? Do you have any apps you use optimize the process?
How to Add a Virtual Home Button on iPhone X/XS/XR/XS MAX/11/11 Pro/11 Pro MAX
The home button has always remained an essential features in iPhones; that is until the latest installment, which is the iPhone 11. It features no home button and has a completely touch based display which lends it a certain beauty. However, for other users the lack of a home button may come as a drawback or it may be a feature that they miss.
Luckily for such people, it is possible to have a virtual home button on your iPhone X, XS, XR, XS MAX, 11, 11 Pro or 11 Pro MAX. Anyone who has ever used an iOS device must surely know of the ‘Assistive Touch‘ feature which is incredibly user friendly. For the uninitiated, this feature basically allows you to use your device in a more convenient manner because with it you can restart your device, take screenshots, change the volume and much more.
Steps to Add a Virtual Home Button on your iPhone X/XS/XR/XS MAX/11/11 Pro/11 Pro MAX
In addition, you can even create customized actions for the virtual button. If all this sounds like something you would want read on to learn how to add the virtual home button:
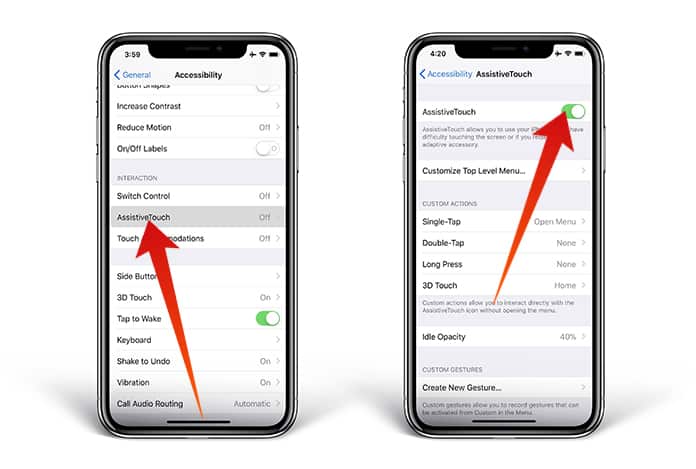
Step 1: Go to Settings -> General -> Accessibility.
Step 2: Tap on the Assistive Touch feature which should appear after you scroll down a bit and toggle it to on.
How to Customize Action Icons with Assistive Touch
It is possible to use the virtual home button for different customization options which gives a lot of flexibility to the user. To get started just follow the steps below:
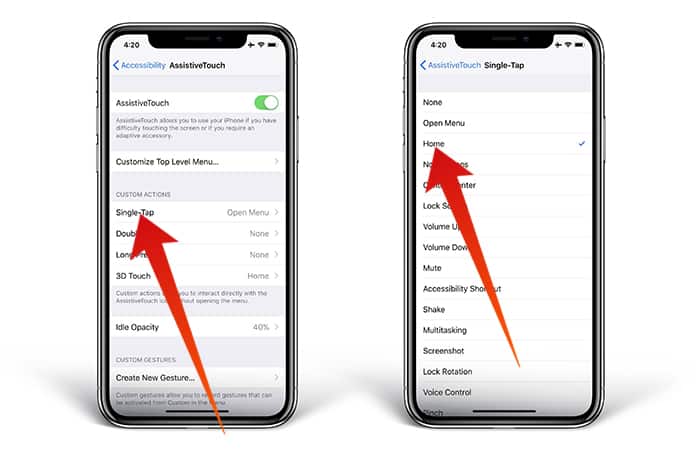
Step 1: Go to Settings -> General -> Accessibility -> Assistive Touch.
Step 2: Next, you just need to assign custom actions to directly interact with the Assistive Touch icon. This can include options like SOS, Restart or even Screenshotting. In total there are 22 actions from which to choose from.
How this works is that basically if you select the custom action to be Screenshot then whenever you tap the virtual home button it will take a screenshot. It’s really that simple!
Reducing Opacity of Assistive Touch
The iOS 11 allows the user to reduce the opacity of the Assistive Touch button when it isn’t being used. What this does is that it doesn’t stay as prominent or distracting when it isn’t required or being used. Let us know how your experience with Assistive Touch goes.
If you purchased your phone through a carrier along with a service contract, your phone will remain locked, and you won’t be able to use it with another carrier until you pay for the device in full. However, your carrier probably won’t unlock your phone automatically once you’re done paying for it.
Unlocking your phone gives you more freedom. Once you have unlocked a device, you can use it with any mobile carrier. You’re entitled to having your phone unlocked once you have paid the device in full, even though some carriers don’t make this process easy.
If you want to unlock your phone and use it on a different network, you will need to reach out and ask your carrier to unlock your device. Here is what this process looks like with different carriers.
What you’ll need
The difficulty of unlocking a phone can vary from carrier-to-carrier, and what is a straightforward process with one can be a pain with another. Depending on who you’re with, unlocking your phone can turn out to be a laborious process that requires several phone calls and hours of work — or it can be extremely simple. No matter how difficult the unlocking procedure is, it’s a good idea to unlock your phone before you leave your current carrier because it will likely prove even tougher after your contract has run out and you’ve left. Even if you’re not planning on using your old phone when you leave, who knows when you might need it in the future? Unlocking a phone that’s come off contract should be second nature, and it’s almost always worth the effort.
While procedures vary, there’s a common list of information you’ll generally need to unlock your phone. Make sure as many of the following are at hand before you start to unlock your phone.
The account holder’s name and account number.
IMEI number of your device.
Your phone number.
The account holder’s Social Security number or password.
A completed contract and/or device payment plan.
Overseas deployment papers, if you are in the military and want to unlock your phone before your contract is up.
Now you have that information, let’s see how each carrier handles unlocking your phone.
Unlocking a Verizon phone
Despite not doing so previously, Verizon now locks its devices — but in fairness, it only does so for a short time. According to Verizon’s policy, newly purchased devices will be locked to Verizon’s networks for 60 days after purchase. This brief period of locking helps to mitigate theft and other fraudulent activity, apparently — and really, you shouldn’t need to unlock a phone in this time period anyway, so it’s unlikely to affect most people. This rule applies to both postpaid and prepaid devices, and the lock will be automatically removed after the 60 days are up. This thankfully means that — unlike most other carriers — there isn’t really a list of criteria to unlock your phone.
As ever, deployed military users are exempt from this rule, and can request to be unlocked during this period by calling Verizon’s support line at 888-294-6804.
Even though SIM-equipped Verizon phones can be used on AT&T, T-Mobile, or other GSM carriers, the phone will need to have roaming GSM radios to make phone calls and send texts in the United States. While most recent Verizon handsets will work just fine on American GSM bands, your mileage will vary when it comes to LTE support.
Verizon’s new unlocking policies don’t mention postpaid or prepaid 3G devices, but it’s assumed they function under the same rules. Under the previous procedure, such devices would require you to enter a code — either “000000” or “123456” — to enable third-party cellular compatibility. If your device appears to be locked, either try that or call Verizon’s support line on 888-294-6804. World Devices are similarly not mentioned, and may still require the assistance of a store tech, which you can request by dialing the company’s support line at 800-922-0204.
Verizon’s off-the-shelf Phone-in-the-Box prepaid 4G handsets are locked to the network for the amount of time specified on the back of the box. You may also have to call Verizon support at 888-294-6804 to start the process.
Unlocking an AT&T phone
The process of unlocking a phone from AT&T is a bit more complicated than with Verizon. But while you’ll need to jump through a few more hoops, it’s still not a difficult process to complete.
The device in question must work on AT&T’s networks.
If you’re a current customer, your current contract or installment plan must be fully paid off (including early termination fees). If not, pay off your plan early and wait 24 hours before making a request.
It must not have been reported lost or stolen or involved in fraud.
It must be attached to an account with “good standing” — i.e., one not associated with fraudulent activity.
It must not be active on a different AT&T customer’s account.
It must have been active for at least 60 days, with “no past due or unpaid balance.”
If you’ve upgraded early, you must wait for the 14-day “buyer’s remorse” period (30 days for business customers) to pass before unlocking your old phone.
If it’s a business device, then you must have your company’s permission.
iPads and wearable devices with LTE connections are handled separately from smartphones, and are sold unlocked, so you won’t need to worry about unlocking them. Just put in your new SIM and enjoy your new network.
Unlike Verizon, AT&T offers an unlock request form you can fill out online. You can either enter your AT&T mobile number — or if you’ve already switched, the IMEI number from your AT&T device will also do. After submitting this form, you’ll have 24 hours to click the link within the confirmation email sent to you, then AT&T will send instructions for unlocking your device via email within two business days of the request being made. AT&T also no longer has a hard unlock limit per year, so unless you’re sending a hundred unlock requests a month you shouldn’t need to worry about being flagged as suspicious. You can check to see whether your request has been successful by checking AT&T’s unlock status page.
In the case of prepaid devices (anything on AT&T Prepaid/GoPhone), AT&T requires that they’ve been active for at least six months.
If you’re in the military, you can scratch off the third requirement on AT&T’s list — you won’t need to complete your contract or installment plans, so long as you’re able to email AT&T your TCS or PCS (Temporary/permanent change of station) documents.
Apple iPhones don’t need an unlock code. Instead, after receiving the email specifying that your unlock request was approved, remove your AT&T SIM card and insert the SIM for your new carrier to begin the setup process.
The network offers limited unlock support via its support line, 888-211-4727, but doesn’t officially unlock handsets over the phone.
Unlocking a T-Mobile phone
T-Mobile may well be the Uncarrier, but it has some very similar criteria for unlocking to other carriers. Here’s what you’ll need to keep in mind if you want to unlock your T-Mobile phone:
It must be a T-Mobile device.
It must not have been reported lost, stolen, or blocked.
It must be attached to an account that is in “good standing.”
On postpaid accounts, the device must have been fully paid for and have been active for at least 40 days on requesting line.
On prepaid accounts, the device must have had more than $100 in refills since the first use date, or have been active for at least a year.
If the device is on a service contract, at least 18 consecutive monthly payments must have been made.
If using T-Mobile’s Equipment Installment Plan, or if your phone is leased through JUMP! On Demand, all payments must be made and the device must be fully paid for.
You’ve made fewer than two unlock requests, per line, in the last twelve months.
T-Mobile may request to see proof of purchase.
If your handset is a prepaid model, it will need to have been active for at least one year, and the account associated with it must have had more than $100 in refills.
Some Android phones can use the T-Mobile Device Unlock app to complete the unlocking process. However, not all phones are compatible, so you can otherwise unlock your phone through a live chat with a T-Mobile customer representative, or by calling 611 from a T-Mobile device, or 877-746-0909 from any other phone. Deployed military personnel can also get their phones unlocked as long as they’re in good standing, and can produce deployment papers.
Unlocking a Sprint phone
Sprint says that domestic SIM card-based devices launched after 2015 will automatically unlock when they become eligible, and that crowd of active phones is decreasing all the time. However, there is a process to unlock if your device doesn’t qualify. Before unlocking your Sprint phone, you’ll need to ensure your device and account meet the requirements below:
It must be a device from Sprint.
It must be domestic SIM Unlock capable (if unlocking for the domestic United States).
It must not have been reported lost, stolen or blocked, or associated with other fraudulent activity.
It must be attached to an account in “good standing.”
It must have been active at least 50 days on the requesting line.
There must be no outstanding or pending payments or fees.
If you’re unlocking for international use, you must also ensure the device is capable of international SIM unlock.
Sprint Forward prepaid devices have some additional requirements:
The device must not have been reported as lost or stolen or otherwise flagged as ineligible to be unlocked.
The device has been active on the associated account for at least 12 months with the account active at that time.
Sprint Forward devices also need to be unlocked by a customer service representative — but don’t worry, you can contact Sprint Prepaid Customer Care by dialing 855-639-4644.
If your device is currently inactive, you’ll want to call Sprint’s Customer Service on 888-211-4727 to help get the device unlocked. Be prepared to potentially force an over-the-air update to get it unlocked, and you may have to submit to extra validation to ensure your device can be unlocked.
If you’re a member of the U.S. military deployed overseas and you want your Sprint phone unlocked, the aforementioned requirements still apply. Also, you and any relatives on the same account must be active members of a branch of the United States military and must have overseas deployment papers, if applicable. If you’re currently deployed overseas, you can unlock your phone by contacting Sprint Worldwide Care or by calling 888-226-7212.
There’s a massive caveat when it comes to Sprint’s unlocking capabilities, however. Because the carrier, like Verizon, relies on a relatively obscure networking technology (CDMA), Sprint-branded phones that have been manufactured with a SIM slot within the past few years can’t be unlocked to accept a different carrier’s SIM card.
Alternatively, you can request an unlock either through an online chat with a customer representative or by calling 888-211-4727 (*2 from a Sprint device).
Uniquely, Sprint offers short-term unlocking for international travel. Assuming you meet the above requirements, you can log into your online account and navigate to the relevant page. Simply click on the My Account tab, pick your phone from the resulting list, and select Unlock device to use int’l SIM from the Manage this device drop-down menu. If you’d rather have a Sprint rep walk you through the process, though, you can request an over-the-phone unlock at 888-226-7212.
Unlocking a U.S. Cellular phone
Since February 1, 2016, all of U.S. Cellular’s 4G LTE devices are sold unlocked, and those sold before that date are about to be unlocked through an over-the-air update, so make sure your device is up to date before contacting U.S. Cellular about unlocking. However, if that doesn’t apply to your device, or if you have a 3G or 1X device, then you’ll need an unlock code from U.S. Cellular’s customer service line on 611 (from a U.S. Cellular device) or 888-944-9400 on another device.
Like other carriers, U.S. Cellular’s unlocking procedure is fully in-line with CITA’s guidelines on unlocking its devices, and will unlock phones and tablets, as long as they adhere to the following criteria:
It must be a device from U.S. Cellular.
The device in question must not have been lost, stolen, or obtained fraudulently.
The device in question must have been fully paid for.
For prepaid devices, you must wait 12 months from the first activation of the device.
U.S. Cellular also warns that some devices can’t be unlocked, either because of the age of the device, or because it doesn’t have the technology to access other networks. If it sounds like your device might fall under that, you can contact U.S. Cellular on 611 (from a U.S. Cellular device) or 888-944-9400 on another device. As is usual, deployed military personnel can get their device unlocked by presenting their deployment papers, as long as their account has no past-due balance.
Unlocking your prepaid or fully paid phone
Julian Chokkattu/Digital Trends
There are, of course, folks who have prepaid and paid-in-full devices. Unlocking these is, for the most part, relatively straightforward. While there was already a generalized unlocking policy, the Cellular Telephone Industries Association (CTIA) put forth a set of standardized unlocking policies for cell phones and tablets. The agreed-upon terms require carriers to unlock a phone paid in full, or a prepaid phone in service for a year, if a subscriber makes such a request. Cellular providers also have to alert subscribers when their handsets are eligible for an unlock. Finally, carriers must unlock phones for U.S. military personnel upon request.
Sprint, T-Mobile, U.S. Cellular, and Verizon have all complied, and AT&T’s policies were already in line with the terms.
Third-party services
Third-party unlocking services, by and large, differ only in name. Most of them work in the same way: You make your way to a website, provide payment in exchange for an unlock code, and wait for the code to arrive via email. Prices vary depending on your device, but they typically range anywhere from a few dollars to $50. But like everything out there, third-party services can be risky. Most of them require you to pay upfront, and there’s always the danger unsavory services will simply take your money and never send you a code. As ever with this sort of thing, it’s smart to research a service thoroughly before you fork over any amount of cash, so make sure to thoroughly Google any service you’re considering using to make sure it’s legit and above board. Make sure to check websites like Trustpilot being making any decisions and especially before sending over any cash.
Reputable unlocking services often have customer support lines to assist with code issues. They typically deliver codes quickly, too. If you notice a lot of customers complaining about codes being delayed for days, weeks, or even months, it’s probably best to stay away from those services.
Buying unlocked phones
If you’re thinking of unlocking a phone eventually, why not cut out the middle man and just buy an unlocked phone? Many phone makers sell unlocked phones on their websites, and you’ll find such devices from Google, Apple, Sony, Huawei, OnePlus, and many manufacturers. Some of these companies offer payment plans to ease the financial burden a bit, removing the largest barrier to buying unlocked. Retailers such as Amazon and Walmart also sell unlocked phones, but often with high upfront costs. However, you can land yourself a bargain if you hunt for the best price, especially with Amazon’s Alexa Built-in unlocked phones. Those phones come at a knock-down price, but at the expense of having Amazon’s services pre-installed — and if you’re a fan of Amazon Alexa, this shouldn’t be too much of a chore.
In our opinion, the benefits of an unlocked phone more than make up for the added initial cost. You don’t have to jump through any hoops to unlock them, for one, and you have the option to pick any cell phone service you want, whether it’s prepaid, postpaid, or something in between. Sure, you’ll have to shell out a few hundred dollars at the time of purchase, but the freedom to switch between carriers could save you a bundle in monthly plan costs down the road.
The Huawei P40 Pro is a fantastic handset. It packs some pretty awesome hardware under the hood, but all of this is marred by the fact that it does not come with Google Play Services installed on it. This due to Huawei being placed on the US Entity list which ultimately prevents Huawei and Google from doing business with each other.
This means that Huawei is not able to license Google Play Services, which is why it is omitted from the phone. As much as we would like to think that alternative services and apps can fill that void, and we imagine that it could, the general perception and concern is that it will be a very different (and negative) experience.
The good news is there are ways in which you can actually get the Google Play Store installed on the Huawei P40 Pro. This is quite a lengthy process but it is fairly straightforward, so set aside 15-20 minutes to get the Google Play Store up and running on your P40 Pro.
Before you get started
Backup your phone and all of its files in the event that something goes wrong
You will need a USB C flash drive for the installation process or a regular USB flash drive and an adapter that will let you connect it to the Huawei P40 Pro
Check your phone to make sure that the USB drive is recognized and active
How to install Google Play Store on the Huawei P40 Pro
Load it onto the USB drive and connect it to your Huawei P40 Pro
Go to Settings > System & updates > Backup & restore > Data backup > External storage > USB storage
Select the file you loaded onto the USB drive and tap Restore
Enter the password shown on your screen and tap OK
Clear all background applications
Look for the app on your home screen with a purple G icon and tap on it to launch the app
Once the app has launched:
Tap Activate
Tap Allow
Return to the home screen and clear all background apps again
Relaunch the app and tap on the blue button at the bottom of the app’s screen and let it run in the background
Go to your phone’s files and open the USB drive
Look for the Google installation folder and tap on it
You will have to install the first six files so tap on them one by one to install them
Once the apps have been installed:
Go to Settings > Users & accounts
Tap Add an account and select Google
You will be prompted with an error message informing you that the app was built for an older version of Android, but tap OK anyway
Tap Existing
Enter your Google login credentials and tap Sign in
Tap Next
At this point you can keep adding Google accounts you want associated with the device, but you will have to do so now because once the process is complete, you won’t be able to unless you restart the entire installation procedure
Clear all background applications
Installing the Google Services Framework
Go to your phone’s files and open the USB drive
Look for the Google installation folder and tap on it
Tap on the seventh file which will be Google Services Framework
Tap Allow
Tap Install and wait
Once installed, tap Done
Give the phone a minute or two and you will start seeing a bunch of error messages which will be normal. You can then choose to mute these error messages if they’re getting too annoying
Go to your phone’s home screen and you should see the Google Play Store app
Launch the app and look for Google Service Framework
Clear your background applications
Go to your phone’s Settings > Apps
Tap the three dot icon to the top right corner and select Show system processes
Look for Google Play Services
Tap Force Stop
Tap Uninstall
Clear all background applications
Go to your phone’s files and open the USB drive
Tap on the Google installation folder and install the eighth application called GMS Core Mod 1
Tap Allow
Tap Install
Go to your phone’s Settings > Apps
Tap the three-dot icon to the top right corner and select Show system processes
Look for Google Services Framework and tap on it and go to Storage
Tap Clear Cache and Clear Data
Regenerating the Google Services Framework ID
Clear all background applications
Launch the Device ID app and you will notice that the Google Services Framework ID is gone
Launch the Google Play Store – At this point some of you might be greeted by an error message asking you to retry. Keep doing this until the app launches without any error messages. This could take several attempts
Launch the Device ID app and check if the Google Services Framework ID has been regenerated
Repeat steps 3 & 4 until the ID reappears
Once the Google Services Framework ID has been stored, go to your phone’s Settings > Apps
Tap the three-dot icon to the top right corner and select Show system processes
Look for Google Play Services
Tap Force Stop
Tap Uninstall
Go to your phone’s files and open the USB drive
Tap on the Google installation folder and install the ninth application called GMS Core Mod 2
Tap Allow
Tap Install
Conclusion
Assuming you follow these steps correctly, you should now have the Google Play Store installed on the Huawei P40 Pro. Google has warned against sideloading its applications, so you could potentially run into issues when trying to use them.
Our lives are on our phones, making them a likely source of evidence if police suspect you’ve committed a crime. That’s something to keep in mind as protests over the killing of George Floyd at the hands of Minneapolis police officers sweep the nation. Law enforcement has a history of using civil unrest to ramp up their surveillance of the public.

 When you first got your shiny new Android handset you were probably blown away by how fast it was. But over time you may well have noticed that your phone is starting to run slow. Don't worry - it doesn't mean that there's anything wrong with it. Here are some top tips you can use to help speed up your Android phone and get things running quickly again.