If Microsoft Outlook is your go-to application for managing your e-mails and calendar, you might have thought that some of its features can be quite distracting. Of course, Outlook is already set up to help you manage your workload, but it can be even better with some simple adjustments.
Let’s have a look at some of the ways you can make Outlook work better for you.
1. Create Rules for Incoming Emails
When you receive an e-mail, it will automatically go into your Inbox folder. This can be difficult to keep track of if you receive multiple e-mails from many different people, and they can quickly mount up. Outlook lets you set inbox rules to have incoming e-mails from specific people go directly to a subfolder, which can help you to keep track of who is sending what. To create a new rule, follow these steps:
- Go to File > Manage Rules & Alerts and click New Rule. A new window will pop up with various options on it.
- Under Step 1: Select a template click Move messages from someone to a folder.
- Then, under Step 2: Edit the rule description, you need to click on the hyperlinks to select the people or public group whose e-mails you want to divert to the specified folder.
- Click Finish to apply the rule.
The official video from Microsoft illustrates it in detail.
Inbox rules can prevent your inbox from getting clogged. Also, if you need to keep track of particular people or critical work emails, it’s already organized for you.
2. Turn Off Email Notifications
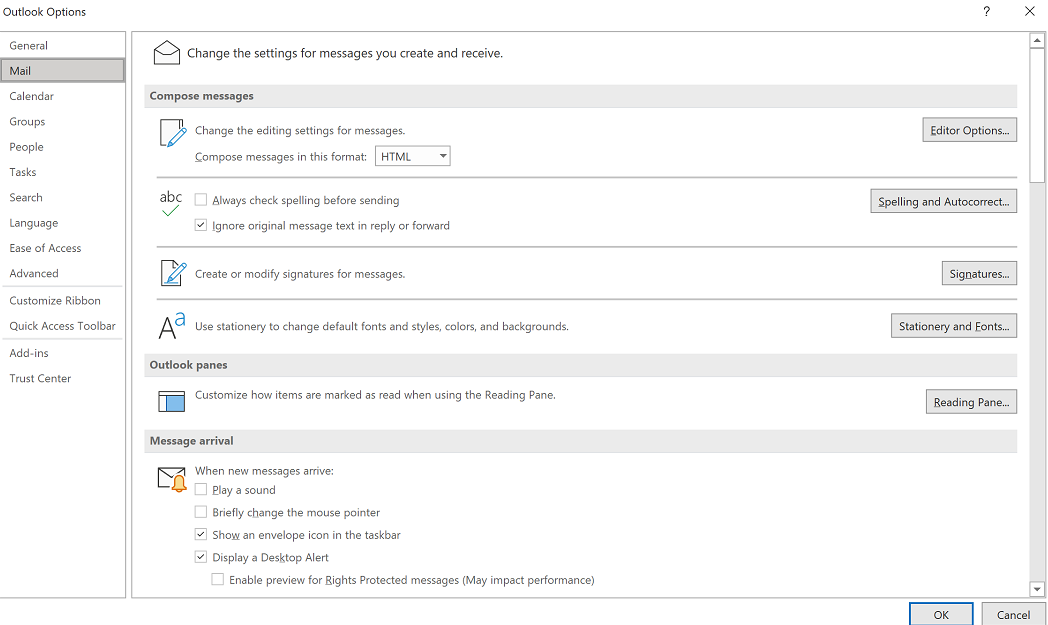
By now, you might have noticed the notification sound Outlook makes when you receive an e-mail. You might have also noticed the yellow envelope icon that pops up on the Outlook icon on the taskbar. This can be useful if you want to be notified, but it can break your focus if those e-mails keep coming in. Fortunately, Outlook also gives you the option to turn these notifications off.
Go to File > Options > Mail, and under the heading Message arrival, you can choose the notifications you want to turn off. Once you’re happy with your selection, click OK.

3. Set Calendar Reminders
Much like the e-mail notifications, the Outlook Calendar is set to remind you of appointments 15 minutes before they start. It does this by displaying your next appointments, and you have to click Dismiss to close the window.
These reminders can be useful if you need them. For example, if you are deep into your work and the reminder pops up, you can wrap up what you’re doing and get ready for the appointment.
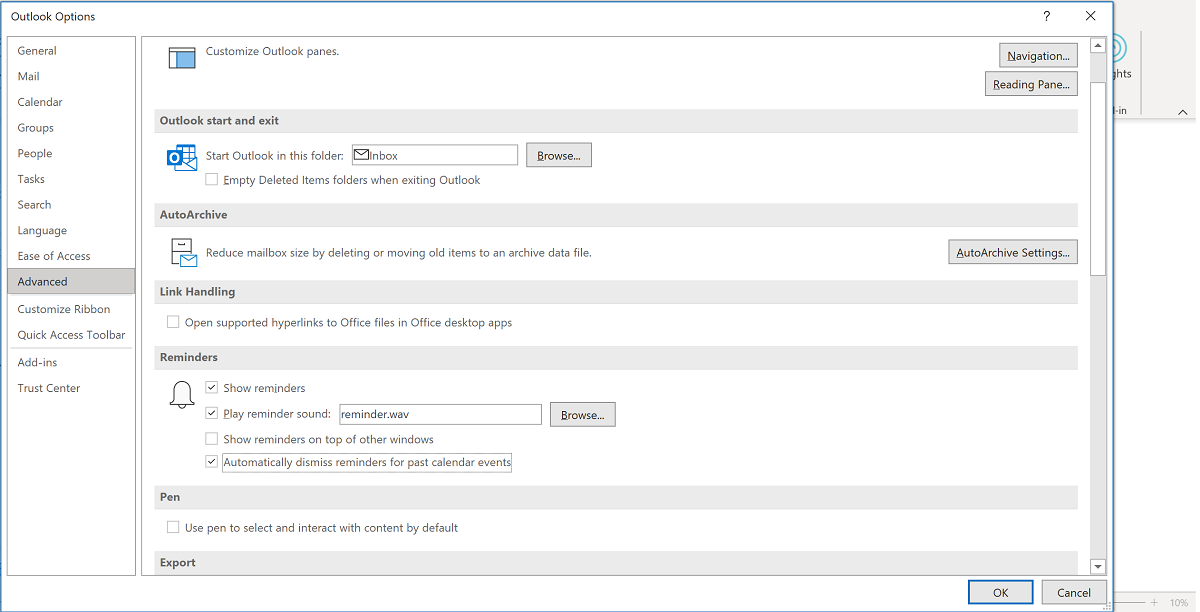
However, if you don’t need this function, then it can break your flow. To stop these reminders, go to File > Options > Advanced, and under Reminders, uncheck Show reminders.

Alternatively, you can also go to File > Options > Calendar, and under Calendar Options, you will see an option for Default reminders. To edit this, follow these steps:
- Click the box next to Default reminders, so there is a tick in the box
- On the drop-down list, select 0 minutes
- Click the box next to Default reminders again, so the tick disappears; if you don’t do this, it will not save your selection
- Click OK
Now you can continue with your work without those reminders popping up. If you still want some way of tracking your important tasks, look at the benefits of Microsoft To-Do as well.
4. Color-Code Your Outlook Calendar
There’s nothing wrong with coloring your Outlook calendar appointments with one color. However, color-coding can help you simplify your calendar and make it easier to get an overview of your working day or week without checking what each individual appointment or meeting is about.
For example, if you have several different types of work, including meetings within your company, meetings with external companies, clients, administrative tasks, and training booked into your calendar, etc., it can become a blur of information that you need to spend more time focusing on.
If you use color-coding, you can quickly skim over your calendar and get a general idea of what types of work you need to prepare for. You can also use color-coding to prioritize appointments in order of importance. For example, you can choose the color red for "urgent" meetings, amber for "important," and green for "routine."
The important thing here is to choose different colors for the different types of work you do and choose colors that don't look too similar to each other to tell the difference. To get started, follow these steps:
- Click on an appointment or meeting in your calendar to show the Appointment Series tab.
- Click the colorful window icon that says Categorize.
- On the drop-down list, click All categories.
- A new window will pop up; on the right-hand side, click New.
- Write in the name of your category. For example, “internal meetings,” and choose the color you’d like for it.
- Click OK on both windows until you see your new color-coded calendar appointment.
Repeat this process for as many categories as you want to create.
Outlook Distractions Solved
Now that you know how to make Outlook less distracting, you can tailor it to work best for you. Although they may not seem important, making little adjustments can make a difference to your working day.
This is by no means an exhaustive list, and you might want to try them out before you commit to them. You can also play around with your Outlook settings and see if you discover any other things that help to optimize your focus.