Android Tricks 4 All: Free
News Update
Loading...
Showing posts with label Free. Show all posts

Thursday, June 11, 2020

Best Mac WWDC app gains clip sharing, transcripts, and ‘Community’ feature ahead of Apple’s virtual keynote


WWDC 2020 is set to start on June 22nd as a virtual event and Apple has said it’s planning to share more about what to expect through its Developer app later this month. However, a Mac version of the app is still missing. Fortunately, the unofficial WWDC app for Mac has been updated and is ready for this year’s digital WWDC with some notable new features.

Created by 9to5Mac’s Gui Rambo along with a small global team, the Unofficial WWDC app for macOS (free) is the best way to plan what you want to get out of the event, livestream current sessions, rewatch past ones, and connect with the Apple dev community on your Mac. This year with WWDC going virtual for the first time due to the pandemic, a Mac app will be more useful than ever.

At the end of 2019, Apple rebranded the WWDC app as the Apple Developer app. It will be a crucial piece of the WWDC 2020 experience and is available for iPhone, iPad, Apple TV, and Apple Watch, but a Mac app is still missing.

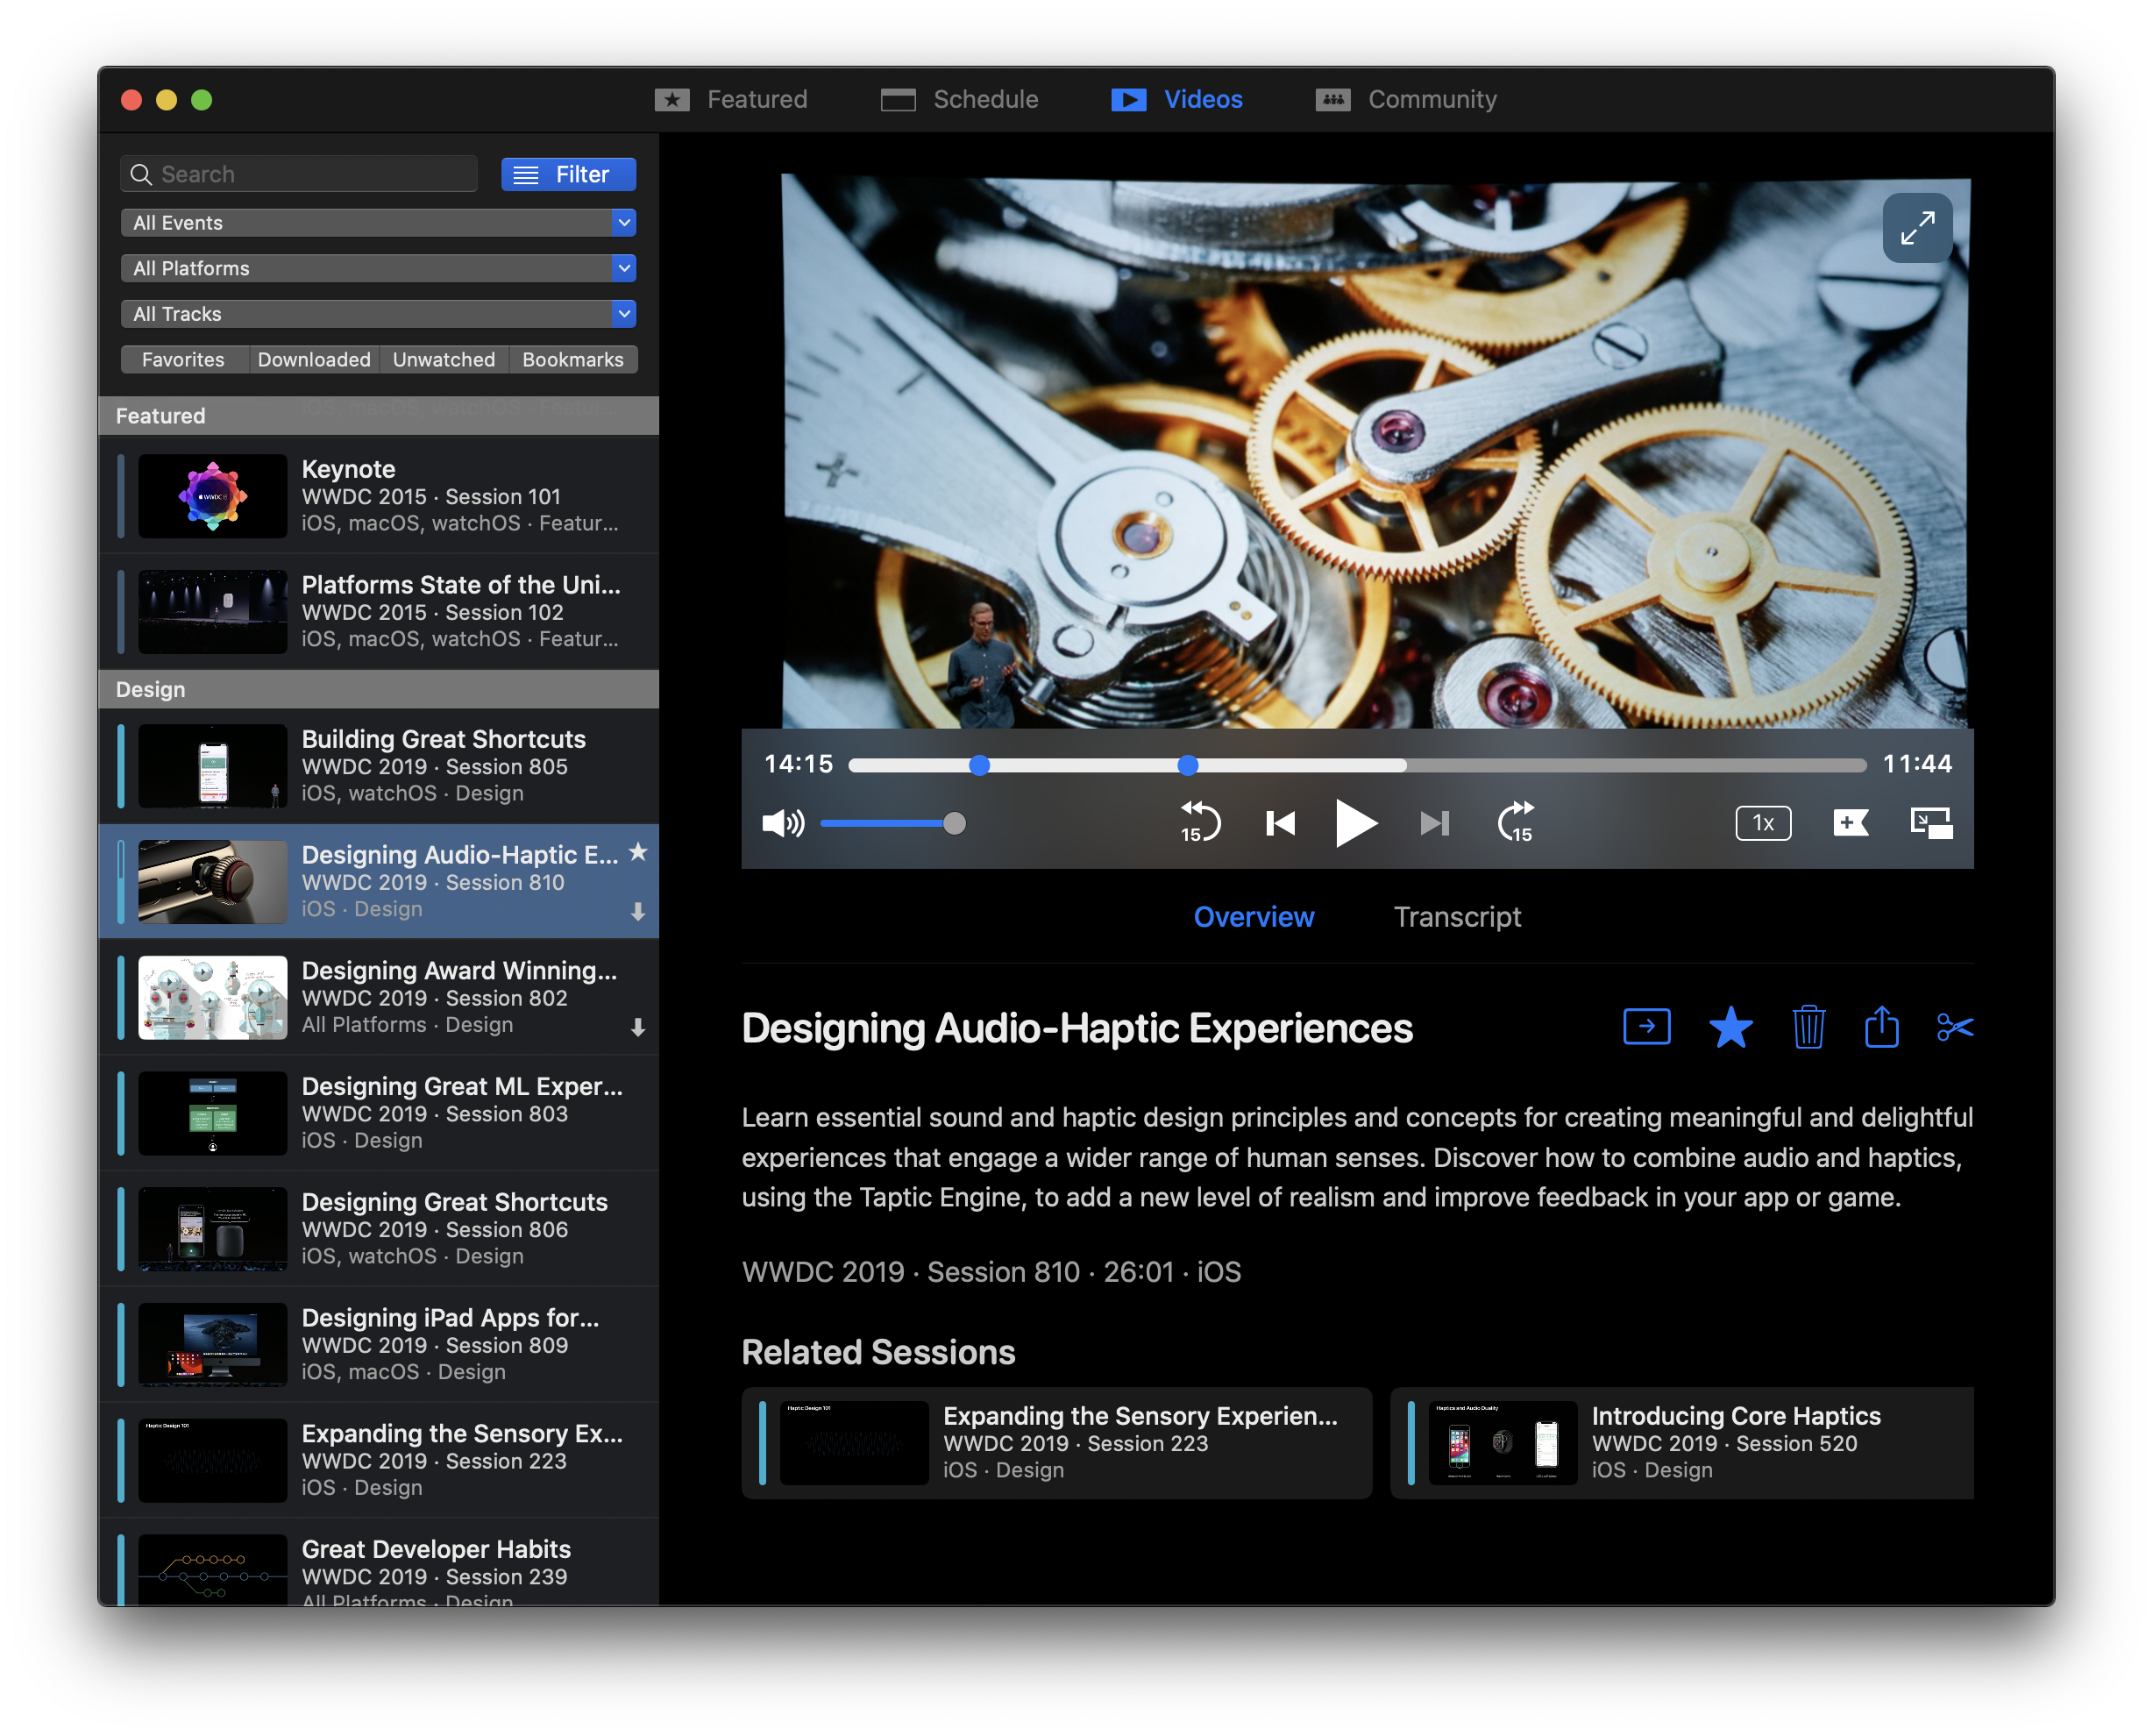
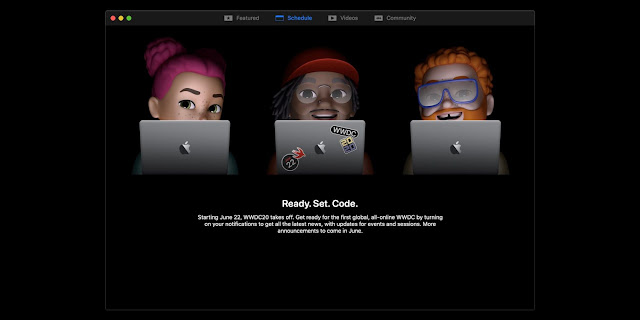
The Unofficial WWDC macOS app has a clean, native interface for the best WWDC experience on your Mac and has been updated today with a number of new features including an all-new Community tab that features content from Apple devs from a variety of sources and a new clip sharing tool to easily share small portions of sessions.

Two other handy updates include support for Universal links as well as transcripts in English, Chinese, Korean, and Japanese.

You can download the latest version of WWDC for macOS for free now.

WWDC for Mac app


Sunday, May 24, 2020

Best word games Android and iPhone in 2020 for free

Learning in a classroom can sometimes feel a bit too boring, especially if it involve thick and heavy textbooks. Thankfully, there are more fun ways to learn, such as through games. If you’re looking for a word game that will help improve or test your vocabulary skills, or maybe if you’re a parent hoping that these games will improve your child’s English, then you will definitely want to check out these games.

Monday, April 27, 2020

How Do I Delete iPhone Albums and Free Up Storage Space

How Do I Delete iPhone Albums and Free Up Storage Space

Snapping out photos can be fun and exciting, especially if you’re using a great smartphone to take pictures like an iPhone. But doing this kind of stuff might consume space on your device, and you may need to delete iPhone albums to free up some storage space. Though, it’s going to be your decision if you would like to delete pictures or delete selected photos. 
It may be unfamiliar to you on how this process is being done, but I’ll help you out. In this post, you’ll learn some new information on how to delete albums on your iPhone, as well as some tips on how to free up some storage space on your device. 

Why do you need to delete iPhone albums on your device? 

Aside from freeing some space on your iPhone’s storage, there are other benefits that you can get when you delete some selected albums on your device. If your iPhone’s performance slows down or becomes sluggish, it can be due to insufficient memory, random bugs or software-related issue. Deleting the albums on your device will not only provide extra space, but it could also remove glitches that may have been caused by corrupted files or data with the photos stored in your albums. 
But it is also important to note that when you delete an album, it does not necessarily delete the photos in it, unless you’ve selected those pictures. That means if you’re looking for ways to free up some storage space on your iPhone, you’ll need to select the photos to delete them.


How Do I Delete iPhone Albums and Free Up Storage Space


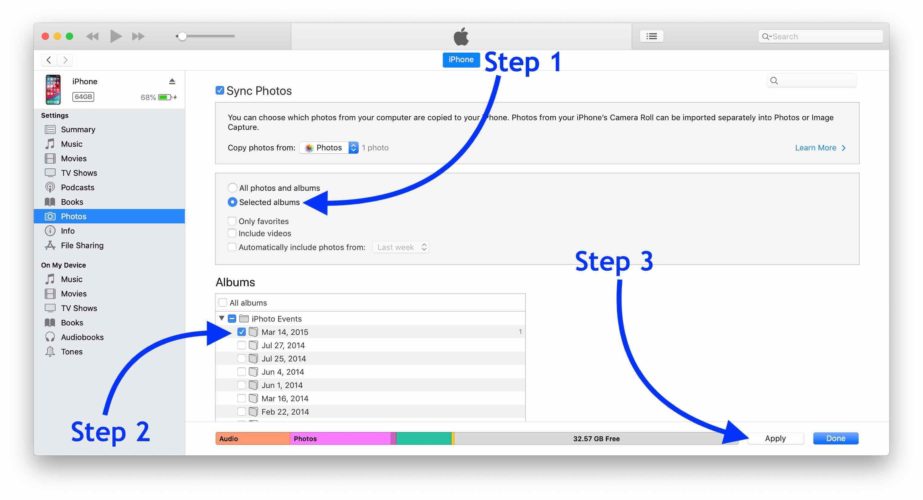
 sync photos from itunes
Snapping out photos can be fun and exciting, especially if you’re using a great smartphone to take pictures like an iPhone. But doing this kind of stuff might consume space on your device, and you may need to delete iPhone albums to free up some storage space. Though, it’s going to be your decision if you would like to delete pictures or delete selected photos. 
It may be unfamiliar to you on how this process is being done, but I’ll help you out. In this post, you’ll learn some new information on how to delete albums on your iPhone, as well as some tips on how to free up some storage space on your device. 

Why do you need to delete iPhone albums on your device? 

Aside from freeing some space on your iPhone’s storage, there are other benefits that you can get when you delete some selected albums on your device. If your iPhone’s performance slows down or becomes sluggish, it can be due to insufficient memory, random bugs or software-related issue. Deleting the albums on your device will not only provide extra space, but it could also remove glitches that may have been caused by corrupted files or data with the photos stored in your albums. 
But it is also important to note that when you delete an album, it does not necessarily delete the photos in it, unless you’ve selected those pictures. That means if you’re looking for ways to free up some storage space on your iPhone, you’ll need to select the photos to delete them. 
Deleting albums on your iPhone should be easy. You might need to do this if you want to remove certain albums on your device due to unwanted images, unused screenshots, or wallpapers that you don’t need anymore. Deleting albums should help you get rid of those items and clean up the device. 
Here are the steps on how to delete iPhone albums: 
  1. From the Home screen, tap to open Photos app. 
  2. Select Albums from the bottom-right of the screen. 
  3. Go to My Albums and tap on See All
  4. Tap Edit on the top-right corner. 
  5. From the context menu, select Delete Album
  6. Once prompted, tap Delete to confirm the removal of the album. 
Be reminded that deleting an album will also remove it from the other devices if you’ve synced via iCloud. And as mentioned earlier, pictures that are in the album will not be deleted and will still show in other albums or Photo library, unless you’ve selected them. 

Ways to free up storage space on your iPhone

Since you now have the knowledge on how to remove albums on your iPhone, will now tackle some different methods on how to get rid of some items on your device to free up some extra space. If you’ve been using an iPhone with lesser storage like those with 16GB or 32GB of ROM, you might be seeing the Storage Almost Full message, which can be quite irritating. Here are some ways on how you can free up some extra space on your device:

Uninstall apps that are not used on your iPhone
There are times that you’ve downloaded an app but will not use it as often as you do. You can remove these apps on your iPhone which should provide extra storage that you can use for other important things. Here’s how to uninstall them: 
  1. From the Home screen, tap and hold on an app icon until the icons start jiggling. 
  2. Tap the X on the app you want to delete.
  3. Select Delete to confirm the deletion of the selected app. 
You may opt in to reset your iPhone after deleting the apps to clear dump cache on the phone’s system. 

Delete pictures or Delete videos on your iPhone
You can remove unwanted images on your device. Recorded videos will usually consume bigger memory and space on your device. Deleting them is a good way to free up the storage on your iPhone. Here are the steps: 
  1. From the Home screen, tap to open Photos app. 
  2. On the top-right corner of the screen, tap on Select
  3. Select the photos you want to Delete
  4. On the bottom-right corner of the screen, tap on the Delete button.
  5. If prompted, select Delete (x) Photos to confirm deletion. 
You can also follow the same steps to delete videos on your iPhone.

Permanently delete photos on your iPhone
Usually, deleted photos on your device will stay up to 30 days under Recently Deleted items. But you can manually get rid of these deleted photos and permanently remove them by following these steps: 
  1. From the Home screen, tap to open Photos app.
  2. Select Albums from the bottom navigation. 
  3. Scroll up or down and tap on Recently Deleted
  4. On the top-right of the screen, tap on Select
  5. Tap on the Photos that you want to Delete
  6. If prompted, select Delete (x) Photos to confirm deletion. 
  7. You can also tap on Delete All to get rid of the photos at once. 

Remove finished podcasts on your iPhone
If you’ve recently downloaded a podcast video and you’re done watching it, it might be necessary to remove it on your device to free up some extra storage space. Here’s how it’s done: 
  1. From the Home screen, select Settings
  2. Tap on General
  3. Select Storage & iCloud usage
  4. Under Storage section, select Manage Storage.
  5. Tap on Podcasts
  6. Tap on Edit and select the Podcasts that you want to delete. 
  7. If prompted, select Delete to confirm deletion.

Deactivate Photo Stream on your iPhone
Activating the Photo Stream feature will automatically sync all photos and videos saved from your iPhone, iPad or Mac altogether through iCloud when connected to a Wi-Fi. Turning this feature off should help in saving memory space on your device. Here’s how: 
  1. From the Home screen, select Settings.
  2. Go to and select Photos & Camera
  3. Tap on My Photo Stream
  4. Toggle the button to turn it off. 

Block automatic image download on your Mail app
If you’re receiving a lot of emails with attached images on it, it may consume more space on your device. Blocking automatic image download should help you save storage space on your iPhone. Here are the steps: 
  1. From the Home screen, select Settings
  2. Tap on Mail
  3. Toggle Load Remote Images to stop automatic image download. 

Done with delete Iphone albums process and free up storage space? 

If you’ve performed all the steps provided above and still need to free up some space on your device, you can also try deleting messages on your Messages app, get rid of built-in Apple apps, delete Siri Voices that you don’t use that often, remove audio voicemails as well as clear cache on your iPhone. Using a third-party storage devices like Sandisk and HooToo or those other external storage that you can purchase via Amazon and eBay is also a good option to expand the storage space on your iPhone.
How to fix an iPhone 11 Pro Netflix app that’s not working

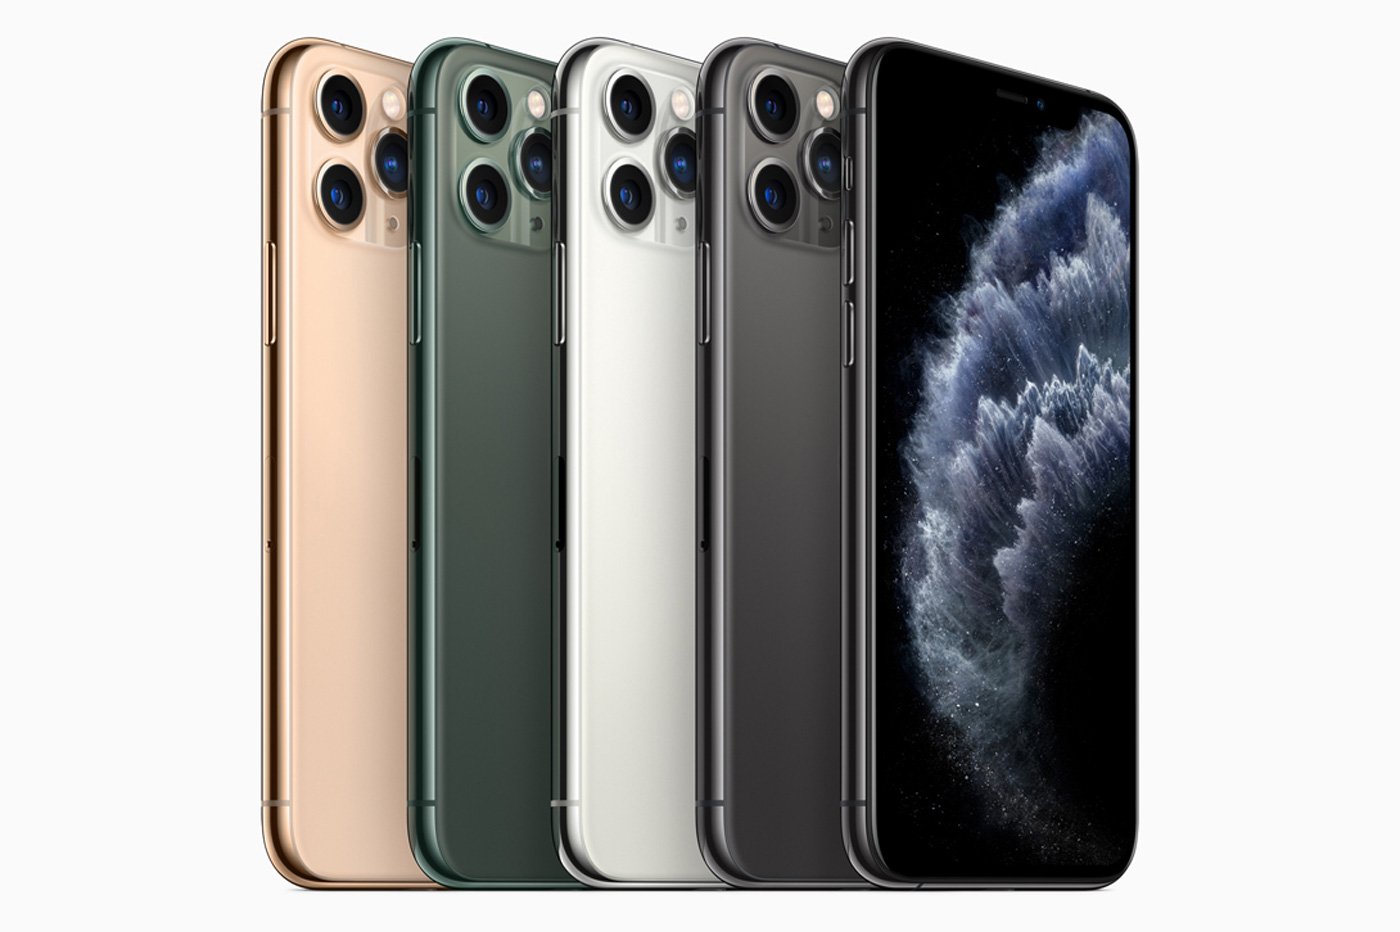
One of the most reliable platforms for online movie and TV streaming is Netflix. It is a popular, subscription-based video streaming service among Android and iOS device users. And now, Netflix is globally known as an online entertainment giant. The main requirements for using Netflix is a valid/registered Netflix account and a stable and fast internet connection on your device. Nonetheless, you would still be able to stream Netflix videos offline considering that you already have downloaded the video file you’d like to watch offline. Most importantly, Netflix must be supported in your current region. In case you’re having trouble using Netflix app on  your new iPhone, I have lined up a few handy tweaks below for you to try on. Read on to find what to do if your iPhone 11 Pro Netflix app is not working.
iPhone 11 Pro Prix
Before moving on, feel free to browse through our troubleshooting pages to find potential solutions to other problems with your other Apple devices. If your iPhone is in the list of our supported devices, then you can visit its exclusive troubleshooting page and find the problem that you need help dealing with. You can refer to or use our provided solutions and workarounds if needed.

Troubleshooting an iPhone 11 Pro Max Netflix app that’s not working

Before you begin troubleshooting your device, make sure that the network settings on your phone are set to automatic. If you are using proxy servers, VPNs or other software that might route your internet traffic outside of your current region or change your IP address, disable them first. If you don’t know how to do so, contact your internet service provider and ask more help in re-configuring any proxy, VPN or unblocker software on your phone.  Any proxy or VPN use will hinder you from streaming Netflix videos, thus it has to be disabled if needed. Otherwise, try any of these subsequent methods to eliminate software-related factors that might have prevented Netflix app from working on your iPhone 11 Pro Max.

First solution: Reset Netflix then end it.

A quick fix that’s been proven to resolve various types or Netflix app problems is an app reset. Doing so will refresh any outdated Netflix information saved on your device and thereby eliminates any associated flaws. Resetting the application will also delete any downloaded titles to your phone. And here’s how it’s done:
  1. From the Home screen, tap Settings.
  2. Swipe down until you find the Netflix app.
  3. Tap to select the app.
  4. Then drag the Reset toggle to the ON position.
  5. Swipe up from the bottom of the screen to go back to the Home screen.
Once you’re on the Home screen, continue with these steps to force close Netflix and other background apps on your iPhone 11 Pro Max:
  1. Swipe up from the bottom of the screen then stop when your finger reaches the middle and pause until the app cards/previews show up.
  2. In the app switcher, swipe sideways to find the Netflix app card/preview.
  3. Swipe up on the card preview to force close the app.
Repeat the same steps to end all other background apps on your device. Doing so can help prevent any of these apps from interfering with Netflix the next time you launch the app.

Second solution: Reboot your iPhone 11 Pro Max to fix Netflix app that’s not working.

To eliminate random system errors that might have prevented Netflix from working properly on your device, try to reboot your phone. This will also dump all junk files and temporary data from your phone’s memory and system cache. Just follow these steps to soft reset or reboot your iPhone 11 Pro Max:
  1. Press and hold both the Side and Volume Up buttons for a few seconds.
  2. Release both buttons when the Slide to Power off bar appears.
  3. Swipe or drag the bar to turn your device off.
  4. After about 30 seconds, press and hold the Side button and then release when the Apple logo appears.
Wait for your phone to finish rebooting and then retry launching Netflix app to see if it’s already working.

Third solution: Turn Wi-Fi off and then on again.

400;”>Internet connectivity issues on your phone can also cause problems if you’re using Netflix app for online video streaming. To eliminate random internet problems, refreshing your phone’s wireless feature can help. You can do so by toggling the Wi-Fi switch on your phone off and on. Here’s how:
  1. Tap Settings from your Home screen.
  2. Select Wi-Fi.
  3. Tap the Wi-Fi switch to the OFF position.
  4. After about 30 seconds, tap the switch again to turn Wi-Fi back ON.
Another way to restart and refresh wireless internet connection on your iPhone is through the Airplane Mode toggle. This trick has been proven by many owners of previous iPhones to work wonders when dealing with various types of Wi-Fi problems. If you wish to try it, then here’s how it’s done:
  1. Tap Settings from your Home screen.
  2. Select Airplane Mode.
  3. Tap the switch to turn Airplane Mode on. Doing so simultaneously disables wireless radios of your iPhone.
  4. While Airplane mode is turned on, restart/soft reset your iPhone.
  5. Then head back to Settings-> Airplane Mode menu.
  6. Toggle the switch to turn Airplane Mode off again.
  7. Wait for your iPhone to re-establish wireless signals.
To eliminate corrupt network from the underlying cause, you can also try forgetting the Wi-Fi network from your iPhone and then add it back. Here’s how it’s done:
  1. To get started, go to your iPhone Settings-> Wi-Fi menu and make sure that Wi-Fi is enabled.
  2. Scroll down to the list of available networks then select your Wi-Fi network.
  3. Tap the information “i” icon next to the name of your Wi-Fi network or SSID.
  4. Then tap the option to Forget this network.
  5. If prompted, tap Forget network to confirm.
The selected network will then be deleted and your iPhone gets disconnected. When this happens, disable or turn off the Wi-Fi switch then give your phone another restart. As soon as your phone is finished rebooting, head back to Settings-> Wi-Fi menu then toggle the switch to turn the feature ON. Wait for the list of Wi-Fi networks to populate then select your preferred Wi-Fi network to use and join.
If you’ve set up a different network on your iPhone and that network is still saved, then you can try switching to other networks instead.

Fourth solution: Update Netflix app, if possible.

Installing the latest update for the app can also be the key to resolving the issue if in-app bugs and malware are the triggers. If your iPhone’s internet connection is working fine and the battery is sufficient, try checking for any pending app updates to download and install via App Store. Just follow these steps to get started:
  1. From the Home screen, tap on the App Store icon to open the application.
  2. Tap on Today tab at the bottom. 
  3. Then tap on the user profile icon (Apple ID header) on the top right corner of the screen. You should see the account details. 
  4. Scroll down to the Available Updates section. 
  5. Tap on Update next to the Netflix app to install pending update for the app. 
  6. If multiple app updates are available, tap on Update All to update all apps at once.
When all apps are finished updating, reboot your iPhone to apply the recent software changes.

Fifth solution: Disable app restrictions on  your iPhone.

Another possible reason as to why certain apps won’t work as intended on your device is because of your iPhone’s restriction feature. This privacy feature can halt certain apps and services, when enabled. To rule this out, follow these steps and try to disable the feature temporarily to see if that fixes the problem with the Netflix app:
  1. Go to the Home screen, tap Settings.
  2. Select Screen Time.
  3. Tap Content & Privacy Restrictions.
  4. If prompted, enter your Screen Time password to continue.
  5. Then toggle the switch next to Content & Privacy Restrictions to turn the feature OFF.
If Netflix is able to work properly with restrictions turned off, you need to re-configure your phone’s restrictions settings to set exceptions and include Netflix among the allowed applications.

Last resort: Uninstall Netflix app then reinstall it.

The app might have been totally corrupted and therefore it’s no longer working. If this happens to your Netflix app, deleting and reinstalling the application would be necessary. Here’s how it’s done:
  1. Navigate to the Home screen to get started.
  2. Scroll to and find the app that you’d like to reinstall. In this case, locate Netflix.
  3. Tap and hold on the app icon for a few seconds. Keep holding the app icon when the pop-up menu appears and then release when the app icon starts to jiggle.
  4. Tap Delete from the warning message. 
  5. Follow the same steps to delete other apps that you’d like to reinstall.
  6. Finally, tap Done on the top-right corner of the screen once you’re done deleting apps.
After uninstalling Netflix and other erratic apps from your device, reboot your iPhone and then launch the App Store to search for then download and install the latest version of Netflix app for your iPhone 11 Pro Max.

Is your iPhone 11 Pro Max Netflix app still not working?

Netflix problems that could not be remedied by the above procedures are usually tagged among major app issues inflicted by complex in-app errors. To deal with these types of errors, more advanced procedures are usually needed. At this point, you can escalate the problem to the Netflix support team for further assistance. It is also possible that the problem isn’t with the Netflix app on your iPhone 11 Pro Max, but rather from within the main Netflix server. Be sure to relay any error codes or warning message you see when trying to use Netflix app on your device. This information usually serves as clues that will help determine the main cause and possible solution. If this happens to be a problem with the main Netflix server, then there’s not much can be done on your end but to wait until the software engineers have fixed the problem.

Connect with us

We are committed to helping our readers fix the problems with their phones as well as learn how to properly use their devices. So, if you have other issues, you may visit our troubleshooting page so you can check by yourself the articles we’ve already published that contain solutions to common problems. Furthermore, we do create videos to demonstrate how things are done on your phone. Visit our Youtube Channel and please subscribe to it. Thanks

Monday, December 17, 2018

Apple Music is coming to Echo devices next month

Apple Music is coming to Echo devices next month

Amazon’s Echo smart speakers already support a variety of music services, including Spotify, Pandora, iHeartRadio, and TuneIn. And starting on December 17th, Apple Music will join this little cohort.
Apple Music users will be able to ask Alexa to play their favorite songs, artists, and albums, as well as any of the streaming service’s curated playlists and radio stations. Echo owners will simply need to enable the Apple Music skill in the Alexa app, link their account, and they’ll be good to go.
Making Apple Music available on Echo devices might seem like it’s running counter to Apple’s usual strategy of using services as a lure for hardware (and vice versa), but the company can apparently see the sense of making its streaming service available on the most popular home speaker platform out there. It also seems to be happier about appearing on Amazon’s platform recently. Earlier this month, it struck a new deal with the e-commerce giant to sell iPhones, iPads, and other Apple products on its site.
“Music is one of the most popular features on Alexa—since we launched Alexa four years ago, customers are listening to more music in their homes than ever before,” said senior VP of Amazon devices, Dave Limp, in a blog post. “We are committed to offering great music providers to our customers and since launching the Music Skill API to developers just last month, we’ve expanded the music selection on Alexa to include even more top tier services.”

Tuesday, November 21, 2017

Android 8.0 Oreo’s Autofill: Why it’s awesome and how to enable it

Android 8.0 Oreo’s Autofill: Why it’s awesome and how to enable it

Between apps, games, services, various accounts, and websites, we have tons of logins and passwords to deal with. If you’re doing things right, you’ve got different usernames and passwords across the board and there’s no overlap between them.
When it comes to desktops and laptops, we have a handful of excellent browser extensions and services to help us keep track of all of these various accounts. LastPass, for instance, gives users a tool that only requires them to remember one login. Simply put your password into LastPass and it will secretly and securely log you into a website or service. Moreover, they also let you store phone numbers, addresses, credit card details, and more.
As it pertains to smartphones and tablets, though, it isn’t quite as easy or intuitive. While you can install the mobile app for LastPass, Dashlane1Password, or other similar titles, things could be better for Android devices. Google recognizes this so it baked something like this into the platform for Android 8.0 Oreo. It’s one of our favorite features and we think users should take advantage of it.
Called Autofill, the option remembers your important data so that you don’t have to worry about it. Let’s say, for instance, that you have a game that you uninstall today and want to come back to it a few months later. Android will keep track of the login details so you don’t have to keep it tucked away in the corner of your mind.

Why It’s Awesome

Filling in forms is another area where Autofill shines; you no longer have to type in the same old information over and over again. Typing in your phone number, address, or credit card details can get really repetitive. Let your phone handle that junk.
Once you get down to it, you’ll realize how satisfying it is when your phone just knows what information needs to be go in and does it. Further, you’ll find that you actually have more accounts and logins than you think. We’re talking dozens, if not hundreds.
Now, as great as this is, the feature is may not be enabled by default. Indeed, you might have to manually turn it on if you want to take advantage of it. This could vary by device or phone maker.

How to Enable

For the Pixel 2 you can log enable (and disable) this by navigating to SETTINGS > SYSTEM > LANGUAGES, INPUT, & GESTURES > ADVANCED > AUTOFILL SERVICE.
One of the key reasons we really love the default way Android 8.0 handles Autofill is that it pulls in your Chrome accounts. That’s right, all of those logins you’ve been saving to Chrome over the last few years are automatically added.

What Else?

Google makes this feature available to app and game developers so that they can also leverage the smarts. The Autofill API works with pretty much any title just so long as there are some hints or code to trigger the fields properly. Among the early adopting tools and services are 1Password, Dashlane, Enpass, and LastPass.
Stop using the same username and password for all of your accounts: use a password manager. Take advantage of the way your phone does this for you and trust Google. The next step is to strengthen the actual passwords for each of your websites, credit card logins, and apps.

Featured

[Featured][recentbylabel2]

Featured

[Featured][recentbylabel2]
Notification
This is just an example, you can fill it later with your own note.
Done