Android Tricks 4 All: Solution
News Update
Loading...
Showing posts with label Solution. Show all posts

Monday, April 27, 2020

iPhone Making Random Calls? Here’s The Fix!

iPhone Making Random Calls? Here’s The Fix!


Your iPhone is making random phone calls and you’re not sure why. It sounds like a weird problem, but it happens quite often. In this article, I’ll explain how to fix the problem when your iPhone is making random calls!

Hard Reset Your iPhone

Is your iPhone making random calls when it’s off? It’s possible that your iPhone isn’t off at all! A software crash can make your iPhone screen go black, making it look likes it off.
A hard reset will force your iPhone to turn off and back on, fixing a minor software crash. It won’t erase any of the content on your iPhone either!

How To Hard Reset An iPhone 8 Or Newer

  1. Press and release the Volume Up button.
  2. Press and release the Volume Down button.
  3. Press and hold the Side button until the Apple logo appears.

How To Hard Reset An iPhone 7

  1. Press and hold the Side button and Volume Down button simultaneously.
  2. Release both buttons when the Apple logo appears.

How To Hard Reset An iPhone 6 Or Older

  1. Press and hold the power button and Home button simultaneously.
  2. Let go of both buttons when the Apple logo appears on the screen.

Disconnect From Bluetooth Devices

It’s possible that your iPhone is connected to a Bluetooth device capable of making phone calls. Head to Settings -> Bluetooth and check if any Bluetooth devices are connected to your iPhone.
If one is, tap on the information button (blue i) to its right. Finally, tap Disconnect.
disconnect a bluetooth device

Turn Off Voice Control

Voice Control is a great Accessibility feature that lets you do a variety of things on your iPhone simply by using your voice. However, Voice Control can sometimes cause your iPhone to make random calls because it thinks you’re telling to. Try turning Voice Control off and see if that fixes the problem.
Open Settings and tap Accessibility. Tap Voice Control, then turn off the switch at the top of the screen. You’ll know Voice Control is off when the switch is gray.
turn off voice control on iphone

Update iOS On Your iPhone

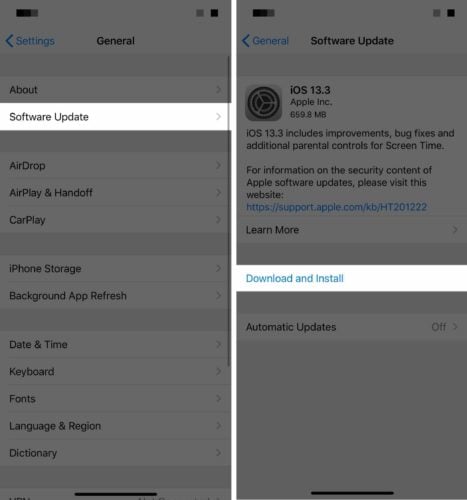
Keeping your iPhone up to date is a good way to avoid troublesome software problems. Apple regularly releases updates to fix bugs and introduce new features.
Open Settings and tap General -> Software Update. Tap Download and Install if an update is available.
update iphone to ios 13

Reset All Settings

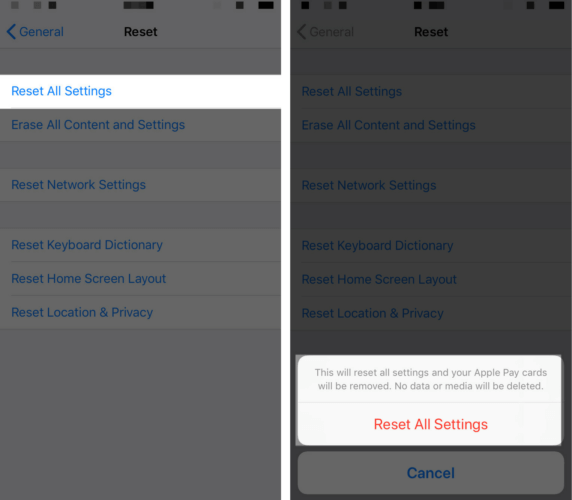
When you Reset All Settings on your iPhone, everything in the Settings app gets reset to factory defaults. You won’t lose any of your personal data, but you will have to reconnect your Bluetooth devices, reenter your Wi-Fi passwords, and set up your iPhone wallpaper again. It’s a small price to pay for fixing a troublesome software issue!
Open Settings and tap General -> Reset -> Reset All Settings. Enter your passcode, then tap Reset All Settings when the confirmation alert appears. Your iPhone will turn off, reset, then turn on again when the reset is complete.
how to reset all the settings on your iphone

DFU Restore Your iPhone

A DFU (Device Firmware Update) restore is the deepest type of restore you can perform on an iPhone. It’s the last step you can take to completely rule out a software problem.
We recommend backing up your iPhone before putting your iPhone in DFU mode so you don’t lose any of your data in the process. When you’re ready, 

Contact Apple

There may be a hardware problem if your iPhone is still making random phone calls. Set up an appointment at the Genius Bar and have an Apple tech take a look at your iPhone. Apple also offers online chat and phone support if you don’t live near a retail store.

Contact Your Wireless Carrier

Hopefully, your iPhone has stopped making random calls by now. If not, your next option is to contact your wireless carrier. Just like Apple, you can personally talk to a customer service representative.
Here are the customer support phone numbers of the four major wireless carriers in the United States:
  1. Verizon: 1-(800)-922-0204
  2. Sprint: 1-(888)-211-4727
  3. AT&T: 1-(800)-331-0500
  4. T-Mobile: 1-(877)-746-0909
You might want to consider switching wireless carriers if your iPhone is making random calls because of an issue with your cell phone. Check out UpPhone’s cell phone plan comparison tool to explore new plans!

No More Random Calls!

You’ve fixed the problem with your iPhone and it’s no longer calling people randomly. We hope you’ll share this article on social media to teach your friends, followers, and family members what to do when their iPhone is making random phone calls.
Any other questions? Let us know in the comments below.
How Do I Delete iPhone Albums and Free Up Storage Space

How Do I Delete iPhone Albums and Free Up Storage Space

Snapping out photos can be fun and exciting, especially if you’re using a great smartphone to take pictures like an iPhone. But doing this kind of stuff might consume space on your device, and you may need to delete iPhone albums to free up some storage space. Though, it’s going to be your decision if you would like to delete pictures or delete selected photos. 
It may be unfamiliar to you on how this process is being done, but I’ll help you out. In this post, you’ll learn some new information on how to delete albums on your iPhone, as well as some tips on how to free up some storage space on your device. 

Why do you need to delete iPhone albums on your device? 

Aside from freeing some space on your iPhone’s storage, there are other benefits that you can get when you delete some selected albums on your device. If your iPhone’s performance slows down or becomes sluggish, it can be due to insufficient memory, random bugs or software-related issue. Deleting the albums on your device will not only provide extra space, but it could also remove glitches that may have been caused by corrupted files or data with the photos stored in your albums. 
But it is also important to note that when you delete an album, it does not necessarily delete the photos in it, unless you’ve selected those pictures. That means if you’re looking for ways to free up some storage space on your iPhone, you’ll need to select the photos to delete them.


How Do I Delete iPhone Albums and Free Up Storage Space


 sync photos from itunes
Snapping out photos can be fun and exciting, especially if you’re using a great smartphone to take pictures like an iPhone. But doing this kind of stuff might consume space on your device, and you may need to delete iPhone albums to free up some storage space. Though, it’s going to be your decision if you would like to delete pictures or delete selected photos. 
It may be unfamiliar to you on how this process is being done, but I’ll help you out. In this post, you’ll learn some new information on how to delete albums on your iPhone, as well as some tips on how to free up some storage space on your device. 

Why do you need to delete iPhone albums on your device? 

Aside from freeing some space on your iPhone’s storage, there are other benefits that you can get when you delete some selected albums on your device. If your iPhone’s performance slows down or becomes sluggish, it can be due to insufficient memory, random bugs or software-related issue. Deleting the albums on your device will not only provide extra space, but it could also remove glitches that may have been caused by corrupted files or data with the photos stored in your albums. 
But it is also important to note that when you delete an album, it does not necessarily delete the photos in it, unless you’ve selected those pictures. That means if you’re looking for ways to free up some storage space on your iPhone, you’ll need to select the photos to delete them. 
Deleting albums on your iPhone should be easy. You might need to do this if you want to remove certain albums on your device due to unwanted images, unused screenshots, or wallpapers that you don’t need anymore. Deleting albums should help you get rid of those items and clean up the device. 
Here are the steps on how to delete iPhone albums: 
  1. From the Home screen, tap to open Photos app. 
  2. Select Albums from the bottom-right of the screen. 
  3. Go to My Albums and tap on See All
  4. Tap Edit on the top-right corner. 
  5. From the context menu, select Delete Album
  6. Once prompted, tap Delete to confirm the removal of the album. 
Be reminded that deleting an album will also remove it from the other devices if you’ve synced via iCloud. And as mentioned earlier, pictures that are in the album will not be deleted and will still show in other albums or Photo library, unless you’ve selected them. 

Ways to free up storage space on your iPhone

Since you now have the knowledge on how to remove albums on your iPhone, will now tackle some different methods on how to get rid of some items on your device to free up some extra space. If you’ve been using an iPhone with lesser storage like those with 16GB or 32GB of ROM, you might be seeing the Storage Almost Full message, which can be quite irritating. Here are some ways on how you can free up some extra space on your device:

Uninstall apps that are not used on your iPhone
There are times that you’ve downloaded an app but will not use it as often as you do. You can remove these apps on your iPhone which should provide extra storage that you can use for other important things. Here’s how to uninstall them: 
  1. From the Home screen, tap and hold on an app icon until the icons start jiggling. 
  2. Tap the X on the app you want to delete.
  3. Select Delete to confirm the deletion of the selected app. 
You may opt in to reset your iPhone after deleting the apps to clear dump cache on the phone’s system. 

Delete pictures or Delete videos on your iPhone
You can remove unwanted images on your device. Recorded videos will usually consume bigger memory and space on your device. Deleting them is a good way to free up the storage on your iPhone. Here are the steps: 
  1. From the Home screen, tap to open Photos app. 
  2. On the top-right corner of the screen, tap on Select
  3. Select the photos you want to Delete
  4. On the bottom-right corner of the screen, tap on the Delete button.
  5. If prompted, select Delete (x) Photos to confirm deletion. 
You can also follow the same steps to delete videos on your iPhone.

Permanently delete photos on your iPhone
Usually, deleted photos on your device will stay up to 30 days under Recently Deleted items. But you can manually get rid of these deleted photos and permanently remove them by following these steps: 
  1. From the Home screen, tap to open Photos app.
  2. Select Albums from the bottom navigation. 
  3. Scroll up or down and tap on Recently Deleted
  4. On the top-right of the screen, tap on Select
  5. Tap on the Photos that you want to Delete
  6. If prompted, select Delete (x) Photos to confirm deletion. 
  7. You can also tap on Delete All to get rid of the photos at once. 

Remove finished podcasts on your iPhone
If you’ve recently downloaded a podcast video and you’re done watching it, it might be necessary to remove it on your device to free up some extra storage space. Here’s how it’s done: 
  1. From the Home screen, select Settings
  2. Tap on General
  3. Select Storage & iCloud usage
  4. Under Storage section, select Manage Storage.
  5. Tap on Podcasts
  6. Tap on Edit and select the Podcasts that you want to delete. 
  7. If prompted, select Delete to confirm deletion.

Deactivate Photo Stream on your iPhone
Activating the Photo Stream feature will automatically sync all photos and videos saved from your iPhone, iPad or Mac altogether through iCloud when connected to a Wi-Fi. Turning this feature off should help in saving memory space on your device. Here’s how: 
  1. From the Home screen, select Settings.
  2. Go to and select Photos & Camera
  3. Tap on My Photo Stream
  4. Toggle the button to turn it off. 

Block automatic image download on your Mail app
If you’re receiving a lot of emails with attached images on it, it may consume more space on your device. Blocking automatic image download should help you save storage space on your iPhone. Here are the steps: 
  1. From the Home screen, select Settings
  2. Tap on Mail
  3. Toggle Load Remote Images to stop automatic image download. 

Done with delete Iphone albums process and free up storage space? 

If you’ve performed all the steps provided above and still need to free up some space on your device, you can also try deleting messages on your Messages app, get rid of built-in Apple apps, delete Siri Voices that you don’t use that often, remove audio voicemails as well as clear cache on your iPhone. Using a third-party storage devices like Sandisk and HooToo or those other external storage that you can purchase via Amazon and eBay is also a good option to expand the storage space on your iPhone.

How to fix an iPhone 11 Pro Netflix app that’s not working

One of the most reliable platforms for online movie and TV streaming is Netflix. It is a popular, subscription-based video streaming service among Android and iOS device users. And now, Netflix is globally known as an online entertainment giant. The main requirements for using Netflix is a valid/registered Netflix account and a stable and fast internet connection on your device. Nonetheless, you would still be able to stream Netflix videos offline considering that you already have downloaded the video file you’d like to watch offline. Most importantly, Netflix must be supported in your current region. In case you’re having trouble using Netflix app on  your new iPhone, I have lined up a few handy tweaks below for you to try on. Read on to find what to do if your iPhone 11 Pro Netflix app is not working.
iPhone 11 Pro Prix
Before moving on, feel free to browse through our troubleshooting pages to find potential solutions to other problems with your other Apple devices. If your iPhone is in the list of our supported devices, then you can visit its exclusive troubleshooting page and find the problem that you need help dealing with. You can refer to or use our provided solutions and workarounds if needed.

Troubleshooting an iPhone 11 Pro Max Netflix app that’s not working

Before you begin troubleshooting your device, make sure that the network settings on your phone are set to automatic. If you are using proxy servers, VPNs or other software that might route your internet traffic outside of your current region or change your IP address, disable them first. If you don’t know how to do so, contact your internet service provider and ask more help in re-configuring any proxy, VPN or unblocker software on your phone.  Any proxy or VPN use will hinder you from streaming Netflix videos, thus it has to be disabled if needed. Otherwise, try any of these subsequent methods to eliminate software-related factors that might have prevented Netflix app from working on your iPhone 11 Pro Max.

First solution: Reset Netflix then end it.

A quick fix that’s been proven to resolve various types or Netflix app problems is an app reset. Doing so will refresh any outdated Netflix information saved on your device and thereby eliminates any associated flaws. Resetting the application will also delete any downloaded titles to your phone. And here’s how it’s done:
  1. From the Home screen, tap Settings.
  2. Swipe down until you find the Netflix app.
  3. Tap to select the app.
  4. Then drag the Reset toggle to the ON position.
  5. Swipe up from the bottom of the screen to go back to the Home screen.
Once you’re on the Home screen, continue with these steps to force close Netflix and other background apps on your iPhone 11 Pro Max:
  1. Swipe up from the bottom of the screen then stop when your finger reaches the middle and pause until the app cards/previews show up.
  2. In the app switcher, swipe sideways to find the Netflix app card/preview.
  3. Swipe up on the card preview to force close the app.
Repeat the same steps to end all other background apps on your device. Doing so can help prevent any of these apps from interfering with Netflix the next time you launch the app.

Second solution: Reboot your iPhone 11 Pro Max to fix Netflix app that’s not working.

To eliminate random system errors that might have prevented Netflix from working properly on your device, try to reboot your phone. This will also dump all junk files and temporary data from your phone’s memory and system cache. Just follow these steps to soft reset or reboot your iPhone 11 Pro Max:
  1. Press and hold both the Side and Volume Up buttons for a few seconds.
  2. Release both buttons when the Slide to Power off bar appears.
  3. Swipe or drag the bar to turn your device off.
  4. After about 30 seconds, press and hold the Side button and then release when the Apple logo appears.
Wait for your phone to finish rebooting and then retry launching Netflix app to see if it’s already working.

Third solution: Turn Wi-Fi off and then on again.

400;”>Internet connectivity issues on your phone can also cause problems if you’re using Netflix app for online video streaming. To eliminate random internet problems, refreshing your phone’s wireless feature can help. You can do so by toggling the Wi-Fi switch on your phone off and on. Here’s how:
  1. Tap Settings from your Home screen.
  2. Select Wi-Fi.
  3. Tap the Wi-Fi switch to the OFF position.
  4. After about 30 seconds, tap the switch again to turn Wi-Fi back ON.
Another way to restart and refresh wireless internet connection on your iPhone is through the Airplane Mode toggle. This trick has been proven by many owners of previous iPhones to work wonders when dealing with various types of Wi-Fi problems. If you wish to try it, then here’s how it’s done:
  1. Tap Settings from your Home screen.
  2. Select Airplane Mode.
  3. Tap the switch to turn Airplane Mode on. Doing so simultaneously disables wireless radios of your iPhone.
  4. While Airplane mode is turned on, restart/soft reset your iPhone.
  5. Then head back to Settings-> Airplane Mode menu.
  6. Toggle the switch to turn Airplane Mode off again.
  7. Wait for your iPhone to re-establish wireless signals.
To eliminate corrupt network from the underlying cause, you can also try forgetting the Wi-Fi network from your iPhone and then add it back. Here’s how it’s done:
  1. To get started, go to your iPhone Settings-> Wi-Fi menu and make sure that Wi-Fi is enabled.
  2. Scroll down to the list of available networks then select your Wi-Fi network.
  3. Tap the information “i” icon next to the name of your Wi-Fi network or SSID.
  4. Then tap the option to Forget this network.
  5. If prompted, tap Forget network to confirm.
The selected network will then be deleted and your iPhone gets disconnected. When this happens, disable or turn off the Wi-Fi switch then give your phone another restart. As soon as your phone is finished rebooting, head back to Settings-> Wi-Fi menu then toggle the switch to turn the feature ON. Wait for the list of Wi-Fi networks to populate then select your preferred Wi-Fi network to use and join.
If you’ve set up a different network on your iPhone and that network is still saved, then you can try switching to other networks instead.

Fourth solution: Update Netflix app, if possible.

Installing the latest update for the app can also be the key to resolving the issue if in-app bugs and malware are the triggers. If your iPhone’s internet connection is working fine and the battery is sufficient, try checking for any pending app updates to download and install via App Store. Just follow these steps to get started:
  1. From the Home screen, tap on the App Store icon to open the application.
  2. Tap on Today tab at the bottom. 
  3. Then tap on the user profile icon (Apple ID header) on the top right corner of the screen. You should see the account details. 
  4. Scroll down to the Available Updates section. 
  5. Tap on Update next to the Netflix app to install pending update for the app. 
  6. If multiple app updates are available, tap on Update All to update all apps at once.
When all apps are finished updating, reboot your iPhone to apply the recent software changes.

Fifth solution: Disable app restrictions on  your iPhone.

Another possible reason as to why certain apps won’t work as intended on your device is because of your iPhone’s restriction feature. This privacy feature can halt certain apps and services, when enabled. To rule this out, follow these steps and try to disable the feature temporarily to see if that fixes the problem with the Netflix app:
  1. Go to the Home screen, tap Settings.
  2. Select Screen Time.
  3. Tap Content & Privacy Restrictions.
  4. If prompted, enter your Screen Time password to continue.
  5. Then toggle the switch next to Content & Privacy Restrictions to turn the feature OFF.
If Netflix is able to work properly with restrictions turned off, you need to re-configure your phone’s restrictions settings to set exceptions and include Netflix among the allowed applications.

Last resort: Uninstall Netflix app then reinstall it.

The app might have been totally corrupted and therefore it’s no longer working. If this happens to your Netflix app, deleting and reinstalling the application would be necessary. Here’s how it’s done:
  1. Navigate to the Home screen to get started.
  2. Scroll to and find the app that you’d like to reinstall. In this case, locate Netflix.
  3. Tap and hold on the app icon for a few seconds. Keep holding the app icon when the pop-up menu appears and then release when the app icon starts to jiggle.
  4. Tap Delete from the warning message. 
  5. Follow the same steps to delete other apps that you’d like to reinstall.
  6. Finally, tap Done on the top-right corner of the screen once you’re done deleting apps.
After uninstalling Netflix and other erratic apps from your device, reboot your iPhone and then launch the App Store to search for then download and install the latest version of Netflix app for your iPhone 11 Pro Max.

Is your iPhone 11 Pro Max Netflix app still not working?

Netflix problems that could not be remedied by the above procedures are usually tagged among major app issues inflicted by complex in-app errors. To deal with these types of errors, more advanced procedures are usually needed. At this point, you can escalate the problem to the Netflix support team for further assistance. It is also possible that the problem isn’t with the Netflix app on your iPhone 11 Pro Max, but rather from within the main Netflix server. Be sure to relay any error codes or warning message you see when trying to use Netflix app on your device. This information usually serves as clues that will help determine the main cause and possible solution. If this happens to be a problem with the main Netflix server, then there’s not much can be done on your end but to wait until the software engineers have fixed the problem.

Connect with us

We are committed to helping our readers fix the problems with their phones as well as learn how to properly use their devices. So, if you have other issues, you may visit our troubleshooting page so you can check by yourself the articles we’ve already published that contain solutions to common problems. Furthermore, we do create videos to demonstrate how things are done on your phone. Visit our Youtube Channel and please subscribe to it. Thanks

Wednesday, July 12, 2017

How To Bring A New Look To Notification Banners And Today Widgets In iOS 10

How To Bring A New Look To Notification Banners And Today Widgets In iOS 10

If you want to bring a new look to notification banners and Today widgets on your iOS 10 device then you should definitely download a new jailbreak tweak known as Modern. This tweak change the banner notifications look throughout iOS 10, whether you’re in an app, on the Lock screen, or in Notification Center.


Look on the image example below you can see that the effects of Modern are noticeable and look quite nice. The tweak doesn't change the size of banners. It means that they still take up the same amount of space after installation as they did before. However, the sleeker UI now gives the optical illusion that banner notifications are smaller and it make the whole interface look better.


Modern also brings some changes to your Today widgets appearance on the Home screen’s left-most page, in Notification Center and on the Lock screen:

Modern tweak is available for download from Cydia for $1.00. The tweak works fine only with jailbroken iOS 10 devices. Modern comes with a preferences pane that allows you to customize banner notification look and behavior:


The tweak allows you to enable it for widgets and alert banners separately, change the app icon size on the banner, turn on/off shadows, replace the ‘No Notifications’ label with any text of your choice and change the color of notification header text to black or white.

Respring your device is necessary in order to apply and save your changes. So hit a respring button that is included inside of the preferences pane to bring a new look to notification banners and Today widgets on your iOS 10 device.

It should be mentioned that Modern is compatible with other notification UI-enhancing jailbreak tweaks such as ColorBanners and Noctis, so you are free to play with your notification aesthetics using all these tweaks.

Tuesday, June 14, 2016

26 iPhone 5s Tips You Should Not Miss

26 iPhone 5s Tips You Should Not Miss

26 iPhone 5s Tips You Should Not MissThe smartest smartphone has come a long way. Apple has molded their product into a gadget with cutting edge design and features. Look at these hot ones:
  • A one-of-a-kind chip that has a 64-bit architecture.
  • A camera that works better and faster.
  • Equipped with an identity sensor that can decipher your fingerprints.
  • Comes with an operating system that’s built and designed solely for 64 bit.
To say all of those features make the iPhone 5 a smartphone that’s ahead of its time is an understatement. There’s absolutely no doubt, it leads the smartphone game. Not only that, it’s more savvy than it appears, and so much more. This is your day. I’m unleashing tips and tricks to raise up your iphone 5 experience to the next level.

Time for tips ahoy…

(View photos from left to right then see corresponding description of tips below each set of photos.)

PHOTOGRAPHY

iPhine 5_photography_hero
Share multiple photos
Tip #1 Tap multiple images to share them all at once with iCloud Photo Sharing.
Panorama
Tip #2 You can easily shoot panorama photos from left to right or right to left. Just tap the arrow to switch the direction.
Burst Mode
Tip #3 Capture multiple shots of the action — for as long as you hold down the button — by snapping 10 photos per second. And real-time analysis suggests the best photos of the bunch.

FACETIME

FacetimeMessages
Tip #4 View timestamps of your messages by touching and dragging message bubbles to the left.
Weather
Tip #5 View all your locations by pinching to see a collapsed view. To reorder locations, simply drag them where you want. Swipe from right to left on a location to delete it.
facetime_hero_Anthony
FaceTime audio
Tip #6 Now you can make audio-only FaceTime calls. On your contact’s card, tap the phone icon in the FaceTime section.

SWIPE GESTURES

iPhone 5_gestures_heroDelete a message in Mail
Tip #7 Simply swipe from right to left on messages in your inbox to quickly delete them.
Go back in Mail
Tip #8 To go back, swipe left to right from the edge of your screen.
Spotlight search
Tip #9 To open Spotlight search, swipe down from anywhere on the Home screen — such as the middle. Then type in what you’re looking for to quickly find it on your device.

SIRI

siri_hero
Tell Siri who’s who
Tip #10 Tell Siri about your relationships, such as “Erin is my wife” or “Rick is my dad.” Then you can say “Text my wife” or “Call Dad” and Siri knows who you mean.
Set your locations
Tip #11 Enter your home and work addresses in Contacts. That way, Siri can remind you to do things when you leave or arrive at either place.
Change the way Siri pronounces a name
Tip #12 If Siri mispronounces a name, simply say “that’s not how you pronounce that.” Siri will ask you for the correct pronunciation, then say the name back to you three different ways so you can choose the one you like.

CALENDAR

calendar_heroNew views in Calendar
Tip # 13 View your calendar by list, day, or month. Switch to landscape view to see a full five days.
Swipe gestures
Tip #14 Tap the month name in the left corner to change to month or year views. In Day view, you can swipe the week bar at the top to jump to days in the next or previous week.
Search for specific events
Tip #15 Tap the search icon for a list view of every event in your calendar.

MUSIC

music_hero
Create playlists
Tip #16 In the Music app, tap Playlists, then tap Add Playlist and give it a name. Now tap any song or video to add it to the playlist. You can add individual songs, entire albums, or all songs by an artist.
Create radio stations
Tip #17 To create a station in iTunes Radio, tap the + icon under My Stations and search for an artist, genre, or song. Or choose from over 250 genre-focused or DJ-curated stations.
Edit radio stations
Tip #18 Remove or add new stations to your My Stations list by clicking Edit and the minus symbol to delete stations or the plus symbol to add them.
Buy songs from iTunes Radio
Tip #19 Tap Buy on a song that’s currently playing or one in your History or Wish List, and it downloads instantly from iTunes to your library.
music_hero2Musical landscape
Tip # 20 While browsing your music collection, switching to landscape view displays a mosaic of your album covers. Swipe to scroll, pinch to zoom in and out, and tap to play.

MAIL

mail_hero
Insert a photo or video
Tip #21 When you’re composing an email, touch and hold in the message to see the “Select, Select All” menu. Tap the arrow and select “Insert Photo or Video.” Now you can choose a photo or video to attach from your Camera Roll, albums, or shared streams.
Keep your inbox clean
Tip #22 You can delete or move messages in batches. From your inbox, tap Edit, select the messages you want to organize, then tap Trash or Move.
Get back to your draft
Tip #23 Touch and hold the Compose button to switch to your list of saved message drafts.

SAFARI

safari_hero
Single sign in
Tip #24 Sign in once under Settings, and you can tweet or update your Facebook status directly from Safari, Photos, Camera, and Maps. Or ask Siri to do it for you.
Manage open Safari pages
Tip #25 Drag and drop to rearrange your tabs. To close tabs, tap the X or just swipe them off the screen.
Create web clips
Tip #26 Quickly visit your favorite websites by creating web clips for them on your Home screen. Visit the site and tap the Share button. Then select “Add to Home Screen.”

Featured

[Featured][recentbylabel2]

Featured

[Featured][recentbylabel2]
Notification
This is just an example, you can fill it later with your own note.
Done